Monday, July 27, 2009

easy brownie...eggless and low fat.


brownies are such a loving and adorable treat that i have yet to see a person who denies a brownie.......my husband loves brownies of all color , size and shape and is super delighted to have it with vanilla ice cream....it is quite understandable that this one dessert recipe is a regular at my place.........and i make it in many ways .....initially when i first learnt to make brownies i would stick to the standard recipe using dark cooking chocolate ( i have that recipe in my drafts n have been postponing it for no apparent reason)....but now i try brownies with almost any thing chocolaty.......cocoa powder is a common replacement for dark chocolate but this time i made it with cadbury's drinking chocolate ( ran out of dark chocolate and cocoa powder both)........the reason for such adjustable recipes of brownie is that arvind can demand them anytime n i try n make it without a trip to the store....and secondly whenever some guests arrive for evening tea on short notice it is the easier thing to prepare for me...............we have a tradition to serve mithai to guests in India and i generally don't keep any store bought mithai at home .....this time i had suji ka laddo ( recipe coming later) and thought that a brownie will be a better option since the guests had young kids ( the kids liked it very much and the mother ended up asking for the recipe) ...he he...


also i find that the brownies made with dark chocolate are very fatty as they have higher amount of fat in the form of not only cocoa butter, some trans fats too.............when you replace dark chocolate with cocoa powder the fat content of brownie becomes considerably low....works very well for me because the intense flavor of chocolate is still there, just it becomes a bit drier...no problem with me.........so it's like the more fatty the brownie is , it is more gooyi , soft and sinful...heavenly in fact......as you replace it with cocoa powder it becomes a little dry and crumbly......tastes as good as the original one though.........after all, the choice is your's..........i think something which you like so much and is so fatty.....you should be able to adjust a little with the texture at least, if not the taste..........right!!


One more thing i want to tell about a recipe of brownie......many of my friends who have had my brownies, have been asking for the recipe for a long time.....and i tell you that at one such discussion of sharing the recipe i used to tell them that i'll start writing a blog wher i'll write down the recipe for you guys..........it took me this long even after starting my blog, to post this recipe....i am almost on a guilt pang now..........so it was the recipe of brownies , asked again n again , when i started thinking of blogging about food.....( people used to ask me recipes of almost everything i made though )..........so here it is.........


the brownie at last........it takes less time to make than reading my crap above...he he.........

ingredients

all purpose flour 1/3 cup
drinking chocolate 1/2 cup ( or cocoa powder which i use normally)
soda bicarb 1/4 tsp
baking powder 1/2 tsp
butter 1/4 cup
thick curds 1/2 cup ( i used curdled soy milk cuz i always have it due to mithi)
sugar 1/2 cup
coffee 1 heaped tsp brewed in 2 tbsp of hot water
procedure

mix together the first four ingredients with a fork or by sifting them together......

soften the butter and mix the remaining four ingredients by whisking them together......

now slowly add the dry ingredients into the wet ingredients little by little and keep whisking...i use a fork mostly...or a wire whisker...

the batter should be of thick ribbon consistency , that is , when you drop a ladle full of batter from above the bowl, it should fall like a thick ribbon...

pour in a suitable baking dish....i used a borosil loaf dish as i find it easier to make slices.....you can use a shallow dish to get thin sqaure pieces of brownie....

if you want nuts in your brownie.....add them just before pouring the batter into the baking dish...in that case a shallow dish is better as the nuts drown in the loaf dish....n you find them only in the bottom...

microwave for 4-5 minutes........

you have to make approximation with the timing according to the amount of batter.........my tip for making cake or brownie in the microwave is..........watch the sides of the cake rising first as it starts cooking from the sides........slowly when the center rises and the central most point rises...watch it...as soon as it comes up n gets firm , wait for 5 secs and stop.......your cake is done.........nice tip na!!

wait for 2 minutes before taking out from the microwave...you can insert a toothpick to test if it's done...

cool and cut into pieces to serve.....it crumbles when sliced while it is hot....so be careful.

enjoy..

Sunday, July 26, 2009

recipe of kadhi pakodi | UP style kadhi pakodi recipe


Kadhi pakodi is one of my favorite foods and whenever I cook kadhi it I make it enough to last for the next day too. Not only that, just after making the kadhi I get myself a big bowl full of this delicious creamy treat and relax. I love the khatta teekha swad (hot n sour taste) with just a hint of aromatic masalas and I can have it with rice or roti both. Traditionally kadhi is always served with plain boiled rice but I like it with plain chapatis too. Oh and I like kadhi even like a soup. So you know what kadhi means to me.

kadhi pakodi UP style

The most interesting part is that this recipe is made using the very sour, about to go rancid curds which was lying in your fridge for a fortnight or so. Kadhi is always made with khatta dahi or khatta mattha (saur curds or sour buttermilk) and most families have kadhi as a weekly feature, the next day when ghee is made. Making ghee is a tradition in mnay Indian families, clotted cream from milk is collected for a week and then cultured with yogurt, then it is whisked to churn butter, the butter goes on the make clarified butter (ghee) and the leftover curds becomes thin and fat free which is called mattha or kachhi lassi (buttermilk). This mattha is used to make kadhi in most families. Making best use of the leftovers.

kadhi pakodi recipe

But if you want to make kadhi and don't have sour curds you can just keep the curds overnight out of your fridge, mixed with a little salt and you get it perfect to make kadhi in the morning. Most families relish this treat for lunch as sour curds should not be eaten in the night according to Ayurveda. It is said to aggravate arthritis if consumed after evening.

This recipe was lying in my drafts for a long time now and I am posting it today for a blogger friend Pamela Timms of eat and dust who was talking about using the leftovers and I suggested kadhi for any surplus sour curds in the fridge. She asked for the recipe and I am quick this time. To be honest I was quick just because I had the recipe in the drafts already.

It is a simple recipe though you need to be accurate with the steps. And I make it without the use of garlic or onions but it is rich in flavors of the masalas used in tadka.

Kadhi pakoda is normally not a low fat dish as the pakodas made for the kadhi are deep fried and obviously soak oil. To reduce fat coming from the pakodas, you can reduce the quantity of pakodas used in kadhi or used chopped spinach or other vegetables instead of pakodas.

I recommend that you go with this recipe first if you are making it for the first time and \ then make your own adjustments...

ingredients for the pakodas
besan or chickpea flour 1/2 cup
bishop's weed or ajwain seeds 1/2 tsp or a bit more
turmeric powder 1 tsp
soda bicarb a pinch

to make pakodas
...

Mix all the ingredients (no salt is being added here as when you cook the pakoras with kadhi, they soak salt from that) and adding water, a little at a time make a batter by whisking it vigorously. It should look like a cake batter once whisked and if you drop a spoonful of this batter in a cup of water the besan batter floats. The sure shot test of it'slightness.

Now with a spoon or with you trustworthy fingers drop about 15 ml of the batter into hot oil to deep fry. I just collect a small portion of the batter with my fingers neatly and drop it in the hot oil. Many pakodas can be fried in one batch. Like this.

kadhi pakodi recipe

The pakodas swell double their size while frying and make a dumbbell shape, like in the picture. Turn them to fry on all sides, drain and keep aside.

I use mustard oil to fry the pakodas but you can use any oil of your choice..

kadhi pakodi recipe

Also I make some extra pakodas every time and keep them in the freezer for future use. Next time when you make kadhi you have ready pakoras and the kadhi becomes easy n quick.

ingredients for the kadhi..

besan or chickpea flour 1/2 cup
sour curds ( sour buttermilk is considered the best for kadhi) 2 cups
when you have thick curds, just dilute it with water and whisk to make a smooth homogeneous buttermilk
water 2 cups or more if you want thin kadhi
salt to taste
turmeric powder 1 tsp
bay leaves 2 nos.

to make kadhi

Just mix everything together except the bay leaf, using a hand mixer or a whisk to make a thin solution and pour in a thick bottomed pan and start cooking on medium flame, drop in the bay leaves and keep stiring the mixture till it get a good boil.

Lower the heat and cook till it reduces a bit. It is called kadhi because of this step. Kadhna in hindi means cooking a liquid to reduce the quantity and make it thick. Just like kike kadhna of milk results in rabdi and finally the khoya. So kadhna is like cooking to reduce.

kadhi pakodi recipe

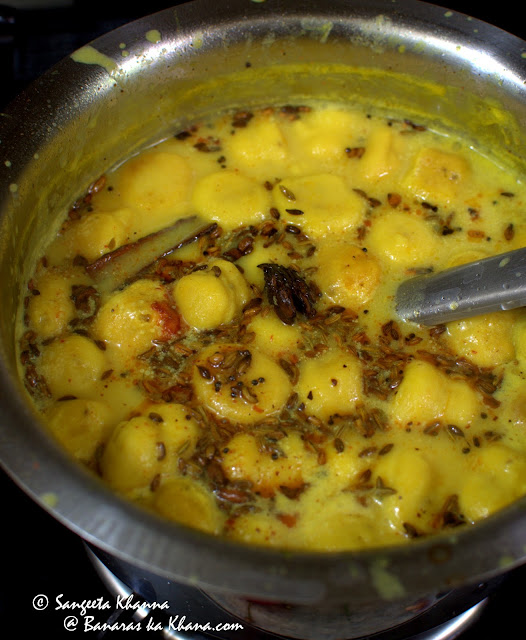
Add the fried pakodas after about 20 minutes of simmering the kadhi. In about 20-25 minutes more of simmering kadhi will result in softening of the pakodas like sponge.

kadhi pakodi recipe

Note that the cooked pakodas sink into the reduced kadhi. If the pakodas at this stage remain hard from inside it means the pakoda batter was not made well.

Now is the time for the tempering or the tadka. Take off the reduced kadhi from heat and proceed for the tadka. The tadka is the taste maker of kadhi and it should be done only in ghee...

ingredients for the tadka

ghee 2 tbsp or more if you wish
asafoetida a pinch
cumin seeds 1 tsp
chhoti rai or small variety of mustard grains 1 tsp
fenugreek seeds 1/2 tsp
cinnamon stick 2 inch long
black cardamom crushed 1 no.
green cardamom 2 no.
cloves 4 nos.
star anise 1 no.
red chilli powder 2 tsp or as much you like

to prepare the tadka
Heat the ghee in a tadka pan or in a deep small pan. Throw in the asafoetida first when it starts dancing in the ghee throw in all the other tadka masala except red chilly powder and let them splutter and get aromatic. Take care not to burn them.

Now put off the heat and throw in the chilli powder. Wait till the chilli powder immerses in the ghee. You may need to stir the ingredients if using lesser ghee, once aromatic pour this tadka over the cooked kadhi.

kadhi pakodi recipe

Cover the kadhi immediately after the tadka as to help all the flavors to infuse into the kadhi. After a couple of minutes stir the kadhi and serve hot with plain boiled rice.This is how it looks after mixing the tadka..

In the north of India most people do not need even a side dish with their kadhi chawal. But I suggest some bhujia like this one or patato fries and papad with it. This meal is something people look forward to.

There are many versions of kadhi like sindhi, punjabi etc. and made with tomatoes or other veggies too. Hopefully I will post them too once by one.

This kadhi recipe in a UP style kadhi pakoda where the pakodas are a hollow spongy melt in the mouth texture and the gravy of the kadhi is creamy and flavourful with a faint hint of garam masala blending in really well in the tangy creamy kadhi.

The same kadhi is called as Banarasi kadhi too, though each family may have minor variations in the tadka. The soft pakodis of this kadhi remain the same and is considered as the test of a good cook.


Friday, July 17, 2009

paneer safeda | white paneer curry in a cashewnut gravy


Paneer is the only special treat for vegetarians or one of the few protein rich foods for them. At least it is perceived like this here in India. And a whole lot of paneer recipes are made in Indian homes, mostly because it blends well with all types of flavors, just like eggs and potatoes.  But strangely enough I have not posted many recipes of paneer here although I keep cooking with paneer quite often due to the ease of cooking a quick curry it provides. But when I made this safeda paneer or paneer safeda, which is actually paneer in a white gravy, I could not stop myself from posting it here almost immediately, well that is within 5 days after making it. Can't get quicker than this :-)

Paneer safeda is made in many versions using different types of nuts for their subtle flavors and the taste differs in each of those versions. This recipe is a simple and quick one, like all my recipes which is good for everyday cooking and the flavors are so exotic that it is fit for a formal dinner as a main course dish. Actually last time when I made this dish for a large family get together of 20 people I choose this dish because a few extended family members did not eat garlic and onion. And I had to cook a no fuss recipe because there were many more dishes to be taken care of for a 7 course meal for 20. No need to tell that this dish became the talking point at the table. Simple delicate flavours and rich tasting curry. Many of them asked for the recipe and when I told how simple it is, they were surprised.

This paneer safeda is a Jain recipe (without onion and garlic) but a few other versions make use of onions and a bit of garlic too. Some call it Doodhiya paneer or Chandni paneer with minimal variations like using chopped almonds and saffron as a garnish or finely chopped green chillies and minced ginger as a garnish.

We prefer paneer safeda in it's pure white form. Just like this one.


As I mentioned, paneer safeda is a special recipe meant for formal dinners, more because it is a bit rich tasting due to the use of nut paste. Also because it presents delicately flavored aroma of spices that is appreciated well in most Banaras homes. And paneer safeda goes well with butter naan or roomali roti, more reason to be erved for such north Indian meals.

This time I served it with thin whole wheat chapatis which complemented the dish very well. Note that this recipe is certainly rich because it uses cashew nuts, but it is not a fatty paneer curry which gives you those guilt pangs after a cozy dinner. The amount of cashews per serving is very low, that is about cashews and the amount of fat (I used fresh cream as a cooking medium) is also low, that is 1/2 tbsp of fresh cream per serving. Yeah I calculated the amounts carefully this time and now you know how a rich gravy can be healthy too. Read on...

ingredients..
( serves 4)
paneer 250 gm
cashews 20 nos.
fresh cream (I used fresh malai from whole milk) 2 tbsp
salt to taste

masala made in to a paste
black pepper corns 20 nos. (white peppercorns are better but i didn't have)
green cardamom 3 nos.
black cardamom 1 no.
cinnamon stick 1 inch long
cloves 5 nos.
fresh ginger root 1 inch piece
bay leaf 2 nos. ( scissor cut into fine shreds)

all these ingredients are to be made into a paste with some water in a spice grinder .

procedure..

Cube the paneer into rectangular pieces and keep aside.

Make a fine paste of cashews with some water and keep aside. Cashews can be soaked for a few hours for making fine paste but do it instantly most of the times. You just have to run the grinder for a few more minutes if you are grinding dry cashews along with the spices.

Now pour the fresh cream into the pan (I used a steel kadhai) and filter the masala paste right into the kadhai. Place a sieve on top of the kadhai and pour the masala paste into it and let all the masala extract pour into the kadhai. Reserve the masala  solids to flavor some daal etc., I usually make some sabut masoor daal too with this curry and the same masala gets used in the daal. Sometimes I add the masala solids to kali daal or chane ki daal.

Coming back to the white gravy, now keep the kadhai on flame and let the mixture come to a soft boil.


Now pour in the cashew paste and let it simmer again. It just takes 5-6 minutes....


I took all these pictures because this is an unconventional way of making a gravy and I wanted the procedure to be more clear....

Now add salt and the paneer pieces and let it simmer again, just for 2 minutes more. Cover the kadhai, put off the flame and let it rest for 5 minutes so that the flavors get seeped in..


Serve hot with any kind of flat bread....we did not have any side dish this time as it was meant to be a light but special dinner It truly was so. You would agree when you try this paneer safeda at home.


Enjoy the curry that is often called Chandni subzi or Chandni paneer, doodhiya paneer. Most common name known in Banaras is paneer safeda.

If you don't filter the masala paste for this curry its not a problem. Only that the curry will not be as white and smooth as the picture above. I cooked paneer safeda again sometime back for a dinner and there was quite a lot of leftover curry. This time I did not filter the masala paste and the curry was a bit grainy and a little darker as seen in the picture below. But that taste was unmistakably the same.


Incidentally I cooked sabut masoor ki daal too even though there was no masala solids after filtration. Some foods become such an inseparable pairing in families that they keep repeating together always.
I hope you would like paneer safeda the way we do. Try it and let me know.

Cheers.


Wednesday, July 15, 2009

ashtmi wale sookhe kale chane


ashtmi wale sookhe kale chane

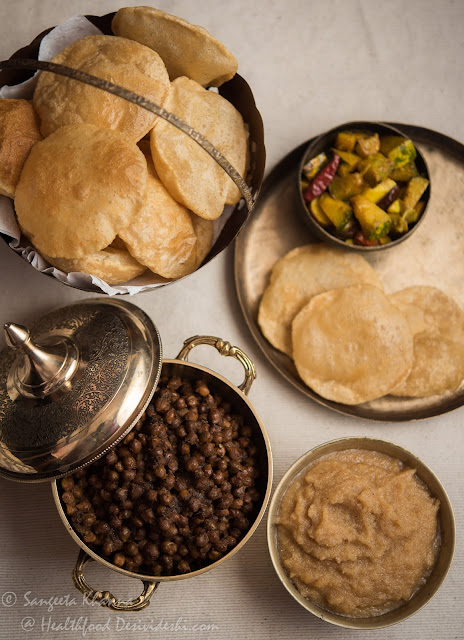
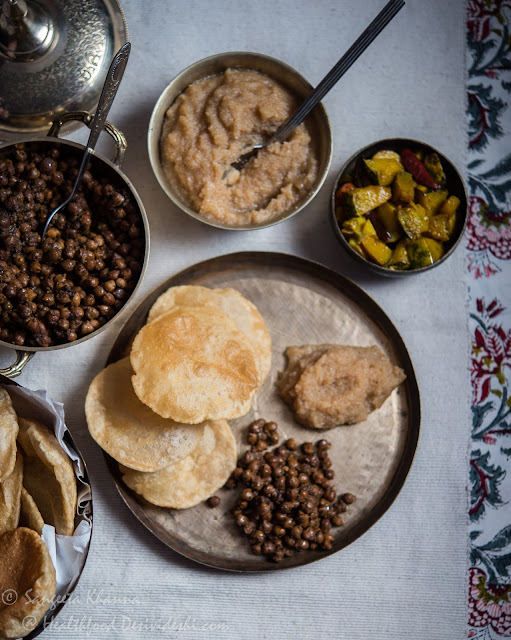
Kaale chane ki ghugni is a traditional recipe which is made as a prasad on the eighth day of Navaratri that is Ashtami. Along with this sookhe kaale chane it is poori and halwa as the usual prasad that day.

Poori, chana and halwa prasad along with some fruits is served to little girls on Ashtmi day as young girls are considered Devi or goddess Durga and are called as Kanjka for this day. Some people celebrate the Kanjka on Dirga ashtmi (eighth day of Navratri) while some celebrate it on the next day which is Ram navami (ninth day of Navratri) but the prasad is the same.

I have been doing this Kanjka ritual for many years and it is a very good feeling to see all those girls and their little brothers too enjoying the meal together. It becomes a small picnic for children that day. Many kids wait for this day so they can have a great time and get some gifts apart from delicious prasad. In my case there was no religious reason behind doing this, but it was always good to see little kids around Mithi. A very selfish reason I must admit.

We like this dish sookhe chane even on regular days sometimes. It is a good chana recipe for lunch boxes as it is dry an tastes great even at room temperature. It is a nice tea time snack sometimes or even a small meal when chana is wrapped in a roti or paratha or even sandwiched in bread. With minor variations this sookhey chane is a staple chana recipe in many homes.

When this kala chana is made for the puja rituals it is always made in either ghee or mustard oil and there is no onion or garlic used in it. On the day of ashtmi this prasad is consider kosher, is made with extra care and hygiene. In fact in my family back home the whole kicthen used to be spring cleaned and rearranged before this day. now I don't follow those rituals and trust my everyday hygiene better.

Everyone reminisces how the poori chana halwa tastes so much better on the day of Ashtmi though. The anticipation of a good meal and may be the season is right for such a meal. Traditions around food have always survived because of seasons and seasonal produce though everything in this meal is made with dry pantry staples.

poori chana and halwa meal

ingredients 
(8-10 servings for prasad or 4 servings as a side dish)

250 gm kala chana (black chickpeas) soaked overnight
4-5 whole red chillies
1 inch piece of fresh ginger root 
2 tsp whole coriander
1 tsp cumin seeds
1 tsp black peppercorns
salt to taste
1 tbsp mustard oil
1 tsp amchoor powder

procedure 

Drain the soaked chana and keep aside.

Make a paste of ginger, chillies, coriander, cumin, peppercorns and 1 tbsp water together. 

Heat the oil in pressure cooker and pour the spice paste in it. Stir and cook till it becomes aromatic and looks glazed.

Now add the chickpeas and toss and mix everything together. Add salt to taste.

Add 1/2 cup water and close the cooker lid. Let it cook on high till the first whistle blows and then lower the flame and cook for 15 minutes.

Cool the pressure cooker, open the lid and add the amchoor powder. Mix well and reduce the water if there is still some left.

Serve as desired.

You can cook it in an iron kadhai as the traditional way but you will need to add more water and cooking time, the water should get absorbed once the chana gets cooked.

This kala chana doesn't need any garnish and tastes really great with poori.

poori chana and halwa meal

You can serve some alu ki subzi or kaddu ki subzi with this meal but it is not required I must add.

These are some of the meals we crave for when we remember home and our childhood. Let's make a part of our children's childhood too and not let them crave for red velvet cakes. These puri chana halwa meals are much healthier than the burgers and red velvet cakes of the modern ilk.


Thursday, July 9, 2009

paneer kulche in whole wheat


kulcha is a flat bread made in the north of India especially in Punjab and i have seen that is made in parts of Pakistan and even in the middle eastern countries where the form and names are slightly changed..........

plain kulche is normally accompanied with chhole or a rich gravy curry , but when they are made stuffed with potatoes or paneer they can be good with plain curds or a raita with green salads on thr side........sometimes i make it stuffed with beets...see the recipe here..........and this time it is a simple paneer stuffed one.........


to make the kulacha base ..........you need 2 cups of whole wheat flour ( to make about 10 kulchas)...2 tbsp of fresh yeast or a pack of dry active yeast, 2 tbsp of sugar, 1 tsp of salt, a cup of whole milk or soy milk ( i use soy milk)

to proceed dissolve yeast into half a cup of warm water with sugar and leave it in a warm place.............like in a preheated warm oven or on the side of gas stove where something else is cooking.........when the mixture becomes frothy which takes about 15 minutes, mix with flour, salt and enough milk to make a smooth pliable dough.........at this step any flavoring spice or herb can be added to the flour like black pepper powder, cumin seeds, coriander leaves or fenugreek leaves......,,keep the dough covered in a warm place again and let it rise to double it's volume...takes about half an hour.........now punch the dough and make portions like you make to prepare stuffed parathas......stuff the paneer mixture generously inside each flattened portion and keep covered for 10 -15 minutes....this will allow the balls to increase in size again.

now roll each ball with a rolling pin to make the kulchas and roast on a flat bottomed griddle
( tawa) , on low flame to allow better cooking and no spotting of the kulcha.......cook both sides till lightly pink in color........butter or ghee has to be smeared after it is done...
alternatively, the kulchas can be grilled in an oven at 180 degree C for about 5-6 minutes each....it is convenient to make it on tawa when making large numbers of kulchas.


to make the paneer stuffing..........you need 400 gm paneer, one boiled potato, a cup of chopped onions, chopped green chillies to taste and salt and pepper to taste.........

mash the paneer and mix with all the other ingredients to make a stuffing...this is a low fat preparation and no frying is done either in the stuffing or in the kulcha base ...so you can enjoy it without guilt........

the pictures do not do justice to the recipe i know ...but they taste yummy and my husband can have them for breakfast, lunch or dinner......even as snacks........

Sunday, July 5, 2009

pabda fish fry / mackerel fry


I got to eat this fish in Calcutta for the first time , and that was the first time i was eating any fish for that matter.......i liked the fish so much that started eating and cooking fish too..........this is a simple fry recipe which a favorite of my husband and i make this with muscular fish too ( big sized rohu fillets mostly).....


ingredients
( for 3 medium sized fish weighing about 700 gms)

garlic cloves 6-7 nos.
whole red chillies 10-12 nos. ( to taste)
amchoor powder or dry mango powder 2 tbsp
salt to taste

procedure

grind all these together in a spice grinder with just a tbsp of water .

make gashes in the fish as desired.

rub on the paste on the skin of fish and keep in the fridge for 1 hr.


heat 2 tbsp of oil in a cast iron pan( any thick , flat bottomed pan) and place the fish in it.

let it fry till one side is brown ( takes about 5 minutes), turn gently as the fish is very tender and fry on the other side similarly.

remove gently from the pan and serve hot with daal chawal, khichri or as an appetizer especially when you make it with small fish or smaller fillets.


for me it is good by itself with some green salad on the side.


Saturday, July 4, 2009

mango chhunda


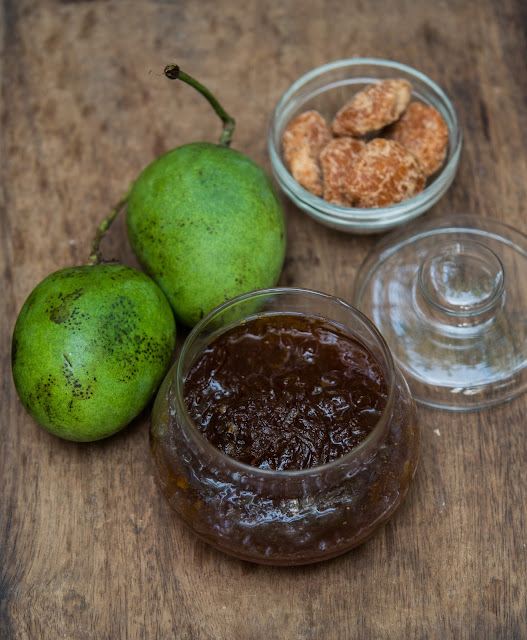
This is the most uncomplicated recipe of a finger licking preserve made of raw mangoes. Tart raw mango slivers preserved in sugar syrup is what we know as aam ka chhunda or kasse aam ka khatta meetha achar.

mango chhunda recipe

Small quantity of mango chhunda can be made in a microwave within minutes, including chopping/grating and cleaning the utensils. yes it is so uncomplicated.

It has been almost 2 months since I made this aam ka chhunda and the mango loaf, both paired so well together that now I will always think of these two recipes together.

I actually serve aam ka chhunda with everything and anything, from parathas to matthis, with multigrain breads or sandwiched between two digestive biscuits. You go by your imagination and you will never fail with mango chhunda. Even a plain aatte ka meetha cheela tastes really good with aam ka chhunda.

To make it more versatile I keep the preserve mildly spiced. One can always add spices like saffron and cardamom or crushed fennel seeds, or a mixture of fenugreek, fennel and red chillies in the last stage of cooking when a stronger spice level is desired.

I prefer flavoring the mango chhunda when needed accordingly, just sprinkle a pinch of required spices with a dash of water and microwave the quantity you need to use immediately, or cook in a small pan over gas stove, even the tadka pan works well. This way you can get any flavor as per choice or serve it plain with some strongly flavored dish. Like you can top the dhaniye wali matthi with a tbsp of plain chhunda.

The preparation is simple s I mentioned, just grate the raw mangoes in a box grater or chop into thin slivers.

Now throw in sugar into the chopped or grated mangoes, let it rest for a couple of hours and cook on very low flame till the mixture starts looking translucent. You can add a little water if you want the chhunda to be a little syrupy.  y

You need about 800 gm of sugar or jaggery for a kilo of mangoes and 100 ml of water to start with.

Mix it all well and wait for half an hour, till the mango slivers exude most of their water.

Now heat this mixture on low flame and keep stirring. It takes about 40 minutes or more to get cooked.

To know whether the chhunda is done, you have to lift the spatula above the cooking mixture, the same spatula you are using for stirring. When the sugar syrup falls in two thin streams, (a third stream is good to get if you want the preserve to be almost dry) it means your chhunda is ready. This is essential for its long term preservation (this is called do taar or teen taar ki chashni in Hindi).

When you are making a small quantity to be consumed within a few days or to be kept in the fridge, the sugar syrup should fall in a single thin stream, your chhunda would be syrupy and thin.

You know you can make the consistency as you like it.

kachhe aam ka chhunda

The light colored mango chhunda on the left is made with sugar, the peeled raw mango is chopped thinly in julienne and there is no spice used to flavor it.The dark colored mango chhunda on the right is made with jaggery, lightly spiced with a hint of red chilli and garam masala, the raw mangoes grated to make it a little homogeneous. Both the variants taste great and can be used differently.

Gujratis call this relish as keri no chhundo and serve it with their bhakhris and theplas.

Here is the mango chhunda, made with sugar and without any spice, with my mango loaf...


Kachhe aam ka chhunda is an essential relish to be stocked for the whole year in many families. My mom used to make it when we were kids, obviously because it was in high demand. She doesn't make the chhunda anymore as all of us siblings have started making it and sharing our pickles and preserves too.

Make the aam ka chhunda and see how it flies off the pickle shelf.


Wednesday, July 1, 2009

atte ka meetha cheela | desi whole wheat crepe recipe


Atte ka cheela is a healthy traditional whole wheat pancake or crepe that is laced with the mild flavour of fennel seeds. Some people like it a little thicker like pancakes (unleavened) and some like it thin like a crepe. The thin cheelas are known as chithda (चिथड़ा ) in some areas, meaning a rag, because once folded it looks like a rag.

atte ka meetha cheela

I sometimes serve the atte ka cheela rolled up with mango chhunda. The meetha cheela is served as a breakfast or a quick snack, can be rolled up nicely with some relish or chutney and can be a good lunch box meal to be carried to work. Kids would sure love it in their lunch boxes. 

atte ka meetha cheela

The recipe is simple and needs no specific instructions.

Just take about a cup of whole wheat flour in a large bowl, for 4 cheelas mix sugar to taste ( I use 2 tbps for this quantity) and a tbsp of whole fennel seeds.

Now pour enough milk in it to make a pouring consistency batter. Just that and now you are ready to make cheelas or pancakes.

You need 2 tsp of ghee per cheela and chhunda or mango chutney or even jam or marmalade of choice as much you like.

Heat a flat griddle or tawa and grease it with a tsp of ghee, pour a ladle full of the batter on the griddle and spread it like dosa or a thin pancake, let it cook for a while.

atte ka meetha cheela

Pour a tsp of ghee on top and now flip it to be cooked on the other side too.

atte ka meetha cheela

When cooked it has to be soft and not very crisp. Take the cooked cheela off from the griddle, keep on a plate and spread the mango chhunda evenly on it (mango chhunda is made with grated raw mangoes and sugar and is something like candied slivers of mango).

atte ka meetha cheela

Now roll this up and serve hot or warm with lassi or hot or chilled milk.

And tell me if you liked it for the simplicity and the taste which is so out of this world with fennel in the pancake combining very well with the sweet and sour chhunda inside the crepe like cheelas.

atte ka meetha cheela

Make your whole wheat cheela plain or roll it up with your favourite relish, this is the easiest breakfast or snack one can make with minimal fuss.