Showing posts with label UP style curries. Show all posts

Thursday, December 21, 2017

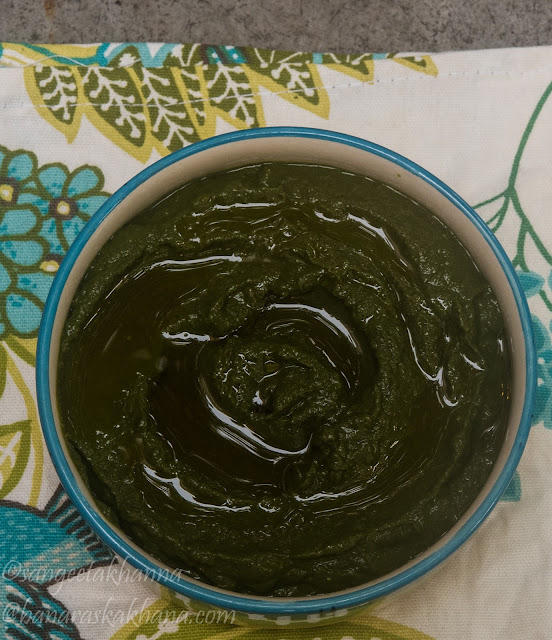
Recipe of chane ka saag or chane ke saag ka chokha


Chane ka saag or chane ka saag ka chokha has a wonderful complex flavour even though the recipe is quite simple. The complexity in the flavour is attributed to the mineral content of the leaves of chickpeas which taste savoury with a rich mineral taste when eaten raw. This saag recipe will leave you spellboud with its simplicity and complex flavours.

chane ka saag

Sadly, chane ka saag (leaves of chickpea plants) is not so common in the cities possibly because it needs some time to sort and clean before being cooked. Most people are busy with work and with nonsensical things too sometimes and consider the time spent on preparing food as a waste of time unfortunately. I have overheard some interesting conversations in the weekly vegetables market in my area when people talk about how they would want to eat the greens but wonder who will clean them.

chane ka saag

And then there are the vegetable vendors who come with a chopping instrument to cut the green right there for their costumers, but only spinach and mustard greens can be chopped like that because they are long stemmed and come in bundles, sometimes even methi greens. I wouldn’t ever think of getting my greens chopped like that, without cleaning them thoroughly in my own kitchen. Such pre-chopped greens loose all their flavour and of course the nutrients when they are rinsed in water before cooking so best to be avoided. Smaller leaves take time to sort and clean and that is the reason chane ka saag is not so popular despite being one of the tastiest green vegetable.

I have realised getting older now, that this kind of time spent on preparing food is quite meditative in nature and ensures healthy delicious food for the family.

Chane ka saag is not grown for the leaves primarily but is a byproduct of growing chickpeas. In the vegetative growth phase, before the flowers set in, the growing tips of chickpea plants are pruned regularly to make the plants bushier so it can bear more flowers and chickpea pods. In the rural areas and smaller towns, many women will be seen selling really fresh chane ka saag that they have plucked the same morning, so fresh that it is eaten in its raw form as well, just like a green snack. The taste of the fresh chane ka saag is savoury with a complex mineral punch on the palate, many people Just munch on the fresh chane ka saag by the handfuls and sometimes pound it with some salt and chilies for a coarse dry chutney.

I have grown chane ka saag Just for the leaves many times in my garden. You need to soak some black chickpeas and burry them under 1 cm of soil in a wide pot, it helps if you crowd them together, and keep it in a sunny spot. The leaves emerge in 3-5 days and grow about 6-8 inches tall in a month or so. Harvest them all and use to make any of the chane ka saag recipes from this blog. The whole plant except the base can be used in this case as it is tender and flavourful.

I have memories of such snacks from the holidays we used to enjoy in my grandmother’s village and how some women used to collect chane ka saag in their Aanchal (free flowing part of the sari, used in multiple ways in rural India) and come home to sell the saag instantly. A few saagwali ladies still come to our Banaras home bearing a large cane basket on their heads every morning to sell freshly plucked chane ka saag or foraged Bathua ka saag during winters and I go berserk whenever I am visiting.

I have already shared a few recipes of chane ka saag (saag is a generic name for all leafy greens as well as cooked leafy greens, used interchangeably) like this chane ka saag in a mustard gravy, chane ke saag ke pakode and chana saag dumpling curry, chane ke saag ka achar etc. The recipe I am sharing today is called just as chane ka saag in my home but some other people, especially from Bihar, call it as chane ke saag ka chokha of chane ke saag ki chutney as this recipe can be consumed like chokha or chutney too. I have used this recipe as a dip and as a spread as well with wonderful results.

chane ka saag

This recipe of chane ka saag is so simple to prepare that you may feel like dismissing it in the first glance. But trust me the complex mineral taste of chane ka saag is enhanced so beautifully by the raw mustard oil and green chillies and garlic used in the recipe. Some people tend to use the green garlic for this recipe but I avoid that because the taste of chane ka saag itself is so rich that it doesn’t need any meddling. But go ahead and use green garlic if you like, minor flavour variations make a big difference sometimes for individual palates.

To clean chane ka saag you need to pluck the tips including tender stem and discard the hard stem, I prefer to shuck off all leaves from the hard stem too as this saag is so difficult to come by in the cities and is quite expensive too. This sorting of the saag takes some time and then you need to wash the leaves in several changes of water, I suggest you soak the leaves in a deep vessel for sometime so all the dirt settles down and then wash with several changes of water.You don’t need to chop the saag for this recipe.

Ingredients
250 gm chane ka saag cleaned and sorted
¼ cup water
¼ tsp salt (or more to taste)
10 cloves of garlic
5-6 green chilies or to taste
1 tbsp raw cold pressed mustard oil
Use 2 tsp mustard powder and 1 tbsp extra virgin olive oil if you don’t have access to mustard oil

Procedure
Boil the chane ka saag with water and salt in a covered pot for 4-5 minutes or till it wilts completely. Let it cool.

Blend with garlic and chilies till smooth. Empty in a serving bowl and drizzle the mustard oil on top.
Add the mustard powder while blending if using olive oil as a topping.

Serve with Indian meals of dal and rice or roti along with other subzis. Many people including me mix chane ka saag with plain boiled rice or dal and rice and eat it, I have seen it being eaten like this in my family. I like it with crisp hot parathas as well and of course in many other ways as mentioned above.

Chane ka saag remains one winter delicacy I look forward to every year. Try this if you get chane ka saag in your part of the world or grow some chickpea greens yourself just for this. It is worth all the effort trust me.


Monday, January 19, 2015

everyday daal : chane ki daal bathue wali | sagpaita cooked with split chickpeas and chenopodium greens


Sagpaita is a name given to all lentils cooked with winter greens. Spinach, Chenopodium (bathua), Fenugreek greens (methi), Chane ka saag (chickpea greens) or a mix of spinach and dill leaves, fenugreek greens and dill leaves etc is cooked with any lentil to make a saucy daal rich with flavours of garlic, hing and cumin used for the tadka.

sagpaita recipe

Sagpaita is basically a winter food that is considered warming and hydrating for the body at the same time. The lentils used mostly for sagpaita are arhar ki daal (split pigeon peas), chane ki daal (split chickpeas) or urad daal (split black beans) but a mix of lentils is also used. Mung ki daal (split mung beans) is also cooked to make sagpaita but it is mostly with baby spinach or baby fenugreek greens.

All these sagpaita recipes are slightly different from each other despite being a mix of lentils and greens basically but the taste of each sagpaita tells you how and why each one is cooked differently.

We do cook lentils with purslane greens in summers too but somehow sagpaita is a name given to the ones cooked with winter greens only. No wonder, the daal can include a lot of spices and loads of ghee is topped over the bowls of sagpaita. It has to be a winter delicacy as the recipe is tuned to be eaten in winters. All parts of Uttar Pradesh get very chilly during the 2 months of winter and there are various foods made with fresh produce to stay warm.

This chane ki daal ka sagpaita with bathue ka saag is made differently in each family. Some would add a little urad dal to it and some would add some fresh green peas or 'harey chane' but the tempering will always have some hing-jeera-lasun and laal mirch along with mild spices like dhaniya, jeera, kali mirch powder and may be a couple of tejpatta. There is good protein in the daal along with a lot of greens, so the hing and garlic etc is added to allow proper digestion of the sagpaita.

I sometimes add es of paneer to my sagpaita to make it a one pot meal. Otherwise it is best enjoyed with plain boiled rice, some bhujia type dry subzi, raita and papad kind of Indian meals.

ingredients
(2-3 large servings)

For pressure cooking
chane ki daal (split chickpeas 100 gm (scant half cup)
finely chopped bathua (chenopodium greens) 300 gm (2 cups packed)
minced ginger 1 tbsp
salt to taste
turmeric powder 1 tsp
water 1.5 cup

For tempering
ghee 1 tbsp
cumin seeds 1 tsp
hing (asafotida) a pinch
chopped garlic 1-2 tsp according to taste
red chilly powder 1/2 tsp or more to taste
everyday curry powder 1 tsp (optional)

lime juice to serve.
Paneer cubes as per requirement.

procedure

Pressure cook the daal and bathua greens along with the ingredients listed. Wait till the pressure builds up and the whistle blows, then cook on low flame for 10 minutes.

Prepare the tempering by heating the ghee and then adding the ingredients one after the other in the order listed. Make sure the garlic gets pink in colour and turns aromatic before you add the chilly powder and then remove the pan from the stove and pour the ingredients into the cooked daal. Mix well and churn the daal mixture if you like the sagpaita a bit saucy.

Serve hot with some lime juice or hot melted ghee or butter on top. This can be served with all the usual Indian accompaniments for a meal as I mentioned.

When I add paneer cubes I usually let the sagpaita simmer for a few minutes to soften the paneer before serving. Sagpaita or bathue wali chane ki daal has a distinct aroma of hing, cumin seeds and garlic that we call 'hing-jeera-lehsun ka tadka' and a mild kick imparted by red chillies. The base is earthy with bathua and chana dal that makes this sagpaita a very uniquely flavoured daal.

You can cook this daal with arhar (toor or pigeon peas) ki daal as well. The recipe wont changeeven if you use a mix of chane and arhar ki daal. But mung and urad daals need a different treatment. We will talk about that when I share the recipe of sagpaita with those lentils.

Enjoy bathua chane ki daal ka saigpaita till then.

Wednesday, January 15, 2014

Lasun mirch wala keema | a mutton mince curry with chilly and garlic


Lasun mirch wala keema is not as intensely garlicky or intensely hot as the name suggests. So relax. This a creamy curry with pleasant notes of garlic and green chilly peppers where you get sweeter taste of chillies more than the heat. This mutton mince curry with loads of garlic and green chillies is soul satisfying type of food if you believe me. It replaces our soup dinners in winters many times and we fall for kadak mixed grains roti with it, although we eat more of the curry and less roti, the curry is so addictive good.

Green chillies come in all shapes and sizes, with different heat levels and we use them for differently in our food. We are spoiled for the chilly peppers varieties now a days, Jalapenos, Anaheim, Serrano, Poblanos and Cayenne are some of the varieties visible in the markets. I usually get a small bag of all of them and keep using them to make pickles, stuffed chillies etc. But I mostly like them to be used in my soups or stir fries depending on how hot they are and how much flavour they pack for the recipe. So when I need the rich chilly flavours and lesser heat I use the Anahiem or Jalapenos or a mix of these two.

Go for the larger and wider chillies if you want the sweet flavours of chillies in your recipes, especially if you live in India and the chillies are not labeled by their names in the local markets.

This lasun mirch wala keema recipe I was planning to cook this winter and yet something or the other kept distracting me from this keema recipe. I make a nice mirchi gosht too but this lasun mirch wala keema is a totally different bouquet of flavours. Just a few spices are used and a nut paste makes this dish a rich meal without many side dishes. You wont need much when this lasum mirch wala keema is in the menu.


ingredients
(2-4 servings depending on side dishes)

keema (mutton mince) 300 gm
garlic cloves 50 gm
mild variety of green chillies 80-100 gm
melon seeds 50 gm
cashew nuts 20 gm
whole coriander seeds 1 tsp
cinnamon stick 1 inch piece
green cardamoms 2
chopped coriander greens and stems 100 gm
ghee 1 tbsp or 15 gm
salt to taste ; 1 tsp will be good enough

procedure

Soak the melon seeds and cashews in hot water for 10 minutes and make a fine paste. Keep aside.

Mince the garlic and slice the green chillies. Keep aside.

Heat ghee in a thick base pan, preferably a handi and tip in the whole spices in it. Wait till the spices get lightly aromatic, taking care not to brown them. Add the minced garlic and sliced chillies at once and keep stirring till it all looks translucent. Do not brown the garlic or chillies, we want them to be just a bit translucent.

Add the keema and the chopped stems of coriander greens. Save the chopped coriander leaves to be added in the last phase of finishing the dish. Stir fry for a minute and add 2 cups of water, bring to a soft boil and then simmer for about half an hour, preferably covered but take care not to let it spill.

Add the nut paste and coriander leaves. Adjust the gravy consistency by adding some water if required, or simmer without the lid to reduce if you feel like.

Simmer again after adding the nut paste till the fats float on the surface. This is the time the dish is ready. Serve hot with any Indian style bread, roti or naan.


We generally don't need any accompaniments with this lasun mirch wala keema. It is an indulgence to be enjoyed in singularity.


Sunday, November 17, 2013

methi wali machhli | fish curry with fenugreek greens


I have had methi wali machhli cooked by a friend's mother and had been planning to cook fish the same way since then. It is a mildly spiced fish curry in yogurt gravy and a lot of fresh fenugreek leaves. The fish suitable for this curry is large steaks with bones and skin and I decided to cook methi wali machhli as soon as I found good large fish steaks. This fish curry is similar to Machhli ka salan that doesn't use so much methi leaves o skips using them altogether.

methi wali machhli

Most people cook this recipe with a lot of oil in it but my recipe doesn't have oil floating on top. You can use oil generously to get more glaze (or roghan) in this curry.

Having fish at home has been an occasional treat lately, as we don't get good fish around our place. The skinned de-boned fillets don't count as fish which of course is available abundantly. I do cook some Basa sometimes but it doesn't feel like eating fish honestly. I want a fishy fish when I want fish, I know you understand what I mean. Although this methi wali machhli is not too fishy I must add. If you cook it with Basa fillet or large Pomfret fillets, it wont be even remotely fishy.

We have a few nice fish markets in Delhi and we do get our fish from those places whenever we are around. We generally get a large Rohu or Catla or a Betki nicely cut into steaks to be frozen in portions and sometimes we get some Mackerel or Bombil which we cook the same day. The steaks I cooked in this curry were from the belly part but any bony steaks will be suitable, just take care the pieces should be sturdy enough to handle in a curry.

This methi wali machhli is loosely based on a recipe I  saw here but my recipe has fresh fenugreek leaves as the star ingredient, exactly the way I had loved it. This is a slightly tart curry as the curds I use for this is a little sour, the way I prefer it, the flavors of fenugreek complements really well with the tartness of curds (dahi).

ingredients
fish steaks (Rohu. Catla any firm fish, preferably river fish) 500 gm approximately
fresh yogurt 1 cup
roughly chopped onion 1/4 cup
garlic cloves 3-4
dry red chillies 2-3 or to taste (keep it more than you think enough as yogurt neutralises chilies)
coriander powder2 tsp
turmeric powder 1 tsp
finely chopped fenugreek leaves 1.5 cup packed (or lesser)
salt to taste
mustard oil 2-3 tbsp
fenugreek seeds about a dozen

methi wali machhli

procedure

Make a paste of the onion, garlic, red chillies and 1/4 cup of yogurt along with coriander powder and turmeric powder. Add salt to it and dump this paste over the fish steaks in a mixing bowl. Add the chopped fenugreek leaves to this mixture, mix well and refrigerate for 2 hours.

Blend the remaining 1/4 cup yogurt in the same mixie jar and keep aside.

Heat mustard oil in a pan and add the fenugreek seeds in it. Wait till they become fragrant but take care not to brown them. drain the fish steaks form the marinade and fry in this hot oil both sides lightly. Drain and keep in a plate.

In the remaining oil add all the marinade and bhuno till the oil separates. It takes about 4-5 minutes and the mixture get aromatic.

As you see the oil separating form this cooking mixture, add the remaining yogurt, mix well and add about 1.5 cups of water. Let it come to a soft boil before adding the fried fish steaks.

Cover and simmer for about 5-7 minutes or till the oil floats on top.

methi wali machhli

Serve hot with plain boiled rice.

These steak were large about 6 inches long with 2-3 long bones in it. The flesh acquires a nice yogurt and fenugreek taste while the gravy is absolutely yummy with all the flavors. I am planning to cook paneer exactly the same way next. Will let you know if I do.

Better you cook and let me know if you are a vegetarian..

Monday, September 23, 2013

mooli aur turai ki subzi | a plain curry with radish and sponge gourds


Some one was talking about mooli aur turai ki subzi the other day and I couldn't resist making it the very next day. This is a simple soup like curry with radish and sponge gourd slices stewed together with a light tempering of cumin seeds and green or red chilly. The simple clean flavors of both the frugal vegetables is to die for. Although, in this age and in this place (the national capital) nothing is frugal. Radishes and sponge gourds both come for Rs 60 a kilo, but the dish originated as a frugal meal I am sure. Also, I remember having it in hot summer days, this is supposed to be cooling and light , especially if taken with rice. I have tried this curry in a proper soup form and it was great. With a little boiled rice added to the soup it is a very light detox type meal. All desi, traditional flavors and super healthy. The curry is known as nenua mooli ki subzi in eastern UP, you might like to see nenua chana ki subzi and nenua chana daal ki subzi and nenua pyaz ki subzi in reference to this.

Interestingly, my MIL also used to make this curry and in exactly the same way as my mother. Arvind's family is punjabi but they have stayed in UP for generations now, and have imbibed many local flavors as their own. Actually all the other three types of nenua ki subzi was made exactly the same way in every home I have been to. No one played with the recipes to spoil them as these were classics.

Some people like to have plain rice with this mooli nenua ki subzi and some like it more with roti, there are some people who just hate mooli so this curry is not for them. This flavor is an 'all or none' kinda food, you like it and crave for it or you just hate it and can't stand it. If you have had this curry in your childhood and been craving for it, here is this easy recipe that will take you back in time.

ingredients..

one large radish (long white variety if possible) about 200 gm
5 large sponge gourds about 600 gm
2 hot green chilies or to taste
one hot dry red chilly
1 tsp cumin seeds
1 tsp turmeric powder
salt to taste
2 tbsp mustard oil (do not replace this oil with any other is possible, the authentic taste is something you would love)

procedure...

Peel, wash and slice the radish after slitting it length wise, so you get half moons or quarters. Thin round slices are also good.

Peel, wash and slice sponge gourd the same way you did with mooli (radish).

Heat the oil in a wide pan (kadhai) and tip in the cumin seeds and both types of chilies. Let them all splutter and then add the turmeric powder and immediately cover it with the sliced vegetables all at once. Add salt, stir and mix everything.

Cover and let it simmer for about 25 minutes. Stirring once in a while in between. The vegetables are  watery in this case so you wont need to add any water, the fresh vegetables are so watery that the contents of the pan become all liquid after 10 minutes or so. Cook till everything is soft and the consistency you prefer. Some people like it soupy and some people like it dry, almost looking like a scramble of sorts. Your choice.

The curry has a hint of mooli but it doesn't stink as many think. I love mooli any which way but you have a fair chance with this curry even if you hate mooli. Try once and see if you can make peace with mooli this way.

Cheers.


Sunday, August 11, 2013

murgh safaid qorma : a white stew with chicken and almond paste..


Safaid qorma or safed korma or chicken or murgh safeda as it is called in Banaras, this delicately flavored chicken stew is easy to make and creates a stir every time I cook it. Actually all the white curries we make are very curiosity inducing among the guests and extended family. While many light colored curries are popular in UP, all of them using some or the other kind of nut paste as a base, a pure white curry is something people keep coming back to. Second and third helpings are normal as the stew is not spicy as well. Very delicate flavors or spices used and a rich broth of chicken make this stew quite interesting. Although I would suggest to serve this stew along with some more spicy side dishes, at least a spicy raita or green chutney and raw onion slices if you are cooking it as a routine homely meal, we prefer this stew with just warm fluffy home baked naans.

ingredients...
for 8-10 servings

To simmer together..
8 -10 chicken thighs on bone cut into 3 pieces each
1.5 L water
ginger garlic paste 2 tbsp
4-5 black cardamoms crushed lightly
8 green cardamoms
20 cloves
2 large sticks of cinnamon (dalchini)
2 tsp lightly crushed pepper corns
salt to taste

200 gm almonds, soaked for 3 hours
a cup of full fat milk or a bit more
2 pinches of nutmeg powder
1 tsp of cinnamon powder

Yes, there is no additional oil used in this stew. All the fat me from the chicken, the nuts and the full fat milk used.

procedure...

Put everything under the simmer together list in a deep wide pan or stock pot and simmer for about 1.5 hours. There will be a lot of scum during this, you can remove it if attending the simmering pot or let collect on the top. Keeping the pot half covered makes sense or just place a loosely fitting lid over it.

Mean while, peel all the almonds and make a nice smooth paste adding the milk if required. Add the nutmeg and cinnamon powders to this paste and blend once more to incorporate. Keep this paste aside.

Remove all the chicken pieces from the simmering broth and put them all into a kadhai, removing any scum if it get stuck to the pieces. Now strain the stock over the chicken pieces and discard all the scum and whole spices that collects into the strainer. This is a trick to get a clear smooth and pure white gravy for this stew.

Now add the almond paste and the milk, adjust seasoning by adding salt if required and simmer for 5-8 minutes more. Serve hot or warm with your choice of accompaniments.

We have served this stew with biryanis, with naans and with an elaborate meal many times and the chicken safaida was appreciated well by the guests every single time I cooked it. The stew is very lightly spiced but you can adjust the spiciness to your taste.

I make it a point to adjust the heat into this stew according the preference of people having it. Adding some white pepper powder, some yellow chilly powder and simmering a few slit green chilies in the first step helps getting some heat into this stew. But we like it the way I cooked this time.

Do let me know if you try this chicken safaida. I have posted a mutton safaida or gosht safaida as well and that is a frequently repeated recipe at my place too. Another whitish curry called chicken rezala is also a white chicken stew, another chicken stew mughlai style is whitish but way different from this one, and a chicken in a creamy white gravy. All these are favorites, but get made according to what we are planning on the side. Try all of these and see which one you like.

You can always cook these curries with vegetarian options too, paneer and lightly fried cauliflowers will be wonderful in this curry I feel.

Saturday, March 9, 2013

harey chane ka nimona | a typical UP curry made with green garbanzo beans...


Talking about traditional UP curries one thinks of a spicy hot curry with deep colors and robust flavors. Winter and spring time curries are more spicy than the summer curries. Seasonal produce is used in the most appropriate way. I have been cooking spicy curries this winter more than ever. 

Harey chane ka nimona was also cooked for the love of eastern UP style curries. I have been talking about nimona a lot on this blog and noticed that a few of my friends and readers tried out my nimona recipes and wanted more of them. Of course variations of it. I knew how addictive these curries are. And all of them so different from each other in final flavors. 

This Harey chane ka nimona is yet another version of a lentil curry made using a paste of the lentil. Fresh green chickpeas or garbanzo beans are used for making this nimona but soaked green or brown chickpeas can also be used. This one a little more spicier than the other ones. The reason is, chana or chickpeas is loved in the spicier avatar in Eastern UP. The curry is enjoyed most with plain boiled rice or sometimes chapati. 

ingredients...
(2-4 servings)

fresh green chickpeas 300 gm 
boiled, cooled and cubed potatoes 1 cup

to be made into a smooth paste...
garlic 3-4 cloves
ginger roughly chopped 1 tbsp
whole dry red chilies 2-3 or to taste
whole cumin 2 tsp
whole peppercorns 2 tsp or lesser if you don't want it too peppery hot
whole coriander seeds 1 tbsp
scissor cut tejpatta 2 
turmeric powder 1 tsp

mustard oil 2 tbsp
whole cumin seeds 1/2 tsp

procedure....

Grind half of the green chickpeas into a coarse paste. Keep aside

Heat oil in a heavy based pan and tip in the cumin seeds. Let them crackle.

Add the cubed potatoes and half of the whole green chickpeas. Stir fry for a couple of minutes. Add the masala paste and bhuno for about 5 minutes or till the masala gets aromatic. Add salt to taste and mix well.

Add the coarse paste of green chickpeas, mix well and bhuno for a couple of minutes more. The paste now becomes a little lumpy but wont stick to the pan if you keep the flame on the lower side. Just let everything mixed up so the spices are soaked in.

Add about 3 cups of water, cover the pan and simmer the curry for about 10 minutes. Adding more water if required.


Serve hot with plain boiled rice. Some people like it with parathas or pooris. It is a tasty spicy curry that can go well with any traditional bread or rice preparation.

Simple home cooked meals used to be frugal most of the times as the lady of the house was the only one contributing to the kitchen or cooking most of the times. I am talking about middle class Indian households, the way food traditions are formed. So one curry and one daal used to be cooked mostly, sometimes the daal and curry was rolled into one with such curries like nimona. It made sense as taste and nutrition both were taken care of.

Joint families used to have more elaborate meals I have seen. Many more hands to contribute to the cooking process and many more choices to be catered to. In nuclear families, elaborate meals were prepared only on weekends or on festivals. Who cared when frugal was so yummy.

Saturday, June 13, 2009

parwal ki bhujia or aaloo parwal ki lehsuni bhujia..


alu parval ki lehsuni bhujia

This is a very simple stir fry vegetable which is called bhujia in UP. Parwal or parval is pointed gourd, also known as patal or potol. This small gourd looks like a miniature snake guard and is considered cooling and detoxifying according to  Ayurveda.

This sukhi sabzi can be a side dish with daal chawal lunch or it can be a main accompaniment to roti or paratha. I remember carrying this bhujia to school in my lunch box, with tikona parathas of course.

This is one of the few recipes I make in exactly the same way as my mom used to make it. I usually keep experimenting and improving my recipes on the ground of health and nutrition, but this bhujia is the best representation of healthy, tasty and easy everyday Indian food and keeps repeating in my kitchen every summer.

Parval comes only during summers, I have tried growing parval many times but haven't been successful yet.

ingredients
(2 large servings)

250 gm parvals
100 gms potatoes with skin
5-6 fat cloves of garlic or a few more if you like
dry red chillies or green chillies to taste
salt to taste
1/2 tsp turmeric powder
1.5 tbsp mustard oil
1/4 tsp methi and cumin seeds each

procedure

Just scrape the parvals using a paring knife, cut the parwals lengthwise in four pieces or six and some potatoes too in thin wedges.

alu parval


Heat mustard oil in a pan, throw in a tsp of methi and jeera seeds each and when they crackle put the parwals first.

Stir fry till they are pinkish and then add the potato wedges and fry till they are pinkish too. Add salt to taste and turmeric powder is added along with a generous amount of garlic and green chilly paste. This paste is the main taste maker in this bhujia and it is always made in mustard oil.

After adding all these, stir fry and slow cook  till the aroma of cooked garlic is predominant and the bhujia is ready.


I make this bhujia in minimum oil. Just about 1.5 to 2 tbsp for 250 gm parwal and 100 gm potatoes, unpeeled new potatoes taste best.

It is easier to make it in more oil as it fries well but when using less oil you just have to be patient with the frying. A heavy bottomed pan and low heat works best for low oil version. Taste is the same for both the versions.

alu parval ki lehsuni bhujia

I prefer serving this bhujia with daal chawal for our lunch. It makes a healthy lunch with daal and boiled rice, plain curds and papad goes well with it but I like just this bhujia with my daal chawal for the rich garlic pleasure, nothing else is required between my dal chawal and bhujia.

I like the crunchy methi seeds in this bhujia too, if you don't like the slight bitter crunch of methi seeds, you can omit that and use only cumin seeds for tempering.

I am telling you one of my hack for this recipe too. Sometimes I use a past of garlic powder, chilli powder and turmeric powder mixed together with a little water to make this recipe too and it has never disappointed me. Slow cooking is the key in this recipe, keep the gas on low flame, keep stirring every couple of minutes and this bhujia will cook perfectly.

Do let me know of you try this recipe. It gives me immense pleasure to introduce the recipes from my homeland and the pleasure multiplied when you all find the recipes useful...


Friday, June 12, 2009

sarson wali machhli | fish cooked in mustard seeds gravy...


 Sarson wali machhli or any mustard seeds gravy is something synonymous with Bengali food but it is an integral part of UP food too. There is difference between the way it is cooked in Bengal and in UP though, in a Bengali sorshe jhol the taste of the mustard is prominent and the curry is a bit milky in appearance  but in UP it becomes infused with garam masala and amchoor and the curry becomes brown n rich in color. I like it both ways. Both the curries are very distinctly different in the final bouquet of flavors.

sarson wali machhli

Actually I started eating fish much later in life and learned to cook fish from Bengali friends of mine, and that was my first preference for a long time, but then I learned the way my mom and grandmother used to cook it too. I love this curry both ways now.

sarson wali machhli
you need for this preparation I used a large fish, cooking process differs with the size of the fish. I used 4 large pieces (steaks) of fish weighing about 500 gm total. 

Any fish will be fine but Rohu or Catla (river fish) are more suitable for this curry. Rub some salt and turmeric powder to the pieces and let it rest for half an hour.

masalas needed are

mustard seeds 2 tbsp
turmeric powder 1 tsp
curry powder 1 tbsp
garam masala powder 1 tsp
ginger garlic n green chilly paste 3 tbsp
paste of one big tomato
cumin seeds 1 tsp
salt to taste
and oil to fry
amchoor powder 1 tsp or more
green coriander leaves to garnish

sarson wali machhli
to proceed

Heat oil in a shallow pan and fry the fish pieces both sides until golden brown and keep aside.

Make a fine paste of mustard seeds with some water using the chutney jar of your mixie. Add some water to the paste and decant it for a while, pour the paste in a cup discarding the skins (which settles down in the jar) alternatively the paste can be passed through a  sieve, keep aside...

Now empty the pan just keeping 2 tbsp of oil into it, throw in the cumin seeds and let it splutter, add the ginger garlic green chilly paste and fry till oil separates, throw in the powder masalas, fry for a minute and add the mustard paste.

Mix well and cook for a while, then add the tomato paste to the pan. Add salt and cook covered on medium heat till oil separates again.

Now add about 1.5 cup of water to it. More or less depending how thin or thick gravy you want. Let it boil and drop in the fried fish pieces.

Cook covered till oil separates and the fish is done. Throw in coriander leaves and put off the flame and keep the pan covered for 5 minuted so that the coriander leaves infuse their flavor into the curry.

Serve hot with boiled rice, with some salad n papad on the side....

Machhli chawal was a comfort food in our household but now I make it rarely as fish is not readily available in our locality. I miss the days when a machhli wali used to come to my doorstep when we were in Dhanbad, Arvind's previous posting. Small towns have their own charm and fresh produce is one of those lovely things that you get without any extra effort.


Monday, June 8, 2009

kele ke kofte | green plantain fried dumplings in a spicy curry sauce...


Kele ke kofte is one recipe that gets repeated often and is remembered a lot by almost all my relatives. There is a story behind it.

Let me tell you that Kachhe Kele ke kofte is a fried dumpling made using green plantains and is curried into a spicy gravy. This is one of those UP recipes inspired by Mughlai keema koftas.

recipe of kachhe kele ke kofte

I remember once when it was my sisters engagement ceremony and the cook disappeared at the last moment. There was utter chaos and my parents were at a loss of words. There was no option but to cook it all by ourselves but there was no one else apart from me and being the eldest in the family I had to take responsibility even though I wasn't too confident to cook for a huge crowd like that.

I had to cook for around 50 people and the only helping hand was that of my sister's friend Parmita. She helped me in the preparations but all the actual cooking was dome by your's truly. That day I made this kele ka kofta and it turned out so good that most relatives and cousins still remember that and ask me the recipe again and again whenever they get to meet me at some or the other family get together.

I also remember, I had made a LOT of kofte that day, and that there was a lot was leftover too. Everybody from our side of the extended family asked for the leftovers as well the next day and not a single ball of kofta was wasted, huge wastage of such stuff is otherwise so common when you cook things for a large party.

recipe of kachhe kele ke kofte

I still feel proud about that cooking marathon as I had cooked many other dishes apart from this kofte, and that cooking experience made me confident forever. I could cook for large gathering without thinking twice about how would I go about it, you do less mistakes when you are confident and your eyeballing the ingredients works well.

I still make these kofte in large amounts most of the times, to last three days at least and the remaining 2 portions of dry kofte is frozen for later use.

It becomes a lot more easier when you have a bhuna masala in the fridge and some dry kofte in the freezer. Just mix the two, add water and simmer till soft.

ingredients for the kofta balls
(makes 3 batches serving 4 people each)
raw plantain 6-8 nos.
onions chopped finely 1 cup
ginger garlic paste 3 tbsp
green chilies chopped 1 tbsp
red chilly powder 1 tsp
garam masala powder 1 tsp (freshly made )
chickpea flour or besan 3-4 tbsp ....or just enough to bind the mixture
salt to taste
oil to deep fry, I use mustard oil

to proceed...........

Do not peel the bananas, just remove the stalk, remove any blackened skin, cut in slices and boil in a pressure cooker with a little salt up to 1 whistle......let it cool to proceed.

recipe of kachhe kele ke kofte

You need to mash the boiled and cooled plantain completely and it is a bit difficult with the skin on, so just mince the boiled slices and then mash them with hands or any other appliance you find convenient, it should not be completely creamed, small bits of peel makes it spongy in gravy.....

You can always use a food processor or chopper for mashing this boiled plantain.

recipe of kachhe kele ke kofte

Chop the onions and then the ginger garlic n green chilies in the same chopper one by one.
Mix in other ingredients except oil and make a pliable dough like mixture.

Divide into balls and deep fry in hot oil. Note that if they break into hot oil it means they need a bit more of besan added. So correct the consistency before you fry all of them. Fry all the kofta balls and keep the extra in the freezer if that is the case.

Read on for making the gravy...

recipe of kachhe kele ke kofte

ingredients for the gravy
(for 4 servings)

onions chopped 1/2 cup
tomatoes chopped and pureed 1/2 cup
ginger garlic paste 2 tbsp
red chilly powder 2 tsp
turmeric powder 1 tsp
coriander, cumin, blac kpepper powders 1 tbsp each
garam masala 1 tbsp
green coriander for garnishing
salt to taste
mustard oil 3 tbsp
cumin seeds 1 tsp

recipe of kachhe kele ke kofte

to proceed ...

Heat oil in a pan and throw in the cumin seeds. When it splutters add the chopped onions and fry it till golden brown. Add the ginger garlic paste and fry till oil separates. Throw in all the powder masala, salt and tomato puree and mix well.

Cook covered till oil comes on top, mixing in between. Add about 1 cup of water and give it a boil. Sslip in the kofte (1/3rd of the above stated quantity for this much gravy) and switch the flame off.

Do not disturb the kofte till they absorb water and grow bigger in size. Garnish with coriander leave, transfer carefully in to a serving dish (the kofte can break while doing this) and serve immediately with roti, paratha, naan or any rice preparation, we had it with plain rice in the below picture.

recipe of kachhe kele ke kofte

And with some daal and roti in the above pictures...

To prevent these kofte from breaking after putting them into gravy just arrange all the kele ke kofte into a casserole dish. Pour the gravy over it and microwave for 2 minutes. Serve immediately after this.

Add fresh cream in the last step if it has to be served for a party For the two of us I avoid adding cream.


Friday, February 20, 2009

besan katli ki sabzi UP style


 besan katli ki sabzi UP style

Besan ki katli is a chickpea flour savory cake that is shallow fried and then curried in a mustard gravy. This besan ki katli curry is often called dhoka subzi as it masquerades as a fish curry for vegetarians, there is a Bengali version of this curry called Dhoka'r dalna which mean the same. The besan or chickpea flour cakes resemble fish steaks in appearance and have a meaty texture, hence a special dish for vegetarians during festivals or family get-togethers. This is one of my favorite vegetarian recipes too. The pungency of mustard is balanced well by tomatoes and generous helping of coriander greens and the chickpeas cakes absorb every bit of it. 

The bengali version of this curry, dhokar dalna is quite a yummy curry with a slight sweetness to it, but this curry is a UP version, eastern UP to be precise. I feel the curry is influenced by Bihar and Bengal with minor changes, only had got a bit more pungent, hot and sour in this version. But a really good balance of flavors as besan ki katli soaks up flavours of mustard and chillies etc magically.

ingredients for the katli
besan 1 cup
water 1.5 cup
turmeric powder 1 tsp
salt to taste
cumin seeds 1 tsp
asafoetida a pinch
garam masala powder 1tsp
mustard oil 1 tbsp


procedure

Mix everything together to make a batter. Pour it all into a non stick pan or an iron kadhai and start cooking while stirring the mixture continuously. The mixture thickens and dries up within 7-8 minutes of cooking and forms a lump. This the an indication of it being ready, remove the pan from the stove.

Quickly grease a flat plate with oil and spread this mixture over the plate, patting it down using the spatula or a large flat knife. Spread it as thick as you like, make the edges smooth and let it cool down. Cut in diamond shapes when perfectly set. These diamond shaped chickpea flour cakes are called besan ki katli and will be shallow fried before currying.

Shallow fry the katlis in a flat base frying pan, browning them  lightly on both the sides. Reserve for currying or have them as a tea time snack if you wish.

ingredients for the gravy

yellow mustard seeds 2 tbsp
coriander powder 1 tsp
black pepper powder 1 tsp
turmeric powder 1 tsp
green chilies 4 nos
red chilly powder 1 tsp
garlic 10 cloves
tomatoes 2 nos.
mustard oil 2 tbsp
cumin seeds 1 tsp 
fenugreek seeds 1/2 tsp
a generous handful of coriander leaves to garnish

procedure

Soak the mustard seeds in a little water for 10 minutes and make a fine paste of it along with all the powdered spices and garlic in the mixer. Keep aside.

Now heat oil in a pan and throw in the cumin and fenugreek seeds, let them both crackle a bit before pouring in the mustard paste into it. Add salt and cook stirring it all for 3-4 minutes or till the spices become aromatic.

Add 1.5 cups of water, slip in the besan ki katlis and simmer for about 15-20 minutes.

Add slit green chilies and quartered tomatoes in the last 5 minutes of simmering. Finish with coriander greens and serve with plain boiled rice and raita, kachumber salad etc.

You can add brinjals or even shallow fried okra to the same curry to include some vegetables in it too.

 besan katli ki sabzi UP style

You can make a curry of the besan ki katli in a tamatar pyaz ka masala as well. I normally add a few makhana or green peas whenever I make besan ki katli subzi in tamatar pyaz ka bhuna masala.

 besan katli ki sabzi UP style

One made, the besan ki katli can be frozen in the steamed form and then can be thawed, shallow fried and curried whenever required. A healthy curry will be ready with minimal effort if you have bhuna masala in the freezer too.

These katlis can be added to kadhi as well. But they usually don't last long once you make them. Most of it gets over in snacking with chai.