Wednesday, December 8, 2010

desi banana pancake with toffee banana topping ..... and toffee banana for a dessert

Every country has it's own pancake and every home has it's own version . Not only one ,  different versions for different seasons , for many healthy - yummy reasons . Overripe bananas in the fruit basket is one great reason to mash them up for a quick pancake ( if not a bread or a cake ) .


Meetha cheela is a common desi pancake often served with malai ( clotted cream ) , honey , fruity chutneys or with just a tall glass of hot milk . I make it with jaggery or white sugar but when it is made with bananas , it is a special flavor for the sweet tooth guy . This pancake has bananas in two ways ... read on...

ingredients...
( 4 pancakes )
whole wheat flour 2 cups
milk 2 cups approximately
sugar 1 tbsp or more if you want it sweeter
mashed banana 1 no. ( large n overripe )
firm ripe banana 1 no. ( sliced diagonally )
Ghee 1 tbsp per pancake
butter 1 tbsp
sugar 1.5 tbsp for caramel

Procedure...


Mix the mashed banana , whole wheat flour and milk with sugar to taste and make a thick batter of flowing consistency .

Heat 1/2 tbsp ghee in a griddle ( i use an iron one ) , spread the ghee evenly and pour a ladleful of batter and spread to make a thick pancake ..... flip when brown on one side and apply ghee on the other side too....make similar pancakes with the remaining batter .

For the toffee banana topping , heat the butter on the same griddle or a different pan if you must , add the sugar to the melting butter and let it melt and get browned . Arrange the sliced bananas over the melting sugar and let it get coated with the caramelized sugar .

Pour over the pancakes and serve immediately......... and be ready for huge complements coming your way...

Take a bite yourself and you would know...


 But ...this is not a pancake for you if you hate bananas . Going by the belief that most of the kids and adults like bananas , this is a great weekend breakfast . Still not for me .... cuz i like these pancake in a very small portion and my breakfast has to be a hearty filling something savory kind ....you get that...all the uttapams and poodas , poha etc. are for me....

Those toffee bananas are a favorite dessert of mine with some whipped fresh cream ....or a scoop of plain vanilla ice cream............

Just melt some butter and sugar together and let it caramelize ... dunk in the sliced bananas and let them coat ........ pour the bananas in individual serving bowls or shot glasses while still hot and top with vanilla ice cream.......... let the cold ice cream melt over the hot toffee bananas and scoop in........


Pure bliss it is........ don't think about the calories for once and dig in........let the ice cream melt a bit and it's a selfish indulgence after this ........


I have not seen a person who didn't love it.....cheers !!!

Tuesday, December 7, 2010

tamatar ki mithi chutney | condiments for banaras ka khana


There are a few foods you relate to your childhood. While growing up Tamatar ki mithi chutney was a winter delicacy as the tomatoes available in the winters were the juiciest kind packed with sweet and tart flavors. The desi (heirloom) tomatoes are the kind that are easily squished into your palms when pressed, not like the hard shell plastic like tomatoes (Roma and the likes) bred for longer shelf life available in the supermarkets these days.

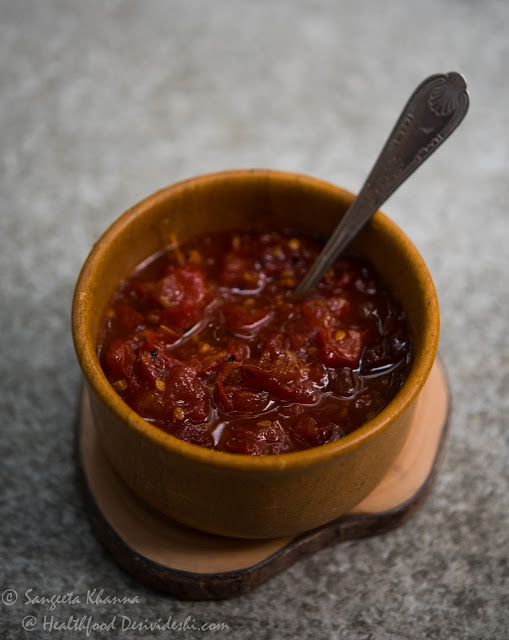
Tamatar ki mithi chutney was made in bulk and was stored either in a ceramic barni or a specific bowl called as pathri in my family. Pathri is actually a bowl made of yellow sandstone of Jaisalmer, the below picture features tamatar ki mithi chutney in the same pathri I got from Jaisalmer last year.

tamatar ki mithi chutney

These pathris were generally used for setting cultured yogurt or storing chutneys and condiments, each family used to have several sizes of these pathris and these were always bought from Banjara women who used to come home for selling their wares brought from Rajasthan.

This tamatar ki chutney is the UP specialty, its counterpart in Bengal is a much thick jam like version with either dates or aam papad added to it. There is another tamatar ki chutney which is made for large family gatherings at my home which includes dried dates, makhanas and some nuts and melon seeds etc, but this one is a simple saucy chutney mostly served with paratha meals in winters.

Some people love this chutney with everyday dal chawal meals, some with khichdi and some use it to replace tomato ketchup too. But this tamatar ki mithi chutney is an essential condiment for an elaborate meal served thali style or even buffet style.

ingredients...
tomatoes 1 kg
whole dry red chilies 4-6as per taste
mustard seeds 1/4 tsp
fennel seeds 1 tsp
fenugreek seeds 1/2 tsp
nigella seeds 1/4 tsp
finely chopped ginger 1 tbsp or more
jaggery 300 gm
salt  1/42 tsp
mustard oil 2 tsp

procedure...

Chop the tomatoes roughly in small chunks, no need to fine chop. Break the whole dry red chilies in two three pieces and keep aside.

Heat the oil and throw in all the seeds and the broken red chilies, wait till they get aromatic and turn brownish (take care not to burn them) add the chopped ginger, wait till they sweat and add the chopped tomatoes at once.

Add water (about 500-600 ml) and salt and cook covered for 8-10 minutes. The tomatoes should get mushy.

Add the crushed jaggery and cook to make a syrupy saucy chutney, the color will darken a bit making the chutney a bright red saucy deliciousness. 

tamatar ki mithi chutney

Dip your fingers in it and lick it, slurp it or dunk your parathas into it. Yummy is the word. The natural glutamates in tomatoes make this chutney so delicious it is a keeper.

Spread it on your bread to make sandwich or have it as a dessert for a change, tell me if you like it.

The chutney has amazing flavors. The heat of red chilies mingles very sharply with the deep earthy sweetness of jaggery while fennel, fenugreek and ginger are the main spicy flavors, the other things are kept subtle in my version. Accentuated fenugreek is great too if you like the methi flavor, add more fenugreek seeds if you wish.

Salt in this chutney is there just to balance the sweetness, this tamatar ki mithi chutney is a mouth watering delicacy and if you love tomatoes and chutneys and have a sweet tooth too  this is for you.

Most people I know from Banaras love it with alu parathas along with plain dahi or white butter. Do try that combination sometimes.


Wednesday, December 1, 2010

Indian flat breads : aloo kulcha, sourdough or yeast flat bread stuffed with potatoes


Aloo kulcha or alu kulcha, a baked flatbread stuffed with potatoes that can become a favourite if made well. The recipe is easy to follow and that makes it even better.

This is the third post in the Indian flat breads series. There will be more flat breads in the future but these three were prepared in the last two weeks or so and are being posted in one go. This aloo kulcha is the most favorite kind of flat bread here, along with the paneer kulcha. Needless to say this is the most repeated type of kulcha here in my home .

alu kulcha recipe

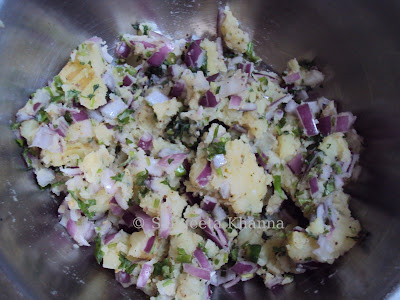
The dough ingredients and procedure is same as the whole wheat kulcha. The stuffing is made with boiled potatoes, finely diced onions, chopped green chillies to taste, chopped green coriander leaves (or methi leaves sometimes) and salt n pepper to taste.

alu kulcha recipe

Stuff the potato mixture into the dough balls, it's better if you can fill large amount of stuffing into the kulcha as it comes out more flavorful. The amount of stuffing should be a bit more than the size of the dough ball. It's not difficult if you take care that the stuffing consistency is similar to the dough consistency, it is stuffed with ease and then it is flattened with ease too ... with the help of your wet fingers of course.

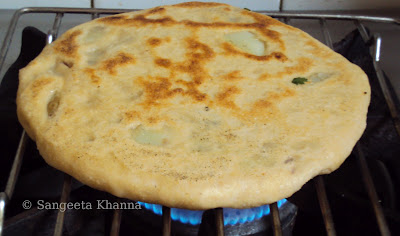
Bits of stuffing peeping through the dough layer looks good and tastes good too. Spread the flattened kulcha on the hot griddle in one quick motion .

alu kulcha recipe

And wait till one side is browned and the kulcha comes out of the griddle easily. It can be baked over naked flame like the plain kulcha but if it is too heavy due to the stuffing it falls down in the process. So using a wire mesh is convenient....

alu kulcha recipe

Repeat with the kulchas asI know you would want to make many of them.

alu kulcha recipe

This particular kulcha is great even when cold and may be a great tiffin box option with suitable side dishes. I make empanadas (baked in the oven) with the same dough and stuffing and that is great for kids tiffin box, easy to hold and eat while talking to friends.

alu kulcha recipe

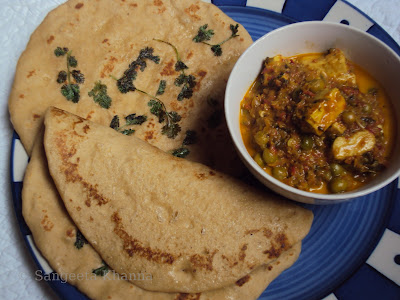
I served it with methi matar malai, a creamy curry with fenugreek leaves and fresh peas. The husband loves to dip the aloo kulchas in fresh creamy curds of fresh malai and he wants a bowl of malai (preferably) of dahi along with it.

alu kulcha recipe

See how the kulcha is crisp on the outside and soft and spongy inside...

alu kulcha recipe

I like big chunks of potatoes and not too fine onion , you can keep the potatoes finely mashed or whatever way you like. The recipe just needs to illustrate the process of baking these kulchas over gas flame basically .... the stuffing can be varied and adjusted to taste .. 

These tips and tricks to make great kulcha or naan will be handy whenever you start to make these alu kulchas. Do let me know if you try this recipe.

Enjoy...


indian flatbreads : whole wheat kulcha recipe, the way they make it on the streets of old Delhi


Kulcha is a yeasted flat bread and is commercially available in the northern India, especially in Delhi. The traditional kulcha dough is fermented with sourdough starter or the dough is left to ferment naturally and then flat breads are made in tandoor. But now a days the commercially available variety is baked in modern commercial ovens, made with yeasted dough they are soft spongy and spotless white sprinkled with some herbs sometimes.

Delhi street vendors sell chhole kulche on a typical street cart carrying a wide brass handi (urn) for the piping hot chhole. They use the ready made kulche out of packets,  just toasting the kulcha quickly on a hot griddle with some butter and serving with hot chhole. I have tasted that chhole kulchea few times and it is the best kind of street food you can find in Delhi.

Here comes the same bazar wala kulcha made with whole wheat flour ... I have tried baking this kulcha over the griddle, in the oven and in the microwave in the past and this version which involves cooking the kulcha first in the microwave and then toasting on the griddle works best to make it just like the ready made ones. They look and feel just like the ready made  kulche (when made with maida) when they are just out of the microwave, white and spotless. After microwaving they can be kept in the fridge and toasted when required. I have been getting requests from many of my friends for this bazaer wale kulche, so friends... the wait is over.

Here they are, toasted on the griddle for those brown spots....

whole wheat kulcha recipe

Before moving to the recipe i must make it clear that it is somewhat similar to the pita bread and the pizza base available ready made in the markets, but this kulcha is thinner and softer and can be folded without breaking, as is shown in the pictures. The best part is, it can be made with the same yeasted dough. Just keep the dough a bit softer and you will see how the texture of the bread changes.

ingredients...

whole wheat flour 2 cups
all purpose flour (maida) 2 tbsp
salt to taste
any oil of your choice 1 tsp
mint or coriander leaves to garnish the breads
vegetable oil for greasing
fresh yeast 1 tsp (or dry active yeast 1/4 tsp, or sourdough starter)
sugar 1 tsp

whole wheat kulcha recipe
procedure...

Heat a cup of water to 40 degree C or just warm to touch. Dissolve sugar into it and add the fresh or dry yeast to it. Keep this water in a warm place and wait till it gets frothy.

Add the maida and salt, it usually gets more frothy while adding the maida and becomes like a slurry. Whisk this slurry for a couple of minutes (it helps the dough to get a stretch). Add the remaining wheat flour and knead a soft dough adding some lukewarm water as needed.

Keep the dough in a warm place to rise and become double in quantity. At this stage the dough can be kept in the fridge too for a couple of days and then proceed with the rest of the process...bring it to room temperature and them keep it warm to proceed.

Punch the dough and make small balls, keep the balls greased and covered ....wait till they rise to double. Flatten the dough balls on a greased rolling board using your oiled fingers, brush plain water on the surface and stick some mint or coriander leaves. 

whole wheat kulcha recipe

In the picture you can see the spotless microwave cooked  kulcha on the left side in the ceramic plate, on the right side you can see how i pressed the dough with hands to flatten it on the rolling board (chakla) and then coriander leaves are stuck to it.

As I said the dough for this flat bread needs to be a bit soft, so it is a bit tacky to roll using a rolling pin sometimes, using your fingers to flatten it is far more convenient.

I prefer keeping a hot griddle ready when the kulcha comes out of the microwave, toast the kulcha with some butter and it gets lightly browned in just a few seconds..

whole wheat kulcha recipe

I served the kulcha with cheat's version of matar paneer, as I didn't want to have chhole with these whole wheat kulche. Matar paneer or any mutton curry is a great accompaniment to these whole wheat kulchas.


indian flatbreads : recipe of whole wheat naan, tips and trick to make naan at home


There are many types of Indian flat breads and the most common is our daily roti or chapati .The roti can get thinner to make roomali roti and a bit thick and fluffy or flaky to become a rot or moti roti of several types.

The leavened breads are kulcha or naan. Naan and kulcha can have many variants further. Parathas are shallow fried flat breads made in a zillion avatars, plain, spiced, stuffed or layered. Parathas can be folded or rolled to make a hundred something layers or stuffed with sweet or savory goodness.

Oh and then there are the fried pooris .... are you till counting ??

whole wheat naan baked on griddle

Forget it. Just think about what suits with your curry the most and get going. I had a few requests for whole wheat naan and kulcha recipes and I was procrastinating as usual. The credit goes to GB who writes a wonderful blog Peacocks and Paislies, she requested for naans and kulchas while complementing my blog hugely. See what complements can do to me :-)

So I made naans and kulchas and there will be a series of posts on these flat breads. In this post I am including two versions of naan, one is baked on a gas stove and the other is baked in an oven, both of them using the same whole wheat dough.

whole wheat naan baked on griddle whole wheat naan baked in oven

The ingredients ...

whole wheat flour 1.5 cup
all purpose flour 1 cup
egg 1 no.
fresh curds 3/4 cup
baking powder 1 tsp
baking soda 1/2 tsp
salt to taste

Procedure for the dough...

Mix the flours and the baking powder, baking soda and salt, make a well in the center and break the egg into it. Add the curds too and mix the liquids first and then incorporate the flour into it adding a little water to make a soft pliable dough. Keep the dough aside for an hour or so. In the fridge it keeps for a day.

Procedure to bake the naan on gas stove ...

Heat a tawa or griddle. Keep a shallow bowl of water nearby.

Make small balls of the dough depending on the size of naan you want. Flatten the balls either by tapping your palms or on the rolling board. A round, oval or a typical drop shaped naan can be made as required. To make it drop shaped you have to pinch one side with your thumb and index finger and pull to stretch, though it is optional.

Dip the flattened naan in the bowl of water and spread on the griddle in one quick motion. If you are patting the naan flat using your palms, you will need to wet your palms to flatten them smoothly and then the naan will be already wet and needs not be dipped into the bowl of water.

whole wheat naan being baked on griddle

A wet naan will stick to the griddle until it is cooked properly even if you invert the griddle, which you are going to do just after this. Wait till small bubbles appear on the surface, patting or rolling the other naans at the same time, if you are used to making chapatis it's not at all difficult. 2-3 naans can be baked on the tawa at a time and this makes it so easy for the cook, especially when you have to bake too many naans. Now is the time to invert the tawa over the gas flame to cook the naan on the other side and to get those spots...

whole wheat naan being baked on griddle

Keep the flame under control as you don't want charred naans. The naans will get unstuck as soon as they are cooked through, use a pair of tongs to remove them. Butter them lightly immediately by rubbing a cold cube of butter over them, or you may want to serve it with a blob of butter melting enticingly.

Serve right away as the crisp exterior and soft flaky interiors of the naan are best when hot, once it cools down it becomes soft, still good but everybody likes a hot naan and you know that.

whole wheat naan baked on griddle

We had this naan with chicken n chickpea curry, that is, our chicken chhole with some spinach thrown in, a healthy meal. Most of the people love the naan with a butter gravy but it's a rarity at our place ...

chicken and chickpeas curry with naan


I personally like this tawa baked naan, you may like it baked in the oven so I made that way too....

baking the whole wheat naan in the oven...

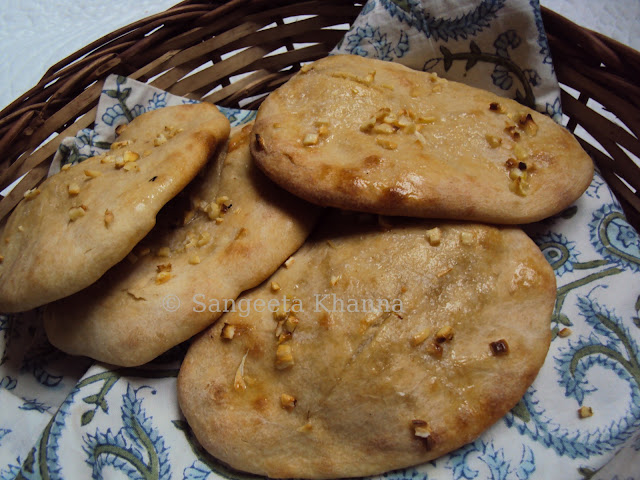
Flatten the same dough and arrange on a greased baking tray. I spread finely chopped garlic and little butter on top of the naans to make garlic naan. Garlic paste or chopped garlic can be added to the dough if you like it that way.

whole wheat naan baked in oven

Bake till pinkish brown, insert a knife under the naan to see if the naan is cooked through. It should get unstuck promptly and should be lighter in weight. You may want to butter them again before serving....

whole wheat naan baked in oven

As I mentioned, I personally like the tawa baked naan as it seems easier for me to make (or for anybody who make chapatis everyday) plus this one stays soft and flaky even when it has cooled. The oven baked whole wheat or even maida naan gets a bit chewy so consume those right away.


Tips and tricks to make great whole wheat naan at home...
  1.  Knead the dough really well by stretching and folding it several times till it gets elastic. It imparts flakiness in naans.
  2. Keep the dough soft and sticky if you can manage. It gives a nice crust and the crumb remains soft and flaky that way.
  3. It is best to make the dough balls in advance and keep them covered with a wet cotton napkin. Pat it with hands or roll with soft pressure. This allows the naan to become more fluffy.
  4. Wet the naans before patting them on the griddle. It helps to achieve a great crust and the naan sticks to the griddle giving you a chance to invert the griddle and flame it for a while. This gives you results closer to an actual tandoor.
  5. Serve the naans immediately after being baked, topped with butter. If you need to keep them for a while you can butter them and stack them over a cotton napkin. It helps the naans stay warm till served and soft too. Once buttered the naans can be reheated on flame if required.


Now a quick recipe of chicken wale chhole....


Chicken (boneless breast pieces  are used for this. A large piece including the backbone and ribs is boiled along with the soaked chickpeas so that all the chicken flavor comes into the gravy.

Then a bhuna masala paste is fried along with the boneless chicken pieces on low heat, till the chicken gets cooked. The boiled chickpeas are added and given a good boil. I added baby spinach and coriander leaves in the end and served hot with these hot naans.

chicken and chickpeas curry with whole wheat naan

One thing to take care while making the naans with whole wheat flour, it will not be as soft and flaky as the white flour ones but it's perfectly good otherwise. They are soft with a nice bite (and not chewy as the maida ones get as soon as they get colder even while eating) and the flaky character of naan is retained to a lesser extent.

This recipe of naan is mostly followed by the restaurants because it is quick and doesn't need yeast or sourdough. But in homes it was made with sourdough always. If you want to bake sourdough whole wheat naans and kulchas you can follow the sourdough recipes here.

Hope this post helps you bake whole wheat naans easily at home. Do write to me for queries and feedback. I always appreciate hearing back from you. 


Saturday, November 20, 2010

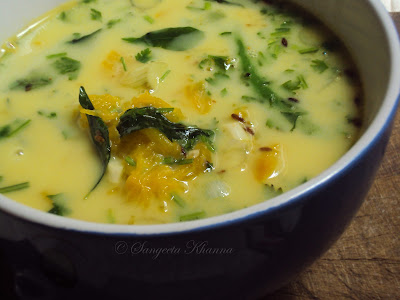
Olan made with pumpkin | the Kerala Olan suited to our taste | pumpkin curry with coconut milk


I was never sure if I would like Olan made with pumpkin but since I love all the curries and stews made with coconut milk, I knew it was close to my comfort zone. I was still apprehensive whether others in the family will appreciate the taste.

I love yellow-orange fleshed ripe pumpkin, so whenever I used to see those olan recipes on some blogs, it was like a visual treat always. This recipe by Gauri looked really light and flavourful and I decided to cook Olan with a firm ripe orange flesh pumpkin.

Pumpkin olan recipe

I used coconut milk from a tetra pack and I am sure freshly squeezed coconut milk can make a lot of difference to the dish. But I think as the recipe is so easy to put together, any beginner in the kitchen would feel elated to concoct a beautiful looking curry with ease, especially if canned coconut milk is used.

Fresh coconut milk should not become an issue with this recipe at least. So go ahead and make it with canned coconut milk.

Pumpkin olan recipe

ingredients...
(2 servings)
coconut milk 1/2 cup
pumpkin cubed 2 cups
water 4 cups
spring onions 2-3 nos.( only the lower halves )
curry patta 3-4 springs ( i refrained myself from using a lot of these and saved the olan )
green chillies slit length wise 2-3 nos.
green coriander leaves with stems , chopped finely 2 tbsp
cumin seeds 1 tsp
coconut oil or vegetable oil 1 tsp
salt to taste

procedure...

Boil the pumpkin with water and salt to taste till the pumpkin is mushy.

Heat oil in a pan and throw in the cumin seeds, wait till they splutter and add the green chillies and curry patta. Stir for a while as the green chillies and curry patta start twisting and getting aromatic.

Add the roughly chopped spring onions and coriander leaves. Both these ingredients are my own addition to this curry and I found them really good in the curry. You may wish to exclude them and the curry will be great that way too. The spring onions have to be cooked just till they get shiny and soft, not pink or brown.

Pour this mixture of stir fried ingredients to the boiling pumpkin and stir to mix.

Add the coconut milk and allow another boil before turning the heat off.

Such a simple curry for a side dish. I am getting new ideas with these flavors and you will see me coming up with some more on this. We had the olan with our regular dal roti meal. Here you see a maah chhole palak daal (urad chana daal cooked with spinach), muli ka saag and the olan with chapatis.

Pumpkin olan recipe

I was apprehensive if my mom would like it as she does not like any watery curries. She is always suspicious of my curries tasting 'healthy', that kind of mother :-)

But she just loved it when I served the leftover olan with a matar paneer, raita and bhujia kind of lunch.

One very impressive aspect of this recipe is that the pumpkin is cooked in water first, just like making a soup and then a tempering is thrown in to make it very flavorful.

As healthy as it can be, this technique is not followed in any of the curries in the North, as much as I know. Not for vegetables at least, lentils are always boiled first and then the masala tempering is added and cooked again.

Pumpkin olan recipe

I have never tasted an authentic olan so the recipe may result in a different flavor than the southern homes but I loved the curry with these flavors to start with and may be in future when I come across a purist recipe I might give that a try.

Do you have a link of a purists olan ?? I will be more than happy to get a few links of yummy olan made with just the pumpkin. Come on share it with me here.

Thursday, November 11, 2010

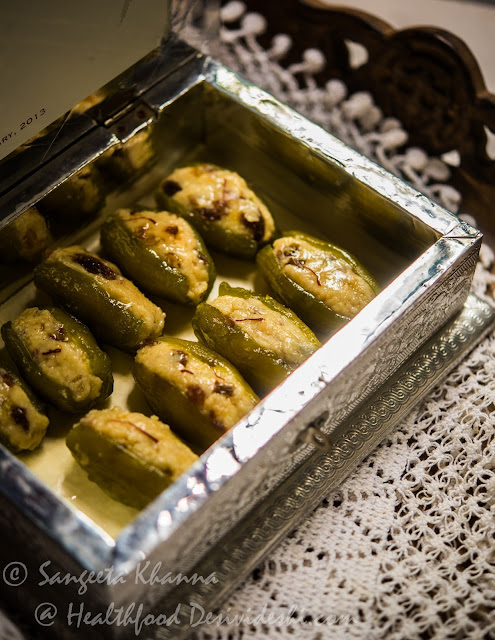
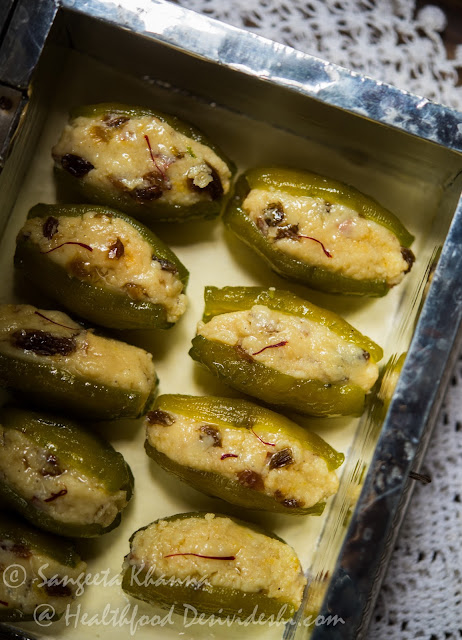
how to make parwal ki mithai | khoya stuffed candied parvals


parval ki mithai

Parval ki mithai is definitely a genius work of someone who had this idea to turn a vegetable into a delectable mithai.

Parval (pointed gourd) grows really well in the Indo-Gangetic plains and there are a few cultivars of this vegetable that taste really good when cooked to make alu parval ki bhujia or even parval ka chokha. Stuffed parval ki kalonji is something every family cooks at least once a fortnight in eastern UP.

parval

When the same parval is stuffed with mithai material it transforms into something else literally. I remember how I used to be a reluctant mithai eater always but would look for a parval ki mithai in the assorted sweets dabba whenever someone brought a mithai gift. There is a tradition in UP to carry a dabba of mithai to your host whenever you visit.

parval ki mithai

Later when I started making a few mithais at home, the rasgulla and parval ki mithai were the most frequent. The reason why I make mithais and other desserts at home is that I am a little paranoid about the synthetic colours, silver foil and too much sugar used in the commercial mithais. Although most Indian mithais are relatively safe to eat but one must watch out for synthetic colours used.

They use green colour to make the parval look bright green in the mithai shops. The stuffing has now deteriorated too with spurious khoya and some leftover mithai material being stuffed after dehydrating everything. A few such experiences in the past have actually made me positively allergic to mithai shops.

I started making this parval ki mithai a few years back when a tribal subziwala (a vegetable vendor) used to knock my door whenever he could not sell his tokra full of vegetables. Parvals, lauki and green papaya was always there in his basket and as I could never refuse him, I always ended up buying 2-3 kilos of each of these vegetables. And then he used to get treated with this mithai too. My friends in Dhanbad tell me that he still remembers me. Not for this mithai but for buying all his stuff.

Oi khanna boudi onek shobji kinten he says (that khanna lady used to buy a lot of vegetables)  ...

Normally a whole parval is slit from one side, innards emptied, cooked in syrup and a khoya filling is stuffed inside. In the mithai shop version the filling is not visible mostly and the parval looks just green on the outside, the slit covered with a silver foil.

I never use silver foil in my cooking for obvious reasons and I find making boat shaped mithai with the fillings visible as a topping more attractive and practical.

ingredients....

parval 500 gm (choose equal sized ones, I used 9 parvals to make 9 mithais )
sugar for syrup 1 cup ( if making it my way )

for filling ...
homemade khoya 1 cup (about 250 gm )
finely chopped cashew nuts 3-4 tbsp
finely chopped almonds 3-4 tbsp
chopped raisins 2-3 tbsp
green cardamom powder 1/4 tsp
saffron threads a generous pinch

procedure...

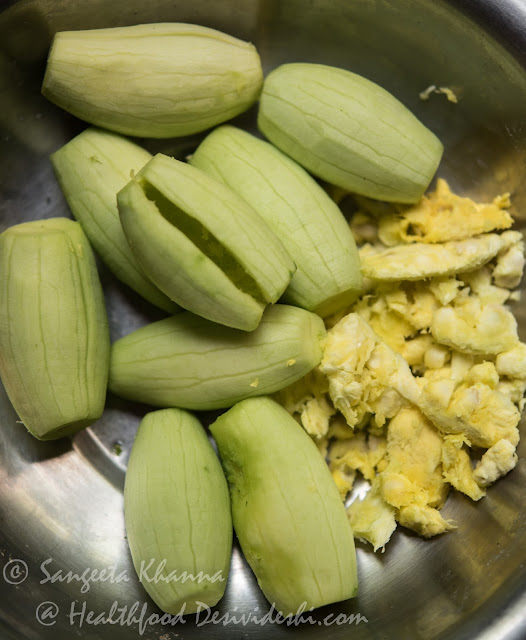
Peel the parvals using a potato peeler.

Make a slit and remove the innards using a melon ball scoop or just using a paring knife. 

prepared parval for making parval ki mithai

Boil enough water (to submerge all the parvals) in a wide pan with the sugar. Dunk the peeled and emptied parvals in simmering sugar syrup and cook till done. Keep stirring in between and turning the parvals so they cook evenly.

The syrup starts frothing when the parvals are nicely candied and yet wet and sticky. The syrup should not dry up but remain a honey like consistency. There will be very little syrup remaining in the end.

Now fish out the parvals and drain them into a colander propped over the same pan so the sugar syrup drains back into the pan. The syrup can be used to make something else as it will not be used in this recipe any more.

Make khoya using this method of home made khoya in microwave. You can cook the milk powder mixture into a pan on low heat to make a nice granular khoya. Use ready made khoya if you get good quality.

Add the chopped nuts and raisins, saffron and mix well. No need to add sugar to this stuffing.

Now make lime sized balls of the khoya stuffing. Elongate the ball of stuffing by pressing into your fist or rolling between the palms, prop open the candied parvals and stuff the khoya mix into it.

You would actually need to wrap the candied parval around your stuffing if you want more stuffing into each parval ki mithai. Pinch the ends to make them look pointed as the raw parval looks. Repeat with each candied parval and make more parval ki mithai.

parval ki mithai

The process doesn't take more than 40 minutes for 9-10 pieces of parval so I would say it is fairly easy to make from scratch. There will be some khoya mix left after making this quantity if the parvals are small or you could not fill so much.

Make stuffed paratha with the khoya mix, that khoye ka paratha is also a Banaras special that many people crave for.

parval ki mithai

The end product of this exercise is sensational. Especially if you love this mithai. A forgotten gem amongst the Indian mithais. 

Earlier I used to make open faced parval ki mithai too. Here is a picture to show how I used to halve the parvals and make 2 mithais out of one parval.

parval ki mithai

Make the way you like it and let me know if you try this recipe.

Many other summer gourds are made into mithais and I intend to share the recipes some day. So much to do so little time.


Tuesday, November 2, 2010

lemon pound cake served with a quick butterscotch sauce...


I baked a lemon cake for Arvind's birthday after spotting a few plump lemons in my garden . The lemon tree is laden with green lemons but they are not yet ready to be juiced or zested . I spotted a few of them just fragrant enough for a nice lemon cake .


But the flavors were not a bit close to the lemon cake i used to bake some years ago when i had a gondhoraj lebu ( a variety of large lemons with a think and very fragrant rind ) tree in my garden . That gondhoraj lebu was so good for making cakes and lemon tarts , i am looking for a seedling of that variety just for the lemon cakes and tarts we so used to enjoy.


Baking a lemon cake is anyways a great thing as the home is filled with a nice lemony fresh aroma and anybody entering the house is tempted to snoop into the kitchen . Lemon pound cake has been a long time favorite with both of us and whoever has been visiting when the cake was baked.

And the quick butterscotch sauce is as aromatic while being cooked , it sizzles on the flame and makes me drool with a chocolaty caramel aroma .........so well complemented with lemon cake . I made the butterscotch sauce thin so that the cake is soaked well , thick butterscotch sauce is suited for ice creams and trifles .


The cake is a normal pound cake where the cup measurements are so convenient even a child can whisk and bake them..

ingredients for the cake ...
maida ( APF ) 2 cups
butter 1 cup
sugar 3/4 cup ( 1 cup can be used when the cake is not topped with butterscotch sauce )
eggs 4 nos
lemon juice 1 tbsp
lemon zest 1 tsp
salt a pinch
soda bicarb 1/2 tsp
baking powder 1.5 tsp

procedure....

Sift the maida , soda bi carb and baking powder together to mix them well and keep aside.

Whisk the eggs in a small bowl . Whisk the butter and sugar in another larger bowl till light and creamy . Add the whisked eggs slowly and keep whisking till a creamy frothy consistency is achieved . Add the lemon juice and lemon zest and whisk to mix .

Add the flour and fold the batter to make a homogeneous batter. Pour in a greased tin and bake for about 25 minutes at 200 degree C . Insert a skewer to check if the cake is cooked .


It is a lightly sweetened cake and great with a cup of tea any time of the day...


As a dessert it is complemented very well with this runny butterscotch sauce ...

ingredients for the butterscotch sauce...
sugar 1 cup
salt 1/2 tsp ( or 1/4 tsp if you don't like the hint of salt )
heavy cream 1 cup
milk 1/2 cup or more if you want it more runny
cocoa powder 3 tbsp
vanilla essence 1 tsp ( i used butterscotch essence which my sister had gifted me )

Pour sugar in a pan and heat to caramelize , as soon as it starts melting and getting golden colored add the cream and let the mixture boil . Mix cocoa powder with the milk and pour into the boiling mixture . Let it boil vigorously once again . Add  salt and take off heat. Use hot or cold as required.


A runny sauce is very well soaked into the cake and it was great this way . For ice cream topping it is better to keep the sauce thick so do not add any milk in that case.


You may like a thicker butterscotch sauce sandwiched between the slices of cake .... chocolate and lemon are the hottest of flavors and eat the way you like it.....


Thursday, October 28, 2010

kalonji ...... the masala stuffed vegetables...


In the eastern part of UP there are a lot of spicy hot fried vegetable preparations to go with a daal-chawal lunch . Kalonji is the name for masala stuffed vegetables ,and the vegetables used for this are parval ( pointed guard ) , karela ( bitter guard ) , bhindi ( okra ) , baby sponge guards , baby egg plants etc. While the spices for stuffing are usually different for different vegetables , like my mom used to make a mustard spice mix for baby egg plants , a onion and raw mango based spice mix for karelas and a ginger-garlic-onion and garam masala mix for parval , bhindi , baby sponge guards and potatoes .

Potatoes are halved and slit along the length and then the furrows are stuffed with the same spice mix and they taste really good .  Unlike other stuffing where a paneer , boiled potato , chick pea mixture or coconut mix based masala is used for the stuffing , this kalonji uses this spicy hot garam masala mix . Stuffed in small quantities the spice mix makes the vegetable really smoky hot .... i made it with parval and potatoes this time but the same stuff can be used for any vegetable you wish .


ingredients for the spice mixture...

onion 1 no.
garlic 8-10 cloves ( indian garlic)
green chillies 3-4 nos.
whole dry rad chilly 1 no. ( or more if you like it hot )
ginger 1 inch piece
turmeric powder 1tsp
coriander seeds 2 tsp
cumin seeds 2 tsp
black pepper corns 2 tsp
cloves 3 nos
black and green cardamom 1 no. each
half a star anise or 4-5 petals of the whole star anise
bay leaves 2 nos ..scissor cut in small bits
amchoor powder 1-2 tsp ( according to taste )
salt to taste 
 mustard oil 1 tbsp
procedure....

Make a coarse paste of onion and keep aside .

Make a fine paste of all the other ingredients except mustard oil , salt and amchoor . Keep aside.

Heat oil in a thick base kadai and pour the onion paste in it . Fry till the onion gets shiny and soft , add the other paste and fry on low heat for a good 5 minutes .

Add salt ( just a bit more than needed for the masala paste ) and amchoor powder and fry the masala paste till the oil starts spluttering a bit . The masala paste starts sticking to the pan while frying but keep scraping and turning to roast it well. A nice aroma of bhuna masala is an indicator to put off the flame.

Now prepare the vegetables for stuffing. about 8 parvals and 4 halves of potatoes can be stuffed with this much of masala paste , but it depends on how much masala paste you would like inside each kalonji ...

Scrape the parval and make a side slit . Emptying the contents is not needed but if there are seeds they are better removed.Blanch in salted water and keep aside .

Peel and cut the potato in two flat halves , now make two or three slits to make it look like the picture . rub salt over it or blanch along with the parval.

Stuff the masala inside the parval and in the furrows in the potato halves.

Shallow fry in a flay base pan using minimal amount of mustard oil. Do it on very low flame and keep turning the vegetables so that they get cooked and browned on all sides .

Some of the masala paste seems to burst out of the seems but it is okay to let it be like that as the over browned masala tastes great with these kalonji....


With hot daal chawal topped with some ghee ... this is the ultimate side dish for most people of eastern UP ....... stuffed vegetables are made in many more ways in other parts o the country but this is the age old recipe of kalonji .... or tawa fry as some people prefer to call it now....

I like it rolled up in a kathi roll too with some fresh salad ........

Monday, October 25, 2010

everyday subzi | guar or cluster beans: two stir fries and a wonderful sesame curry paste


I never knew that the slightly bitter tasting gummy textured Guar can be a favorite of so many people.

guar or cluster beans

love these beans called cluster beans in English but never thought of posting a recipe because not many people like this vegetable. That concept of mine was proved wrong when I posted Guar dhokli ki subzi, as I received many requests for posting more recipes of these beans. Here I am with two simple stir fries I love, cooked with guar phali or cluster beans..

 guar ki lasuni bhujia... 

guar or cluster beans bhujia

This is the simplest of all stir fries especially if I use the green chilly and garlic paste stored in my freezer . I make this lasooni bhujia with many vegetables like raw plantains, parval (pointed guard), tendli or kundru (ivy guard), bhindi (okra), arbi (colocasia) or yams, jack-fruit or even potatoes. The green chilies and garlic paste comes handy for so many things, it is always there in my freezer and I just scoop out required quantity and a yummy bhujia for our daal chawal is ready.

For Guar you need to string the beans. Good quality guar is plump and soft and strings easily. Then it is held in a bunch, rolled together and chopped in small bits ......

guar phali ki bhujia

For the lasooni bhujia you need 
(for 4-5 servings as a side dish)

250 gm of guar chopped
1 tbsp of mustard oil
1 tbsp of green chllies and garlic paste
1 tsp fenugreek seeds for tempering (I like it, can be replaced with cumin seeds or nigella seeds as per choice)
turmeric powder 1 tsp
salt to taste

To proceed ... heat mustard oil in a kadai or pan, throw in the tempering spice of your choice , wait till it splutters and them throw in the chopped guar. Stir fry adding salt and turmeric till the guar becomes shiny and a bit soft (not mushy). Add the green chilly garlic paste and a tbsp of water if the mixture is getting too dry. Cover and cook for a couple of minutes, stir to mix and cook uncovered till nice aroma of garlic wafts through.

Adding a little water with the paste and then covering the pan to cook is crucial in this simple recipe as the flavors of garlic and chillies are absorbed well by the vegetable and you do not get sneezing bout due to frying/burning chillies. This is particularly crucial if you are frying raw plantains or potatoes or any kind of yams this way ...


guar in sesame spice mix...

guar phali ki bhujia

This spice mix has been a hit in my house since I developed it after making a healthier version of baghara baingan and then made a cabbage stir fry with it. It has been tried by many of my blogger and non blogger friends and has become a favorite in no time. I have myself used this spice mix to make many vegetables yummy  for family and guests and every time it has been a topic of conversation....

The sesame spice mix requires ....
sesame seeds 5gm
dry grated coconut 2 tbsp(25-3gm)
dry red chillies 8-10 nos. (to taste)
peanuts 50 gm 

Dry roast everything separately and then grind together when cooled. Some people have tried it without roasting and stir frying the vegetables after adding it for a few more minutes, but I strongly recommend dry roasting the seeds before making the powder (the powder will be a crumbly pasty one due to the oil content of the ingredients) ....it adds a whole lot of flavor believe me..... the paste/powder keeps well at room temperature for a fortnight and for six months in the fridge.

requirements for the guar with sesame curry paste ...
(for 4-5 servings as side dish)

Guar chopped 250 gm
potatoes chopped in small bits 1 no.
tomatoes chopped in small cubes 1 no.
cumin seeds 1 tsp
ginger chopped fine 1 tbsp
sesame curry paste 2 tbsp (or as much you like it)
mustard oil 1 tbsp
salt to taste

preparation...

Heat oil in a kadai and throw in the cumin seeds and wait till they splutter. Add the chopped ginger first and then the chopped guar and potatoes at once with salt and stir to mix well Cover and cook till 3/4 done , add chopped tomatoes and mix well. Keep stirring and cooking till the tomatoes get mushy. Add the sesame curry paste and a tbsp (or more if you wish to have some gravy, use more sesame paste in that case) of water, mix well to coat the vegetables and it's ready. Take off heat and serve hot ......... A toasted sesame aroma will fill your kitchen and you suddenly feel hungry ....... believe me.

You may feel like adding a bit of tamarind extract or lemon juice, but here I like it with just the slight sourness of tomatoes. Adjust seasonings to your taste that's it.

guar phali ki bhujia

A garnish or toasted sesame seeds looks good but it does not enhance the taste.

The taste is in the sesame paste. Try it once and you will be hooked to it. I will post other vegetables cooked with the variations of this paste very soon. A bit of tempering or a bit of garnish, different cuts and different cooking techniques, all of these make difference in your finished curry or bhujia.....

cheers ....