Showing posts with label chicken. Show all posts

Monday, March 5, 2018

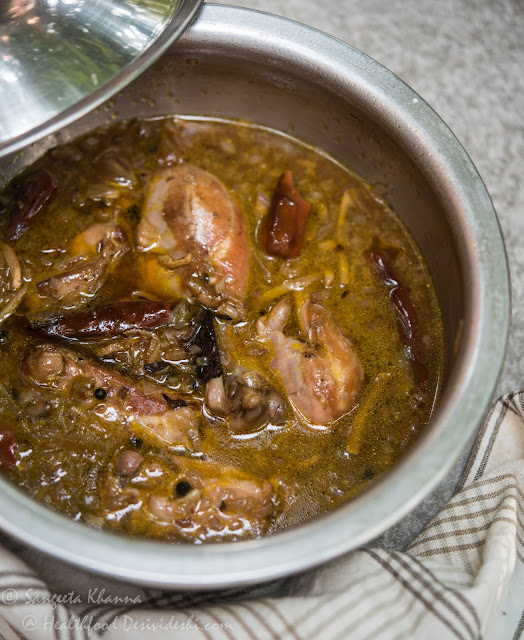
Chicken Biryani Awadhi style


Chicken biryani is useless unless each grain of rice has intense flavour of chicken in it in my humble opinion. Else the chicken Tahiri is a much better choice for great flavour and soft cooked rice. I prefer soft cooked rice even in biryani but each grain of rice should be separate and firm too, khila khila as we say in Hindi. Many biryani makers use parboiled basmati rice for biryani because handling raw long grain rice for biryani is a skill and it breaks or makes lumps if not cooked accurately.


chicken biryani awadhi style

Actually cooking even plain boiled rice is a skill that one needs to learn as this is one of the most basic kitchen skill that many ignore. So when all the main dishes are cooked well and the rice turns up either too hard or too mushy, it spoils the whole meal in my opinion. Rice should be cooked well, soft cooked and still each grain separate and khila khila (fluffy) to soak up the flavours of the curry or dal it is served with. All the hotels serve rice which is too dry for my taste and doesn’t really soak up the curry or dal, I skip having rice always when dining out.

For biryani the cooking technique of rice becomes even more tricky and of one is cooking biryani in bulk it really needs a methodical approach and a not a casual attitude. Here I will talk about a homestyle biryani where the rice is cooked in yakhni (the meat stock) and the separately cooked meat is added in layers when the rice is cooked half way. This particular chicken biryani is made with chicken wings as I was planning to make chicken soup and we decided for biryani instead, but I love wings with skin so it was not a bad idea.

Chicken used for biryani should always be with skin to add more flavour to the rice grains I believe.

Also for 200-250 gm rice there should be 500 gm chicken as rice expands almost three times when cooked well.

Ingredients
(3 portions)

500 gm chicken wings
200 gm rice (I used sugandha basmati form Hansali farm)

For the yakhni
4 tejpatta (Indian bay leaves)
2 black cardamoms
4 green cardamoms
1 star anise (optional)
8 cloves
2 sticks of Indian cinnamon
½ tsp salt
600 ml water

For the chicken wings in masala
The boiled chicken wings retrieved from cooked yakhni
2 onions sliced thinly and browned in 1 tbsp ghee
1 tbsp ginger garlic paste
1 tsp special garam masala
1 tsp red chili powder (or to taste)
½ tsp pepper powder
½ tsp cumin powder
1 tbsp ginger julienne
2 tbsp ghee
Pinch of saffron powder dissolved in 1 tbsp water (for layering)

I like adding a few whole peppercorns to this too, you can also add if you like.

Preparation

Rinse the rice, drain water and let it soak for 40 minutes or till the yakhni gets ready.

Mix all ingredients for yakhni and cook on very low flame for 40 minutes. Strain the stock and save, retrieve the chicken wings and discard the whole spices. The stock should be 400 ml by now, else reduce it to 400 ml in a thick base handi or pan or add water to make up the volume.

Add the soaked rice to boiling yakhni and let it simmer on low heat for 10 minutes. It will take more time if the quantity is more. You are supposed to cook the chicken wings in masala in these 10 minutes.

Now heat the ghee, add the ginger garlic paste and bhuno till ghee separates. Now add the cooked chicken wings and toss and let it get pinkish brown slowly. Add all the powder spices, ginger julienne and whole peppercorns if using and cook till the spices get aromatic. Add 1/2 cup water and simmer for 5-8 minutes. Reserve the cooked chicken wings in masala till the rice is half done, almost 10 minutes for this quantity.

For this small batch of biryani I just quickly remove half the rice cooking in handi and layer the chicken in masala, cover with the rice taken out, sprinkle with saffron water and seal the pot. For larger quantities you have to be more methodical.

Once the pot is sealed with a tight fitting lid or with the help of dough between the margin of pan and the lid, it can be either baked in the oven or can be placed on a griddle on gas stove for dum cooking. The extra layer of griddle at the base of the pan ensures the rice cooks in the lowest possible heat and the aromas mingle well. It needs to cook on dum for 20-25 minutes and then rest off the stove for at least 10 minutes before serving.

Serve the biryani hot with some raita or kachumber salad.

Tuesday, January 24, 2017

murgh ki tahiri | a one pot chicken and rice dish


Murgh ki tahiri or chicken tahiri is one of the comfort foods we love, sometimes more than Biryani because of the simpler flavours and the fact that the chicken tahiri is more moist than a chicken biryani.


One pot meals are a norm on my table. I love such meals because one gets the comfort of a good meal in just one dish, not much because it involves lesser work in the kitchen but the taste and warm comfort such meal bring. Our tahiris and khichdis are not so simple to cook as they sound most of the times but we love such meals for many reasons other than that.

In fact if you think of it, most one pot meals involves as much work as any other meal if you are including all major nutrient groups in one pot, especially the vegetables. You do all the chopping, you do some sauteing, tempering and whatever needed, only the ingredients are cooked in one pot. And most of the times our tahiris and khichdis are served with an appropriate raita that needs additional work but no one minds that.

ingredients
(2 servings and may be some leftover)

2 legs of chicken cut in 3 pieces each
1/4 cup of rice
1 cup of fine diced onions
1/2 cup of chopped coriander leaves (dhaniya patta) along with the stems
1/2 cup of finely chopped fenugreek (methi) leaves or a handful of crushed dry kasoori methi (optional)
1 tbsp minced ginger
1 tsp minced garlic
chopped green chilies as per taste
everyday curry powder 1 tbsp
special garam masala 1/2 tsp
turmeric powder 1/2 tsp or lesser
salt to taste
2 tbsp ghee
1 tsp cumin seeds
2-3 tejpatta (Indian bay leaves)
1 tsp lemon juice mixed with 1/4 cup water 

procedure 

Rinse the rice, drain water and keep for 10-15 minutes till you proceed with the chicken and spices.

Heat ghee in a thick base handi or stockpot. Add the cumin seeds and wait till it gets fried and aromatic. Tip in the onion, ginger and garlic and fry on low heat till it starts getting pinkish brown.

Add the fenugreek leaves or crushed dry kasoori methi if using and the chicken pieces. Keep bhunoeing (sauteing) for about 5 minutes on medium heat. Add the powder spices and salt, stir and cook some more till the spices become aromatic and the chicken looks a little glazed. Add the chopped dhaniya patta and stir to mix.

Now add a cup of water and let the chicken cook covered for 10 minutes. Heat a griddle on the other side of gas stove in the meanwhile.

Add the rice and the lemon juice mixed with water, mix well and cover the pot tightly. Place the hot griddle under the tahiri pot and let it cook on very low flame for 10-12 minutes. Switch off the flame and let the pot sit for another 10 minutes before you open and serve the chicken tahiri steaming hot.


It tastes best with raw onion and pomegranate raita but you can make cucumber raita or any other raita you like. We like it even with a kachumber salad of tomatoes and onions and may be some flame roasted papad too. In fact the chicken tahiri can have many side dishes on the table, have it as simple as you wish or make it elaborate with as many side dishes you wish to have with it.

Chicken tahiri or murgh tahiri will never fail to comfort you warmly and softly like a grandmother. Trust me.

We had it for dinner last month sometime between our back to back travels and the pictures were taken in a hurry to document it. Otherwise I have rarely been able to click pictures of our tahiri meals although we have tahiri quite often.


Sunday, August 11, 2013

murgh safaid qorma : a white stew with chicken and almond paste..


Safaid qorma or safed korma or chicken or murgh safeda as it is called in Banaras, this delicately flavored chicken stew is easy to make and creates a stir every time I cook it. Actually all the white curries we make are very curiosity inducing among the guests and extended family. While many light colored curries are popular in UP, all of them using some or the other kind of nut paste as a base, a pure white curry is something people keep coming back to. Second and third helpings are normal as the stew is not spicy as well. Very delicate flavors or spices used and a rich broth of chicken make this stew quite interesting. Although I would suggest to serve this stew along with some more spicy side dishes, at least a spicy raita or green chutney and raw onion slices if you are cooking it as a routine homely meal, we prefer this stew with just warm fluffy home baked naans.

ingredients...
for 8-10 servings

To simmer together..
8 -10 chicken thighs on bone cut into 3 pieces each
1.5 L water
ginger garlic paste 2 tbsp
4-5 black cardamoms crushed lightly
8 green cardamoms
20 cloves
2 large sticks of cinnamon (dalchini)
2 tsp lightly crushed pepper corns
salt to taste

200 gm almonds, soaked for 3 hours
a cup of full fat milk or a bit more
2 pinches of nutmeg powder
1 tsp of cinnamon powder

Yes, there is no additional oil used in this stew. All the fat me from the chicken, the nuts and the full fat milk used.

procedure...

Put everything under the simmer together list in a deep wide pan or stock pot and simmer for about 1.5 hours. There will be a lot of scum during this, you can remove it if attending the simmering pot or let collect on the top. Keeping the pot half covered makes sense or just place a loosely fitting lid over it.

Mean while, peel all the almonds and make a nice smooth paste adding the milk if required. Add the nutmeg and cinnamon powders to this paste and blend once more to incorporate. Keep this paste aside.

Remove all the chicken pieces from the simmering broth and put them all into a kadhai, removing any scum if it get stuck to the pieces. Now strain the stock over the chicken pieces and discard all the scum and whole spices that collects into the strainer. This is a trick to get a clear smooth and pure white gravy for this stew.

Now add the almond paste and the milk, adjust seasoning by adding salt if required and simmer for 5-8 minutes more. Serve hot or warm with your choice of accompaniments.

We have served this stew with biryanis, with naans and with an elaborate meal many times and the chicken safaida was appreciated well by the guests every single time I cooked it. The stew is very lightly spiced but you can adjust the spiciness to your taste.

I make it a point to adjust the heat into this stew according the preference of people having it. Adding some white pepper powder, some yellow chilly powder and simmering a few slit green chilies in the first step helps getting some heat into this stew. But we like it the way I cooked this time.

Do let me know if you try this chicken safaida. I have posted a mutton safaida or gosht safaida as well and that is a frequently repeated recipe at my place too. Another whitish curry called chicken rezala is also a white chicken stew, another chicken stew mughlai style is whitish but way different from this one, and a chicken in a creamy white gravy. All these are favorites, but get made according to what we are planning on the side. Try all of these and see which one you like.

You can always cook these curries with vegetarian options too, paneer and lightly fried cauliflowers will be wonderful in this curry I feel.

Monday, July 8, 2013

dhaniya pudine wala hara murgh | chicken curry with mint coriander gravy....


Hara dhaniya pudina wala murgh or chutney wala chicken, these are the names we have given to this green curry I make. Many of my friends have been complaining I don't post everyday chicken recipes much and today even a young daughter of my old friend asked me the same question. She lives and works in Senegal and wanted to have a few quick chicken curries for herself. I found this poor quality picture in my albums but who cares when the recipe works.

Here is a quick recipe of a chicken that has been repeated the most in my kitchen whenever I want a quick and light chicken curry either for the two of us or to serve to a gathering is there are other heavier side dishes. This curry has been loved immensely by everyone who tasted but unfortunately I never got to click a picture ever. The reason is, I mostly make this curry in a hurry or when I am exhausted but want a tasty filling meal for ourselves. This time too I clicked a quick pictures just before serving it without any garnish. Actually this curry wont require any garnish ever.

Since the curry is simple, just a paste to be made, chicken to be marinated for 2-3 hours or overnight and then everything simmered on low heat for about an hour. Yes, an hour is a good time and I say that I cook this curry in a hurry. See I work from home and simmering the curry for an hour on very low heat suits me well. No stirring, bhunoeing or frying involved and the green paste can be made ahead.

ingredients...

3-4 chicken thighs cut into 3 pieces each (preferably with skin)
300 gm of coriander greens along with stem
3-4 fat roots of coriander (reserve from the coriander greens and clean well)
mint leaves 50 gm
green chilies 5-6 or to taste
(this recipe uses many citrus flavors so it consumes more green chilly that normal)
ginger root chopped roughly 2 tbsp
4-5 fat garlic cloves
1 heaped tbsp of cumin seeds
salt to taste
lime juice 1 tbsp or to taste

procedure...

Make a fine paste of everything except the chicken. Add about 1/2 cup of water to make the paste in your food processor.

Marinate the chicken in this green paste and refrigerate for at least 2 hours. If you plan to keep it overnight, do not add the lime juice as it makes the chicken quite tart. Lime juice can be added at the time of cooking.

At the time of cooking, transfer the ingredients into a thick base pan and simmer or low flame for about an hour. Check after 40 minutes and take off fire if it is done. You can add some more water to the cooking mixture if you feel it can stick to the bottom.

Adjust seasoning and consistency of the gravy and serve hot with other vegetable side dishes and chapatis or rice or pulao.

You can add 2-3 tbsp of thick cashew paste to this curry to make it creamy and a bit indulgent. That version is more rich looking and is liked by all similarly.


The same curry can be made using chicken mince if you really are in a hurry. It cooks in just 15-20 minutes and doesn't need marination time.

How would you like when the chicken recipe doesn't use any oil or ghee? This one is just that and you wont miss any fats in it. But this recipe is for those who like light chicken curries and are fond of coriander greens and mint. This chutney wala chicken is a favorite of many such people I know. For a few people it is just another chicken curry but then you can always make your own adjustments to it.

An everyday chicken curry that fits into your busy schedule is no harm making. The leftovers make nice stuffing for sandwiches. Try that too.

Friday, June 21, 2013

a mughlai meal and the possibilities of a great take home nawabi zayeka...


I heart regional cuisines and any chance to taste foods from a distinct Indian regional cuisine allures me like a magnet. Mughlai is one such cuisine I have been very very curious about. The robust flavors of Hyderabad mughlai, the meats and the different ways they cook their meats with vegetables make me extremely curious. Awadhi mughlai is a delicate balance of flavors and Bengal mughlai is another shoot off from the main stock. Then there is Punjabi mughlai, Kashmiri Muslim cuisine and even Bohri Muslim cuisine. I am not sure if we would categorize Moplah as mughlai but it always amazes to witness such diversity.

I want to learn more and experiment more with this cuisine as I love my spices and have started loving my meats too in the past decade. Although I advocate using spices and even meats according to seasons and moods.

A Hyderabad foodie and caterer Sadia Durrani invited a few of us at Cal bloggers table to showcase her food. We all lapped it up as it was a nice opportunity to taste home cooked mughlai cuisine. We braved the hot sun to reach Sadia's home and taste the food, it was a hot summer day but it did not deter us carnivores at Cal bloggers table.

The table at Sadia's place was laid with old fashioned elegant wares and the food was served with much anticipation. All of us carnivores had great expectations and we clicked a few pictures of all the dishes before we dug into them. The tandoori rotis and sheermal was ordered from outside but everything else was cooked at home.


Fluffy breads like these tandoori rotis are the best way to enjoy the thick gravies these meat dishes are cooked in. The soda tandoori roti at Al Jawahar is the best I have eaten with the korma they serve, the mutton ishtoo and the nihari of course.


At Sadia's place also, I took a piece of Nihari first. I am so smitten with this slow cooked meat dish that it always tempts me to go to purani dilli every few weeks. I liked Sadia's nihari quite a lot too. Tender falling off the bone meat, the spices imbibed well in every fiber of the meat and juices of the meat seeped well into the gravy. Just as it should be, all flavors melded together well.


Gosht dopyaza was also done really well. The sweetness of onions balanced by well cooked tomatoes and overall balanced flavors. Some recipes of dopyaza used curds instead of tomatoes and some don't use any souring agent but all dopyaza varieties taste wonderful if cooked nicely. Well cooked meat that must have been cooked for a couple of hours, it didn't look like pressure cooked which kills the flavors of the meat in my opinion. This dish can be a good party staple for Delhi crowd I am sure.

I had taken a quarter of roti and used it as a palate cleanser only, I can't eat much roti with meats dishes as it makes me feel stuffed. And here I had to taste all of the dishes served. I was biting into my roti judiciously.


Sadia had arranged the kebabs prettily and I was very curious about the sesame coating and seemingly 'deep fried' kebabs rather than the shallow fried as we do it the 'awadhi shami kebab' way. I had never had deep fried kebabs earlier. Sadia's reason for deep frying the kebab is it's ability to retain the shape probably as she has to pack the stuff and hand it over to customers who would carry it home and by the time the kebabs are eaten it will be around 30 minutes at least after deep frying them. Although the shami kebabs we get packed from Dastarkhwan (in Lucknow) wrapped in ulte tawe ka paratha gets all shapeless, is still yummy to the core.

Anyhow, the kebabs were nice and crisp on the crust and melt in the mouth type inside. There was a stuffing of broken nuts and probably a little hung curd like it is done in shikampur kebabs, the texture was also much moist than the traditional shami kebab I have eaten till now. I found them really tasty, the sesame coating tasted great too, I wont go into the argument of what kind of kebab it will be, or it will be a hybrid. Something that tastes good, uses good ingredients is good enough for me.


The dish I tasted after the kebab was the awadhi murgh. The taste was good as a chicken curry but I failed to feel any awadhi spicing in it. May be everything was cooked with a bit more of chilly and the chilly had overpowered awadhi spicing. This awadhi murgh was a nice chicken curry but not awadhi for me.

I can eat quite a good amount of spices and chilly but by this time I had started feeling the heat that hit me. I was sweating like I had never before in this whole summer for sure. I wish Sadia had served some vegetables along with all the meats as well. Some lightness both in constitution as well as in taste was required and was missed sorely.


This achari murgh looked quite attractive and proved it's worth too. Very well balanced pickling spices , the right amount of sourness added by curds and nicely tenderised well seasoned chicken.  I would definitely try and recreate this recipe as I liked it as much as I like my murgh achari tikka.


This badami korma was nice too, but by the time I had this, it was clear that Sadia loves super spicy food. A korma should be very delicate to my understanding. The spicing is just a lingering aroma that you get apart form the smooth nut paste and the meat flavors. This korma was too spicy for it's name. Although I would like it if I am eating just one meat dish in the meal and there are loads of vegetables around my plate. Look how sorely I missed vegetables.


 And the last of the meat dishes I tasted was the laal maas. It was good, definitely spicy but not the best laal maas I have had. Average laal maas I would say as otherwise too I like laal maas only for the red chilly capsaicin flavoring it has. I think it would have been superbly good if it was cooked in ghee. I knew what I was missing in this laal maas, I inquired and found out all the dishes were cooked in refined oil. I wasn't expecting this.

I know many many great cooks use refined vegetable oils for cooking but I would prefer the good old mustard, sesame, coconut oils for my desi foods and ghee would rate the highest.


She served murgh dum biryani as well and we had high expectations for the biryani. Although I would say chicken doesn't make biryani at all, but still a biryani should have some flavors of the meat stock in the rice and the overall aroma that is so characteristic. It lacked everything. The rice was sticky and overcooked and I didn't find any flavor that would confirm it's a biryani. It would have gone by the name of pilaf probably.


The kheer looked good and tasted perfect. With the earthen aroma of the terracotta bowls this was a kheer one finds in wedding parties mostly. Perfectly cooked rice, reduced milk and whatever it takes to make a fairly good kheer. Not the best I have had but good.

Overall, it was a nice meaty meal. I liked most of them, but felt it would have been a lot better if it was cooked in ghee or mustard oil. Slow cooked meats don't use much ghee anyways but the flavor that develops is unmistakably rich. Ghee also cuts the heat of chilly that we all found so hard hitting.

I would emphasize one point that a meal can be predominantly meats but there should be enough options of vegetables and some cooling type raitas when there are so many meat dishes on the menu. I would have loved even a bhindi gosht or turai gosht for that matter.

A meal ordered from Sadia costs about INR 1000 for two. I would definitely order nihari and murgh achari form her if I do. May be the gosht dopyaza and lal maas as well. I think one can request her to keep the spicing low or cook the meats in ghee to get a better experience. She is an awesome mughlai cook I must say. Preparing so many dishes and serving them in one go is not easy for most of us. Apart from me,  Ruchira, Parul, Mukta and Sid khullar were also there to taste this spread.

You can contact Sadia on her fb page called Nawabi zayeka here and call her at 08588960966 to order your preferred dishes.

Sunday, November 25, 2012

alu dum with chicken keema | keema alu dum..


Winter potatoes are something we relish for the texture and taste they have. The best time to make potato salads and alu paratha is her now. Arvind loves potatoes in all it's forms, it's me who keeps stuffing our plates with all possible kinds of greens. Not that potatoes are bad for us but hey do not let us eat other seasonal bounties of nature. Potatoes should be enjoyed only in winters in my opinion, no I am not forcing you to follow it :-)

The fact is, the new potatoes of winters are the best suited in Alu methi that I normally make like Kela methi, Alu saag and so many other winter subzis like alu sem and alu gobi. A bengali style Alur dom (aloo dum) is a favorite too and goes well with the motorshuttir kachuri (green peas kachori).

I make a keema wala gobi musallam too. It is a much loved recipe in my home.This keema aloo dum is another way to enjoy the wonderful taste and texture of winter potatoes with a spicy meat mince gravy. Very much a winter dinner when accompanied with hot chapatis.

ingredients...
boiled, cooled and peeled baby potatoes 12 (halved)
chicken mince 250 gm
chopped coriander greens 1/2 cup
mustard oil 2 tbsp + 2 tbsp
cumin seeds 1 tsp
salt to taste

to make a rough paste..
roughly chopped onion 1/4 cup
5 cloves of garlic
2 inch piece of ginger chopped


to make a smooth paste..
coriander seeds 1 tbsp
cumin seeds 2 tsp
black pepper corns 1 tsp
black cardamom 1
green cardamom 1
cinnamon stick broken 1 inch piece
cloves 3-4
scissor cut tejpatta 2
dry red chilies 3-4 or to taste
turmeric powder 1tsp

to make another rough paste ...
2 large tomatoes chopped roughly

procedure...

Heat the oil and tip in the cumin seeds and wait till they crackle. Slide in the halved potatoes, sprinkle a little salt, just for the potatoes, and stir fry them on medium heat. The potatoes being used should be boiled and cooled down as mentioned in the ingredients list, as these will be cooked for a long time, along with the mince meat too, and you don't want them to disintegrate. If you use them hot or warm, they would start breaking in this step itself. So be careful about this.

Low flame, added salt and frequent turning will ensure slow frying of the potato halves in a less quantity of oil.

While you stir fry the potatoes, making them golden brown from almost all sides, make the first paste.

Drain the fried potatoes from the oil and keep aside. Add the remaining oil into the same pan and pour the first paste into the hot oil. Add salt to taste and keep stirring till the paste starts getting pinkish. Make the second paste meanwhile and add at this stage. Now is the time to bhuno the mixture on medium flame by scraping the pan and mixing the masala various times. The masala paste gets brown in color, aromatic and shining in appearance when it is ready.

Now is the time to add the chicken mince (or mutton mince if using) and bhuno again. The mince starts getting white and cooked. Let it cook for about 5 minutes, stirring all this while  make the tomato paste alongside and add in the last. Bhuno again for about 45 minutes and add 2 cups of water and the fried potatoes.

Simmer on low flame, covered for about 20 minutes or till the desired consistency is reached.

Add the chopped coriander to finish and serve hot with hot chapatis or naan.

A deep spicy flavor with warmth of mustard oil, perfect winter baby potatoes and some mince is all one needs after a day's work. Coriander greens make it really refreshing.


Monday, March 7, 2011

khade masale ka chicken dopyaza or chicken ishtoo


Ishtoo and Dopyaza are similar recipes made with meats and vegetables both. While Dopyaza normally stays dry as the ingredients are cooked in their own moisture, Ishtoo is stewed with some water so it becomes a comforting winter stew. And yes, Dopyaza is mostly made in summers while Ishtoo is made in winters, the ingredients are exactly the same the cooking pocess is modified to suit the season.

The chicken dopyaza is a mildly spiced recipe which can be a good finger food too if the juices are dried a bit during cooking, the stew version is great with chapatis, naans, khamiri rotis or parathas.

khade masale ka chicken dopyaza or chicken ishtoo

Dopyaza is a name given to a meat curry cooked with lots of veggies as some people say but I doubt of this theory. I call a recipe dopyaza just because there is lots of pyaaz (onions) in it. Onions in a 1:1 ratio to meat or a veggie make the curry dopyaza, as it has been called in my family.

Nothing more special about dopyaza, just a stewed kind of curry cooked with minimum effort, paired well with khamiri rotis or plain parathas.

khade masale ka chicken dopyaza or chicken ishtoo


ingredients...
( for 3-4 servings depending on the side dishes)
chicken with bone 800 gm (I used leg pieces)
sliced onions 500 gm (more onions if you want more gravy)
ginger chopped in julienne 50+25 gm
garlic cloves slit lengthwise or the whole bulb cut through the middle
dry red chillies broken and seeds removed as many as you wish
(no green chillies are used in this stew)
cumin seeds 2 tsp
crushed black pepper corns 2 tsp
small and black cardamoms 3 each 
cinnamon stick 2 inches piece broken
bay leaves 2-4 nos.
cloves 4-5
salt to taste  
mustard oil 2 tbsp

preparation....
Heat oil in a thick base kadai and throw in all the whole spices along with dry red chillies.
Add the 50 gm part of ginger julienne and slit garlic cloves or cut garlic bulb, stir fry till fragrant and then add the sliced onions. Let the onions coat with oil and get hot, there is no need to cook them actually, they get cooked and caramelized along with the meat.
Add the chicken pieces, mix well and cover to cook on medium heat. This takes about 5 minutes and you are free to do other chores in the kitchen as the dish needs minimal attention after this.

Add salt and mix well. The onion should start getting caramelised by now. Once the onions get caramelised, add about 500 ml water if making Ishtoo (like in the pictures) and cook covered for at least 40 minutes on low flame.

For making the dry dopyaza the chicken is cooked with a tight lid without adding any water or just a sprinkle of water if needed. No powder masala is used in this curry and the aroma of the spices need to be conserved during cooking. Hence the lid which also helps in cooking the chicken without any additional water for making dopyaza, the cooking is done on minimum possible heat.

Check after 7-8 minutes of cooking and give it a good stir, the aroma will be very pleasant by now and the onions start caramelizing, giving a darker colour to the dish. Add a splash of water if you feel it is getting dry and can stick to the base before getting cooked. Place the lid again and check again after 5-7 minutes. It should be cooked by this time, otherwise cook till done.

Add the 25 gm portion of ginger julienne in the last and mix them well. This step is optional as I like the crunchy ginger pieces in this dish, the cooked ginger is also enjoyable with a milder taste.

Serve hot with chapatis or anything you like. The dish has a sweetish taste due to caramelized onions and the whiff of the spices is wonderful. You may like to remove the whole spices before plating as some people do not like them in the dish. I like to press the black cardamom and soak in the juices with a piece of khamiri roti or kulcha...

The hollow red chillies also trap the most awesome flavor in it, this is crazy but I like to squeeze them and mix the juices in the caramelized onion gravy.

khade masale ka chicken dopyaza or chicken ishtoo


As I mentioned earlier the ginger pieces added in two steps are to be enjoyed with the masala too, they taste so good when cooked this way...

Enjoy the Ishtooo in winters as a stew comforts like a soup and fills like a hearty meat curry. The dry dopyaza can be made in every season and can be served like a roast too.


Wednesday, December 1, 2010

indian flatbreads : recipe of whole wheat naan, tips and trick to make naan at home


There are many types of Indian flat breads and the most common is our daily roti or chapati .The roti can get thinner to make roomali roti and a bit thick and fluffy or flaky to become a rot or moti roti of several types.

The leavened breads are kulcha or naan. Naan and kulcha can have many variants further. Parathas are shallow fried flat breads made in a zillion avatars, plain, spiced, stuffed or layered. Parathas can be folded or rolled to make a hundred something layers or stuffed with sweet or savory goodness.

Oh and then there are the fried pooris .... are you till counting ??

whole wheat naan baked on griddle

Forget it. Just think about what suits with your curry the most and get going. I had a few requests for whole wheat naan and kulcha recipes and I was procrastinating as usual. The credit goes to GB who writes a wonderful blog Peacocks and Paislies, she requested for naans and kulchas while complementing my blog hugely. See what complements can do to me :-)

So I made naans and kulchas and there will be a series of posts on these flat breads. In this post I am including two versions of naan, one is baked on a gas stove and the other is baked in an oven, both of them using the same whole wheat dough.

whole wheat naan baked on griddle whole wheat naan baked in oven

The ingredients ...

whole wheat flour 1.5 cup
all purpose flour 1 cup
egg 1 no.
fresh curds 3/4 cup
baking powder 1 tsp
baking soda 1/2 tsp
salt to taste

Procedure for the dough...

Mix the flours and the baking powder, baking soda and salt, make a well in the center and break the egg into it. Add the curds too and mix the liquids first and then incorporate the flour into it adding a little water to make a soft pliable dough. Keep the dough aside for an hour or so. In the fridge it keeps for a day.

Procedure to bake the naan on gas stove ...

Heat a tawa or griddle. Keep a shallow bowl of water nearby.

Make small balls of the dough depending on the size of naan you want. Flatten the balls either by tapping your palms or on the rolling board. A round, oval or a typical drop shaped naan can be made as required. To make it drop shaped you have to pinch one side with your thumb and index finger and pull to stretch, though it is optional.

Dip the flattened naan in the bowl of water and spread on the griddle in one quick motion. If you are patting the naan flat using your palms, you will need to wet your palms to flatten them smoothly and then the naan will be already wet and needs not be dipped into the bowl of water.

whole wheat naan being baked on griddle

A wet naan will stick to the griddle until it is cooked properly even if you invert the griddle, which you are going to do just after this. Wait till small bubbles appear on the surface, patting or rolling the other naans at the same time, if you are used to making chapatis it's not at all difficult. 2-3 naans can be baked on the tawa at a time and this makes it so easy for the cook, especially when you have to bake too many naans. Now is the time to invert the tawa over the gas flame to cook the naan on the other side and to get those spots...

whole wheat naan being baked on griddle

Keep the flame under control as you don't want charred naans. The naans will get unstuck as soon as they are cooked through, use a pair of tongs to remove them. Butter them lightly immediately by rubbing a cold cube of butter over them, or you may want to serve it with a blob of butter melting enticingly.

Serve right away as the crisp exterior and soft flaky interiors of the naan are best when hot, once it cools down it becomes soft, still good but everybody likes a hot naan and you know that.

whole wheat naan baked on griddle

We had this naan with chicken n chickpea curry, that is, our chicken chhole with some spinach thrown in, a healthy meal. Most of the people love the naan with a butter gravy but it's a rarity at our place ...

chicken and chickpeas curry with naan


I personally like this tawa baked naan, you may like it baked in the oven so I made that way too....

baking the whole wheat naan in the oven...

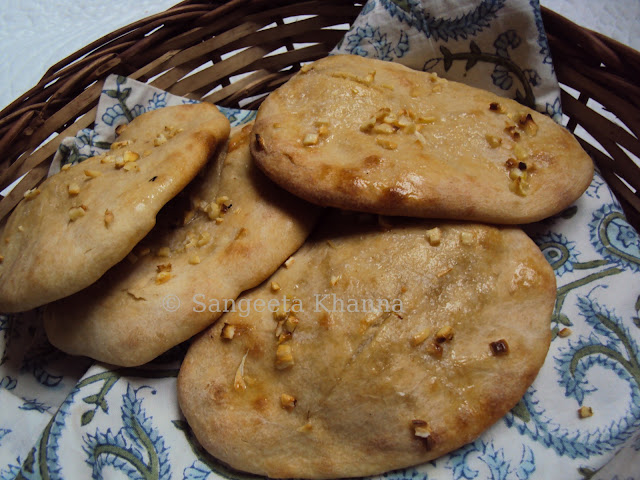
Flatten the same dough and arrange on a greased baking tray. I spread finely chopped garlic and little butter on top of the naans to make garlic naan. Garlic paste or chopped garlic can be added to the dough if you like it that way.

whole wheat naan baked in oven

Bake till pinkish brown, insert a knife under the naan to see if the naan is cooked through. It should get unstuck promptly and should be lighter in weight. You may want to butter them again before serving....

whole wheat naan baked in oven

As I mentioned, I personally like the tawa baked naan as it seems easier for me to make (or for anybody who make chapatis everyday) plus this one stays soft and flaky even when it has cooled. The oven baked whole wheat or even maida naan gets a bit chewy so consume those right away.


Tips and tricks to make great whole wheat naan at home...
  1.  Knead the dough really well by stretching and folding it several times till it gets elastic. It imparts flakiness in naans.
  2. Keep the dough soft and sticky if you can manage. It gives a nice crust and the crumb remains soft and flaky that way.
  3. It is best to make the dough balls in advance and keep them covered with a wet cotton napkin. Pat it with hands or roll with soft pressure. This allows the naan to become more fluffy.
  4. Wet the naans before patting them on the griddle. It helps to achieve a great crust and the naan sticks to the griddle giving you a chance to invert the griddle and flame it for a while. This gives you results closer to an actual tandoor.
  5. Serve the naans immediately after being baked, topped with butter. If you need to keep them for a while you can butter them and stack them over a cotton napkin. It helps the naans stay warm till served and soft too. Once buttered the naans can be reheated on flame if required.


Now a quick recipe of chicken wale chhole....


Chicken (boneless breast pieces  are used for this. A large piece including the backbone and ribs is boiled along with the soaked chickpeas so that all the chicken flavor comes into the gravy.

Then a bhuna masala paste is fried along with the boneless chicken pieces on low heat, till the chicken gets cooked. The boiled chickpeas are added and given a good boil. I added baby spinach and coriander leaves in the end and served hot with these hot naans.

chicken and chickpeas curry with whole wheat naan

One thing to take care while making the naans with whole wheat flour, it will not be as soft and flaky as the white flour ones but it's perfectly good otherwise. They are soft with a nice bite (and not chewy as the maida ones get as soon as they get colder even while eating) and the flaky character of naan is retained to a lesser extent.

This recipe of naan is mostly followed by the restaurants because it is quick and doesn't need yeast or sourdough. But in homes it was made with sourdough always. If you want to bake sourdough whole wheat naans and kulchas you can follow the sourdough recipes here.

Hope this post helps you bake whole wheat naans easily at home. Do write to me for queries and feedback. I always appreciate hearing back from you. 


Friday, June 4, 2010

grilled chicken ...... tikka style


There are times when you want to eat against the weather ..............hot n spicy grilled chicken in this summer heat , that too being grilled in my cubicle kitchen . It happens when we need to spice the mood and the spirit .....cooling mint chutny is always a great companion to this hot n hot tikka....

Every family has a favorite recipe for tikka ....chicken tikka or otherwise........paneer , gobi , broccoli , mushrooms and even the potatoes...............turn just any firm thing into a tikka and dunk it into a cooling zesty tangy mint chutny .....something chilled to drink and the hot weather is suddenly pleasant .

Oven is a painful thought in summer months , and the prevailing temperatures suggest all things cold and chilled and frozen.....what if you need a hot spice ....something aromatic after you have refreshed yourself with a chilled mango shake in the evening .

I find grilling the tikka easier than making a proper dinner , yes it is a dinner for us by itself , no accompaniments....just a few thin slices of onions , a couple of wedges of lime and the tangy cool mint chutny.

Easier because i just have to marinade the chicken for a while , then arrange it on the rack and grill , checking and turning 3-4 times for even browning and thorough cooking...the grilling time is sure to invigorate your hunger by the lovely aroma.

The seasoning for a tikka is mostly chosen by  a whim , what kind of a flavor is needed a the time and how it is going to be gobbled up.............if you want to have it all by itself , a dryish tikka is fine with chutny n onions but if you want to have it inside a kathi roll or with a naan kinda bread , it has to be more succulent n soft ...with butter and more butter for basting ......i made it dry , sans butter ( just a bit of cream in the marinade) and enjoyed every bite with a dollop of green mint chutny ..i like it this way , the overly buttery tikka is not my type.............

ingredients...

chicken cut in 12 pieces ( 1 kg)....boneless chicken is good too
fresh curds 1 cup ( use store bought or hang it to make it thick)
ginger garlic paste 2 tbsp
red chilly powder 1 tsp or more
black pepper corns crushed frshly 1 tbsp
fresh cream 1 tbsp
salt to taste
aromatic garam masala 1 tsp ( home made)

procedure...

Mix everything together and keep in the fridge for about 2 hrs....or overnight or for a day in the freezer .


Defrost at the time of grilling , or just take out of the fridge and preheat the oven at 250 degree C .

Arrange the pieces on the grill rack and grill for about 30 minute turning the pieces and checking for the done sign.


The surface should get wrinkled and it should pull away from the bones , crisp n chewy on the outside and moist and succulent inside.....prick a toothpick and check if it is done.

Serve hot with mint chutny , lime wedges and thin slices of onion............it's so tempting when it's done n ready to eat that i forgot to take the pictures with chutny and onion rings .......that would have been spectacular , i regret that now.....There is always a next time  , it's a convenient thought in itself...:)

The freshly crushed black pepper corns work like magic for this tikka , as much as i want a few pepper corns in each bite .....in each mouthful .......mint chutny , not to say , is the balancing factor in every sense.

Every bite dunked into the cooling mint chutny and topped with a lemon soaked onion rings..........perfect accompaniments...........nothing else is needed actually......they make good starters for a nice chatty get together....it's a favorite at our place for such occasions n i never get to think of any photographs on such occasions too.

We like to have it for a cozy laid back dinner ......the leftovers can always make great toppings for an Indian pizza ........i did not take pictures this time of the pizza dinner made with the leftovers next day.......that is something ordinary to rustle up but great for the taste buds...

enjoy...

Sunday, August 23, 2009

macaroni with chicken sauages


pasta is such a comfort food........any time meal and honestly sometimes it is a weekend brunch or an evening snack too.....the dinner gets delayed or is replaced by a fruit on such occasions...........

this is something the children like very much .....my husband is no less than a child when it comes to food.......he wants everything which does not look like roti subzi or daal chawal............:):)

i make this quite simple.........

boil the macaroni ( 1 cup) in salted water till al dante' .....and drain n keep aside...

boil a few chicken sausages in water ...........till cooked , drain and keep aside.....

chop 2 cloves of garlic and make a coarse paste of 1 onion and 2 tomatoes in mixie.......

heat a tsp of oil in a pan and tip in the garlic......after a minute throw in the onion and tomato paste , salt to taste and a tsp of red chilly flakes........mix n cook till everything gets mixed up n cooked nicely...........

meanwhile chop the boiled sausages into slanting slices and throw into the cooking mixture....

in goes the boiled macaroni and a few springs of chopped fresh basil......

ready to devour.......sprinkle cheese if you wish.........i skip it when i add chicken or some veggie..

Saturday, May 23, 2009

kerala chicken stew with appam ..comfort food for everyone...


Kerala style chicken stew and appam is one of those comfort meals we look forward to. I am a fan of coconut milk gravies actually. I keep making  a lot of chingri malai curry, vegetable stew, meen molly and Thai green curries with coconut milk. Kerala chicken stew or vegetable stew is a favorite too, more because these curries are so healthy and so tasty too.

What creamy and rich curry would be as healthy as this stew and what crisp bread or pancake would be the beat combination of healthy fermented goodness. A creamy flavorful curry to dunk a crisp pancake, coconut goodness at it's best. To make it even better, the meal comes around in less than an hour even if you start from scratch. Well, if using rice powder and instant yeast and coconut milk powder or coconut milk from cartons. That is what I do as I find them good for my taste. Let the purists work hard for the daily grub.


for chicken stew you need
dressed chicken 500 gm (on bone)
carrot 2 nos. chopped in cubes
potato 1 no. chopped in cubes
tomatoes 2 nos. chopped lengthwise (optional)
onions 2 nos. chopped lengthwise
garlic 8-10 cloves slit lengthwise (optional)
ginger 1 inch piece julienned
curry patta 10 springs (or more)
coconut oil 2 tbsp (more if you are not watching weight)
coconut milk powder 1 cup or milk extracted from a whole big coconut
or tetra pack coconut milk 200 gm

whole spices
cumin seeds 1 tsp
black pepper corns 1 tbsp
cinnamon 2 sticks
star anise 1 no.
black cardamom 2 nos.
green cardamom 4 nos.
whole red chilies 6-7 nos.

powder spices
coriander powder 1 tsp
garam masala 1 tbsp
turmeric powder 1 tsp
red chilly powder 1 tsp ( optional)


to proceed ......

Heat oil in a wide pan and throw in all the whole masalas and let them splutter and release thier aroma.......now throw in the onions with curry patta and stir fry for a while on medium flame (if using more oil you can do it on high flame)...put in the chopped ginger garlic too and keep stir frying till they release their flavors n become soft.....adding salt at this stage will quicken the process...after 3-4 minutes add the vegetables and the chicken and keep stirring till everything is half cooked......add the powder masalas....fry for a while till the masala aroma comes.....now dissolve 1 tbsp of coconut milk powder in 2 cups of water and pour into the pan, adjust salt.......cover and cook till chicken is cooked through...stirring in between twice............finish with the remaining coconut milk powder dissolved in 1/2 cup water.....remove from heat when it is about to boil again.......the aroma of the finished stew will make you incredibly healthy ...hope you have done the preparations for the appam in the meantime........


for appam you need
1/2 cup rice flour (the recipe called for 1 cup soaked rice made into paste)
2 tbsp cooked rice
3/4 of a fresh coconut (black skin removed)
fresh yeast 1 tbsp (or a packet of dry yeast granules)
1 tsp sugar to proof the yeast
salt to taste

to proceed....

I set the yeast for proofing before I started my stew preparation for this dissolve the yeast n sugar in 1/2 cup of warm water, it gets frothy in 10-15 minutes....to be mixed into the other things.

Make a paste of coconut and the cooked rice in mixie and mix with rice flour and yeast mixture and some water to make a batter of dosa like consistency....keep in a warm place until it gets frothy. In my case it was ready as soon as the stew finished. Indian summers.


To prepare appams .... 

Mix salt to taste and heat the greased appam pan (mine is non stick) and pour a ladle full of batter in the middle, now immediately swirl the pan, holding the handles, so that the batter coats the sides of the pan, there should be just one swirl and there should be some batter remaining in the middle of the pan.

Cover the lid immediately, it takes about 2 minutes to cook, check by touching in the center, it is cooked if it is firm and spongy. Repeat the process to make more appams. You don't need to use oil after the first appam so the process is easier than it looks.

The first appam is not always the right shape, don;t worry if it happens and feed the first appam to your pet or birds in the garden.

If the appam is too soft to hold the shape after removing form the pan, just add a little semolina and try again. The appam should come out crisp on the edges and spongy in the middle.


I normally keep the middle spongy portion smaller as we both like the crisp lacy periphery of the appams.

The taste of this combination of curry and a pancake like appam is out of this worldly.

Arvind was elated to get this as a dinner, so was I.......


Such meals are special and you don't want anything else to dilute the chicken stew and appam pleasure. Just make the stew and the appam whenever you do this. Nothing else would be touched when this meal is there on the table. Believe me.