Sunday, June 28, 2009

kele ka malpua | banana malpua with home made fresh cream


Banana malpua is a rich and heavy malpua that is made using mashed bananas in a whole wheat batter normally. The batter is made using full cream milk and the malpuas are fried in ghee. But the same thing can easily be adapted for a healthy malpua when shallow fried, the texture changes a bit but it is saved from a lot of ghee. I generally make a quick pancake style malpua sometimes on a weekend brunch as the husband loved his desserts for meals. With a generous lashing of malai he is happy with his plate and wont go near any other food the whole day. Yes if you eat a few of them for breakfast, it keeps you full the whole day.

It is made of whole wheat flour so it's healthy but it is a high calorie food so moderation is the keyword many would like to associate it with. I can't eat much sugary stuff so its okay for me. For the husband it;s a different story...

ingredients

whole wheat flour 1 cup
ripe or overripe bananas 2 nos.
sugar 2-3 tbsp ( optional)
milk 1/2 cup or as needed
fresh cream to serve as much you like
slivered almonds as much you like
honey to top ..as much you like
ghee to fry


procedure

mash the bananas and mix with flour and sugar to make a paste first and then add milk ...little at a time to make a batter similar to cake.

heat ghee( about 1/4 cup) in a flat bottom frying pan ( i use my jalebi kadhai) , pour a ladle ful of batter in the pan to fry....many malpuas can be fried at a time in a flat bottom pan so amke 4-5 at a time.........flip over when bubbles appear on top and fry the other side too...

when nicely browned, take out...drain and serve hot topped with fresh cream , honey and almond slivers..........

see who is licking fingers....:D:D...............simple , easy and yummy........you happy ..................family happy...

Thursday, June 25, 2009

aam ka achar (raw mango pickle)


Any Indian home cannot do without pickles called as achar and aam ka achar is the king of all achars. Call it mango pickle or kairi achar, this is the one pickle which makes you salivate at the thought.

aam ka achar recipe

All our memories of train journeys and school lunch boxes are redolent with aam ka achar, duly stained with the turmeric and spice infused oil.

This particular aam ka achar is a UP specialty which is served with parathas, puris or just anything depending on your imagination. My version is a little different as it has large quantity of masala, almost like a gravy. The masala itself is so tasty that you don't need the mango pieces sometimes, the reason why I make more masala for the quantity of raw mangoes.

Also the masala comes handy sometimes as a salad dressing, or for making some achari veggies or stuffed okra or stuffed karela too. So the extra dose of masala is very useful here and I shall post some of the achari masala recipes in future.

My version of aam ka achar is different in one more respect, that it does not require exposure to sunlight, as is done traditionally. The color and texture of the achar remains as such for 2 years though it does not last that long in my household. There are many takers for this achar and it reaches the dining table of many of my friends.

Clearly my masala to mango ratio is more than normal and you can make double the quantity of achar in the same quantity of masala if you like your achar pieces more than the masala.

aam ka achar recipe

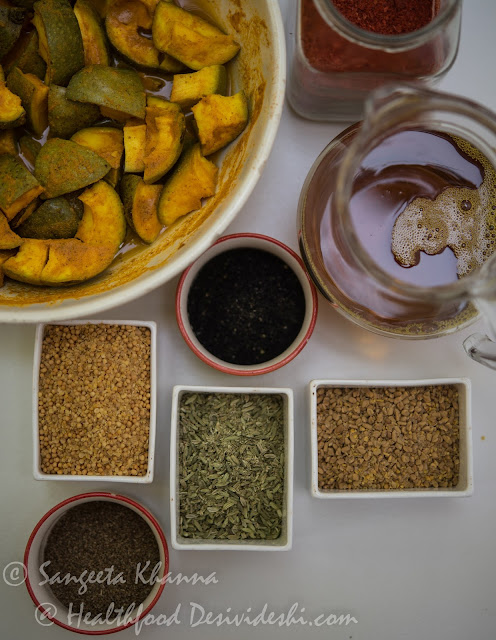
masala required...
( for 4 kg of mangoes)

yellow mustard seeds ground coarsely 200 gm
whole red chilies dried and ground coarsely 200 gm
fenugreek seeds or methi ground coarsely 150 gm
fennel seeds or moti saunf ground coarsely 200 gm
bishops weed or ajwain seeds pounded coarsely 100 gm 
mangrail, kalonji or onion seeds pounded coarely 100 gm
pure crystalline (resin) asafoetida 1/4 tsp
turmeric powder 200 gm
salt 750 gm
mustard oil 1.5 L

the preparation of the achar can be divided in 5 steps.
1. rinsing and chopping the raw mangoes (this is the most laborious work as the mango seeds should be hard and that makes it really tough to cut them. Use a really good knife or old fashioned cleavers)
2. masala preparation and sterilization of jars
3. marination of mango pieces
4. mixing the first masala, ie, chilly and mustard
5. tadka and filling the jars

step 1. Masalas should be prepared before hand or they can be prepared after the marination step. Also the glass jars used to store the achar should be washed well with detergent, dried in the microwave and rinsed with white vinegar before the tadka stage.

aam ka achar recipe

step 2 and 3. First of all cut the raw firm mangoes in serving size pieces and mix with turmeric powder and salt. This will lead to marination and the mango pieces will release water.

aam ka achar recipe

Let it rest for 24 hrs or till it becomes watery as the mangoes release all their water.

aam ka achar recipe

At this point it looks like the mango pieces are drowned in the thick yellow slurry.

In fact 24 -36 hrs is enough time for this but sometimes I leave it as such for 3-4 days when I don't get time to proceed. There is no harm in it, just keep stirring the mixture once a day.

Step 4. You can mix the mustard powder and chilli powder in the marinated raw mango pieces and proceeds for step 5 or the mustard and chilli powders can be added just after the tadka. The idea is not to cook the mustard powder and chilli powder so the colour remains good, flavours intact.

aam ka achar recipe

step 5. Finally heat the oil in a large pan/kadhai heat thoroughly and throw in the asafoetida and let it get dispersed (it tends to fluff up first and then disperses into the oil).

Then add the methi powder, fennel powder and ajwain and kalonji powders in this order and as the masalas disperse quickly in the oil, take the kadhai off the gas.

aam ka achar recipe

Now immediately pour in the achar mixture in to the kadhai and mix well till it looks like this.

aam ka achar recipe

After mixing the achar, it becomes cold enough to handle.

Now fill the achar in sterilized jars, take care not to leave any air spaces in the jar. For this you need to slightly tap the jar against kitchen platform so that the achar settles down nicely leaving no air spaces.

You will see the oil coming on top of the jar in a thin layer. Top up with a little more mustard oil if the surface doesn't gets coated with oil naturally.

aam ka achar recipe

Keep the jar open till it reaches room temperature and then close the lid and keep it safe in your cupboard. No need to keep in the sun. Not at all.

The achar will be ready to eat within a week and you can enjoy the same texture throughout the year. Trust me.

This aam ka achar stays as is for 2 years and doesn't get mushy at all. The colour also remains the same.


khajur / thekua


Thekua is a Bihari deep fried cookie that has spread to eastern UP too. And since I have lived in Banaras and have spent some time in Jharkhand too, I can say it with some authority that no one makes better thekua than Biharis. Many Banarasi families also make great thekua but the crumbly texture is what every Bihari cook excels in achieving. Others make it like a cookie.

I used to make thekua too but that wasn't something that you would remember for long. It was like any other deep fried pastry that tastes sweet and good. But after spending a few years in Jharkhand when I tasted the thekua that used to be made at Chhath (a festival worshiping Sun God) I knew I had to learn it from my neighbors. There is a technique of making thekua that I didn't know till then.

thekua or khajur

The perfect thekua, often called as khajoor should be cracked at the margins, crisp on the outside and softer and crumbly inside. The sugar crystals caramelize on the outside giving it a nice sheen. Arvind used to like it so much that I had to learn to make this desi cookie.

Some people make it with all purpose flour or maida but I prefer making it with whole wheat flour and desi ghee. It is so much more tasty this way, all the old fashined cooks make their thekua with whole wheta flour and ghee, some of them even use jaggery instead of sugar. I will share the jaggery thekua too sometime soon.

This time I made a fried version as well as a baked version. The deep fried one was crisp and perfect but the baked one was a bit chewy but I liked it as the taste was the same (for almost 80% less ghee than the fried version).

The fried ones keep well in an airtight container for about a month but the baked ones become harder after 2 weeks. So consume the the baked thekua within 2 weeks at the most.

you need just a few ingredients for this.....

whole wheat flour or atta 500 gm
ghee 100 gm for rubbing (shortening)
desiccated coconut or grated dried coconut 1 cup
sugar 1 cup
milk about 1.5 cup
more ghee for deep frying

to proceed .....

Follow the instructions carefully about kneading the dough. It is crucial in making of the perfect textured thekua. 

Mix the first four ingredients well, rubbing it between your fingers so that it resembles like fine breadcrumbs.

Heat ghee for frying in a wide kadhai or pan.

Now scoop out a part of the mixture (enough to make a batch of 8-10 thekuas) and sprinkle milk on it and mix so that it starts binding when pressed in your fist. It should not become like a dough, just enough moist to make marble sized balls from the mixture. This allows cracking of the surface, making crisp thekua or khajurs when deep fired at low temperature.

Now flatten each ball with your palms and press with a fork twice at right angles to make a mesh design. There is a traditional wooden stamp to carve designs on thekuas but I don't have them.

Drop this first batch of thekuas in the medium hot ghee and fry on lowest flame turning in between to allow even browning. A nice aroma comes when it gets cooked and also the cracks appear on the surface.

It takes about 20 minutes for one batch if you have made small thekuas, the cooking time depends on how big and thick the thekuas are. Making them smaller is better if thekua is new for you. The cooked thekuas remain a bit spongy to touch but get firm once cold.

Drain from ghee and let it cool. Repeat with the mixture for another batch till you make all of them. Cool and keep in an airtight container.

These are the fried thekuas..

thekua or khajur

For the baked version I arranged the shaped thekuas on a ceramic plate smeared with ghee and baked in the grill option of my microwave for 30 minutes on one side and the 20 minutes on the other side Timing can be adjusted according to the thickness of khajoors.

Here are the baked thekuas..

thekua or khajur

One thing to note, the UP version of thekua has become more rich with lot of nuts added but real thekua only has coconut bits. The UP version is often called as Khajur and some people make the khajur in elongated shape just like dates (khajur or chhuara) with a stuffing of coconut and raisins in it. I will try and share that version too some day.

The thekua or khajur used to be the best food for journey in older days. People used to carry dabbas of thekua and laal mirch ka bharva achar for long journeys and this used to become a snack or meal as and when required. Imagine the sweet thekua smeared with laal mirch ka achar, it was a deadly combination. Just like matthi and aam ka achar, that was another classic journey food.

People used to add loads of nuts and raisins to the thekua when it was made for journeys. I now understand it was a way to pack nourishment in small condensed doses.

Granola bars of the older times these thekua would have been...


Thursday, June 18, 2009

ras wala kaddu


kaddu ki ras wali sabzi, rasedaar kaddu, vrat wala kaddu or pumpkin curry .......whatever you call this kaddu ki sabzi , it is so tasty that you'll end up eating the sabzi like a soup........i made it with plain puris and did not count how many helpings we took of the sabzi...........

i have posted a few more versions of kaddu ki sabzi earlier as i like the this veggie very much..........it is easier to cook, healthy as it is packed with loads of Vit.A and fiber and the most important fact is that it can be made in minimal amounts of oil........with puris it is an ideal combination traditionally too......the recipe is simple and the taste comes from clever use of few common ingredients..........read on the recipe............

ingredients

pumpkin ( with green skin and yellow flesh) cubed 400 gm
potatoes cubed with skin 200 gm
dry ginger(sonth) 1 inch piece
dry whole red chillie 5-6 nos.
( the use of dry ginger powder and red chilly powder is convenient but the taste in this curry comes from freshly ground ingredients)
turmeric powder 1 tsp
salt to taste
amchoor or dry mango powder 2 tsp
asafoetida a pinch
rai seeds or mustard seeds 1 tsp
mustard oil 1 tsp

procedure

heat the oil in a pressure cooker , throw in the asafoetida and the rai seeds and let the splutter.............add the cubed veggies and salt n turmeric powders at once and toss to let them all mixed up n cook for a while.......add the grind sonth and red chilly together in spice grinder n add to the cooker.....toss well and add about a liter of water , place the lid and cook till one whistle and it's done........just add the amchoor powder when you open the pressure cooker, mix well to get the veggies a bit mashed up and serve hot with puris.

missed taking pictures of puris with it as they disappeared as soon as they came out of the kadai.........the combination of these two can't let you wait.....for anything.......


it is better to make this sabzi ahead of time as it tastes better after about an hour of getting cooked....there is a lot of water in this sabzi and veggie pieces seem to be submerged in the 'ras'.......but believe me you will fall short of 'ras' this time.....just try....

Saturday, June 13, 2009

parwal ki bhujia or aaloo parwal ki lehsuni bhujia..


alu parval ki lehsuni bhujia

This is a very simple stir fry vegetable which is called bhujia in UP. Parwal or parval is pointed gourd, also known as patal or potol. This small gourd looks like a miniature snake guard and is considered cooling and detoxifying according to  Ayurveda.

This sukhi sabzi can be a side dish with daal chawal lunch or it can be a main accompaniment to roti or paratha. I remember carrying this bhujia to school in my lunch box, with tikona parathas of course.

This is one of the few recipes I make in exactly the same way as my mom used to make it. I usually keep experimenting and improving my recipes on the ground of health and nutrition, but this bhujia is the best representation of healthy, tasty and easy everyday Indian food and keeps repeating in my kitchen every summer.

Parval comes only during summers, I have tried growing parval many times but haven't been successful yet.

ingredients
(2 large servings)

250 gm parvals
100 gms potatoes with skin
5-6 fat cloves of garlic or a few more if you like
dry red chillies or green chillies to taste
salt to taste
1/2 tsp turmeric powder
1.5 tbsp mustard oil
1/4 tsp methi and cumin seeds each

procedure

Just scrape the parvals using a paring knife, cut the parwals lengthwise in four pieces or six and some potatoes too in thin wedges.

alu parval


Heat mustard oil in a pan, throw in a tsp of methi and jeera seeds each and when they crackle put the parwals first.

Stir fry till they are pinkish and then add the potato wedges and fry till they are pinkish too. Add salt to taste and turmeric powder is added along with a generous amount of garlic and green chilly paste. This paste is the main taste maker in this bhujia and it is always made in mustard oil.

After adding all these, stir fry and slow cook  till the aroma of cooked garlic is predominant and the bhujia is ready.


I make this bhujia in minimum oil. Just about 1.5 to 2 tbsp for 250 gm parwal and 100 gm potatoes, unpeeled new potatoes taste best.

It is easier to make it in more oil as it fries well but when using less oil you just have to be patient with the frying. A heavy bottomed pan and low heat works best for low oil version. Taste is the same for both the versions.

alu parval ki lehsuni bhujia

I prefer serving this bhujia with daal chawal for our lunch. It makes a healthy lunch with daal and boiled rice, plain curds and papad goes well with it but I like just this bhujia with my daal chawal for the rich garlic pleasure, nothing else is required between my dal chawal and bhujia.

I like the crunchy methi seeds in this bhujia too, if you don't like the slight bitter crunch of methi seeds, you can omit that and use only cumin seeds for tempering.

I am telling you one of my hack for this recipe too. Sometimes I use a past of garlic powder, chilli powder and turmeric powder mixed together with a little water to make this recipe too and it has never disappointed me. Slow cooking is the key in this recipe, keep the gas on low flame, keep stirring every couple of minutes and this bhujia will cook perfectly.

Do let me know of you try this recipe. It gives me immense pleasure to introduce the recipes from my homeland and the pleasure multiplied when you all find the recipes useful...


Friday, June 12, 2009

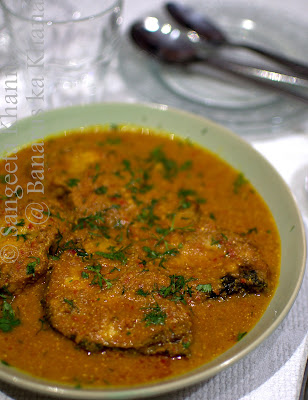
sarson wali machhli | fish cooked in mustard seeds gravy...


 Sarson wali machhli or any mustard seeds gravy is something synonymous with Bengali food but it is an integral part of UP food too. There is difference between the way it is cooked in Bengal and in UP though, in a Bengali sorshe jhol the taste of the mustard is prominent and the curry is a bit milky in appearance  but in UP it becomes infused with garam masala and amchoor and the curry becomes brown n rich in color. I like it both ways. Both the curries are very distinctly different in the final bouquet of flavors.

sarson wali machhli

Actually I started eating fish much later in life and learned to cook fish from Bengali friends of mine, and that was my first preference for a long time, but then I learned the way my mom and grandmother used to cook it too. I love this curry both ways now.

sarson wali machhli
you need for this preparation I used a large fish, cooking process differs with the size of the fish. I used 4 large pieces (steaks) of fish weighing about 500 gm total. 

Any fish will be fine but Rohu or Catla (river fish) are more suitable for this curry. Rub some salt and turmeric powder to the pieces and let it rest for half an hour.

masalas needed are

mustard seeds 2 tbsp
turmeric powder 1 tsp
curry powder 1 tbsp
garam masala powder 1 tsp
ginger garlic n green chilly paste 3 tbsp
paste of one big tomato
cumin seeds 1 tsp
salt to taste
and oil to fry
amchoor powder 1 tsp or more
green coriander leaves to garnish

sarson wali machhli
to proceed

Heat oil in a shallow pan and fry the fish pieces both sides until golden brown and keep aside.

Make a fine paste of mustard seeds with some water using the chutney jar of your mixie. Add some water to the paste and decant it for a while, pour the paste in a cup discarding the skins (which settles down in the jar) alternatively the paste can be passed through a  sieve, keep aside...

Now empty the pan just keeping 2 tbsp of oil into it, throw in the cumin seeds and let it splutter, add the ginger garlic green chilly paste and fry till oil separates, throw in the powder masalas, fry for a minute and add the mustard paste.

Mix well and cook for a while, then add the tomato paste to the pan. Add salt and cook covered on medium heat till oil separates again.

Now add about 1.5 cup of water to it. More or less depending how thin or thick gravy you want. Let it boil and drop in the fried fish pieces.

Cook covered till oil separates and the fish is done. Throw in coriander leaves and put off the flame and keep the pan covered for 5 minuted so that the coriander leaves infuse their flavor into the curry.

Serve hot with boiled rice, with some salad n papad on the side....

Machhli chawal was a comfort food in our household but now I make it rarely as fish is not readily available in our locality. I miss the days when a machhli wali used to come to my doorstep when we were in Dhanbad, Arvind's previous posting. Small towns have their own charm and fresh produce is one of those lovely things that you get without any extra effort.


Monday, June 8, 2009

kele ke kofte | green plantain fried dumplings in a spicy curry sauce...


Kele ke kofte is one recipe that gets repeated often and is remembered a lot by almost all my relatives. There is a story behind it.

Let me tell you that Kachhe Kele ke kofte is a fried dumpling made using green plantains and is curried into a spicy gravy. This is one of those UP recipes inspired by Mughlai keema koftas.

recipe of kachhe kele ke kofte

I remember once when it was my sisters engagement ceremony and the cook disappeared at the last moment. There was utter chaos and my parents were at a loss of words. There was no option but to cook it all by ourselves but there was no one else apart from me and being the eldest in the family I had to take responsibility even though I wasn't too confident to cook for a huge crowd like that.

I had to cook for around 50 people and the only helping hand was that of my sister's friend Parmita. She helped me in the preparations but all the actual cooking was dome by your's truly. That day I made this kele ka kofta and it turned out so good that most relatives and cousins still remember that and ask me the recipe again and again whenever they get to meet me at some or the other family get together.

I also remember, I had made a LOT of kofte that day, and that there was a lot was leftover too. Everybody from our side of the extended family asked for the leftovers as well the next day and not a single ball of kofta was wasted, huge wastage of such stuff is otherwise so common when you cook things for a large party.

recipe of kachhe kele ke kofte

I still feel proud about that cooking marathon as I had cooked many other dishes apart from this kofte, and that cooking experience made me confident forever. I could cook for large gathering without thinking twice about how would I go about it, you do less mistakes when you are confident and your eyeballing the ingredients works well.

I still make these kofte in large amounts most of the times, to last three days at least and the remaining 2 portions of dry kofte is frozen for later use.

It becomes a lot more easier when you have a bhuna masala in the fridge and some dry kofte in the freezer. Just mix the two, add water and simmer till soft.

ingredients for the kofta balls
(makes 3 batches serving 4 people each)
raw plantain 6-8 nos.
onions chopped finely 1 cup
ginger garlic paste 3 tbsp
green chilies chopped 1 tbsp
red chilly powder 1 tsp
garam masala powder 1 tsp (freshly made )
chickpea flour or besan 3-4 tbsp ....or just enough to bind the mixture
salt to taste
oil to deep fry, I use mustard oil

to proceed...........

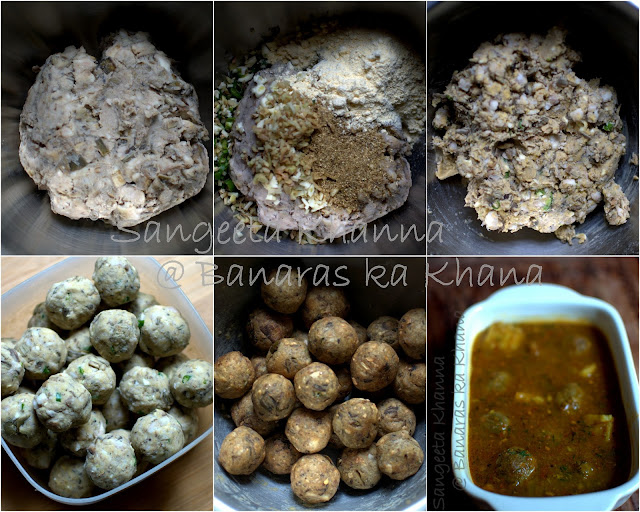
Do not peel the bananas, just remove the stalk, remove any blackened skin, cut in slices and boil in a pressure cooker with a little salt up to 1 whistle......let it cool to proceed.

recipe of kachhe kele ke kofte

You need to mash the boiled and cooled plantain completely and it is a bit difficult with the skin on, so just mince the boiled slices and then mash them with hands or any other appliance you find convenient, it should not be completely creamed, small bits of peel makes it spongy in gravy.....

You can always use a food processor or chopper for mashing this boiled plantain.

recipe of kachhe kele ke kofte

Chop the onions and then the ginger garlic n green chilies in the same chopper one by one.
Mix in other ingredients except oil and make a pliable dough like mixture.

Divide into balls and deep fry in hot oil. Note that if they break into hot oil it means they need a bit more of besan added. So correct the consistency before you fry all of them. Fry all the kofta balls and keep the extra in the freezer if that is the case.

Read on for making the gravy...

recipe of kachhe kele ke kofte

ingredients for the gravy
(for 4 servings)

onions chopped 1/2 cup
tomatoes chopped and pureed 1/2 cup
ginger garlic paste 2 tbsp
red chilly powder 2 tsp
turmeric powder 1 tsp
coriander, cumin, blac kpepper powders 1 tbsp each
garam masala 1 tbsp
green coriander for garnishing
salt to taste
mustard oil 3 tbsp
cumin seeds 1 tsp

recipe of kachhe kele ke kofte

to proceed ...

Heat oil in a pan and throw in the cumin seeds. When it splutters add the chopped onions and fry it till golden brown. Add the ginger garlic paste and fry till oil separates. Throw in all the powder masala, salt and tomato puree and mix well.

Cook covered till oil comes on top, mixing in between. Add about 1 cup of water and give it a boil. Sslip in the kofte (1/3rd of the above stated quantity for this much gravy) and switch the flame off.

Do not disturb the kofte till they absorb water and grow bigger in size. Garnish with coriander leave, transfer carefully in to a serving dish (the kofte can break while doing this) and serve immediately with roti, paratha, naan or any rice preparation, we had it with plain rice in the below picture.

recipe of kachhe kele ke kofte

And with some daal and roti in the above pictures...

To prevent these kofte from breaking after putting them into gravy just arrange all the kele ke kofte into a casserole dish. Pour the gravy over it and microwave for 2 minutes. Serve immediately after this.

Add fresh cream in the last step if it has to be served for a party For the two of us I avoid adding cream.