Sunday, March 31, 2013

sweet chilly-ginger and tamarind sauce...


Sweet chilly sauce is a common condiment and sauce in the western, Thai and Malaysian cuisine. Commonly used for seasoning stir fries or as a dip for fried snacks or to smear on sandwiches and rolls. The uses can always be to suit personal taste as I have liked Thai sweet chilly sauce with my omelets too. But this one is a slight variation of Thai sweet chilly sauce.

This sweet chilly-ginger and tamarind sauce is a versatile sauce owing to it's ketchup like consistency. Actually when I gifted this sauce to a friend, she thought it is a tomato ketchup. Tamarind and ginger make this sauce quite interesting in the taste. It suits both Indian dishes as well as western style stir fries or as a dip.


Big fat red chilies of the cayenne pepper variety, are in season normally from January to March in the north of India and people use it to make stuffed red chilly pickle mostly. I use this variety of chilly to make chilly jam and orange or kumquat and chilly marmalade mostly. I also use this chilly as a substitute for red bell peppers to get a capsaicin flavor in my stews and salads sometimes as the husband is intolerant to bell peppers. Have a look what all I made using these chilies.


This sweet chilly-ginger and tamarind sauce has become quite popular as an all rounder sauce at home. I don't do any straining when I make this sauce, except for the straining of the tamarind pulp after soaking seedless tamarind in hot water for an hour.

ingredients...

Fat red chilies (cayenne or jalapenos will be good to use) 200 gm
fresh ginger root 150 gm
seedless tamarind 100 gm
jaggery or raw sugar 650 gm
salt 1/2 tsp

procedure...

Soak tamarind for an hour in 2 cups of  hot boiling water and strain the pulp in a wide pan after mashing it properly.
Remove stalks from the chilies and chop roughly.
Clean the ginger root and chop roughly.
Puree the ginger and red chilies together in a blender.

Now keep the pan with strained tamarind pulp on gas stove. Add the chilly and ginger paste and the jaggery and salt and heat to boil the mixture. It becomes a little frothy first, lower the heat after this and simmer on low flame for about 45 minutes.


It can take a little more time to reduce and become the consistency of ketchup. You can reduce it further to a jam like consistency.

And the sauce is done. It is an easy sauce to make and you will be spared from many preservatives  colors and texture enhancers used in commercial ketchup and sauces. You might like to to strain the sauce half way into the cooking and then reduce it to desired consistency.

Fill the sauce in sterilised jars or bottles. This recipe makes about 900 ml of sauce. The sauce stays well on room temperature for about 4-5 months. Or keep it refrigerated if you live in a humid area or the jar keeps opening frequently. Using clean and ry spoons will be better or use squeezy type bottles if you wish to prevent contamination.


There are bits and pieces in this sauce since I haven't strained it after cooking the chilies and ginger etc but I like it this way. This way the sauce is not suitable for squeezy type bottles.

We like this sauce with our dahi bhalle chaat, as a dip for crackers, as a sauce for pakodas and even with parathas and omelet sometimes.

I am sure you would love this sauce, especially if you have kids at home. Many friends have been requesting me to make this sauce on a commercial scale and sell it in friends' circle. Yes, this sauce is that good. I will be making this sauce more and more to gift my friends and family as homemade gifts feel more personal to me.

what do you think?

Tuesday, March 26, 2013

thandai : the quintessential holi drink | recipe of easy homemade thandai ...


Homemade thandai and easy? Yes. It takes just under 5 minutes to soak the ingredients and then another 10 minutes to make a paste after the soaking time. A concentrate of thandai is ready to be refrigerated and used as required. Add milk and enjoy thandai any time you like.

You must have come across Haldiram's Thandai or Mishrambu that is manufactured in Banaras. These bottles of thandai concentrate fly off the shelves of supermarkets and small shops alike during holi season. Thandai is a cooling drink to be enjoyed all over summer, but holi is the time when we start having thandai officially.

I had been planning to post a thandai for very long. Last year I made thandai after holi, took pictures too but that couldn't come to the blog. This time I thought let's treat you with this refreshing aromatic drink for the festival of holi. The bhang plant grows in my garden, it self seeds every year and I use it whenever required. For bhang waali thandai, there is nothing better than freshly plucked bhang (Cannabis leaves). Though nicely dried leaves are very aromatic as well.  Use dried leaves if you want.

Here is what you need for making about 10 glasses of thandai...


ingredients...

2 tsp fennel seeds
1 tbsp khuskhus or poppy seeds
1/2 cup of cashew nuts
1/4 cup of almonds
about 15 whole peppercorns (you can mix black and white peppercorns both)
1 tbsp dried rose petals
a generous pinch of saffron threads
about 2-3 tbsp of chaar magaz (melon seeds) is also added to this mix, I didn't have it this time

1/2 cup of sugar (or to taste)

Since I have some fresh bhang (cannabis leaves) growing in my garden, I used that too to make a bhang waali thandai, used 10 leaves to make 2 glasses of the green bhang waali thandai.

9-10 glasses of chilled full fat milk will be required to dilute the concentrate to make fresh chilled thandai.


procedure...

Soak all ingredients except milk and bhang leaves in about a cup of water or to submerge them all well. A minimum 2 hours of soaking will be good.

Blend in your mixie or food processor to make a smooth paste. Add the sugar too while blending the mixture.

Empty in a jar with lid as this is the concentrate to be refrigerated. If making fresh thandai for immediate use, dilute with chilled milk, blend again if you want it frothy and serve. Otherwise, take 2-3 tbsp of the concentrate, dilute with chilled milk to make a glass of thandai and serve.

To the same concentrate mix of thandai, add bhang leaves as required and blend again. Refrigerate or dilute immediately to make bhaang waali thandai. The regular thandai is also called kesaria thandai due to the use of saffron in it.


 If the kesaria thandai doesn't look enough yellow (kesari), don't worry. The blended saffron threads keep releasing color into the concentrate mix and make it quite yellow the next day..see how it releases color after just 5 minutes of blending..Adjust sweetening as per taste.


Bhang waali thandai has a very aromatic flavor of bhang, something relished by those who love it.

The Kesaria thandai has a prominent flavor of saffron, fennel and a mild hint of peppercorns. Richly nutty of course.

The amazing thing is, these hot peppercorns are cooling in nature when ground with water and taken with cold milk. The other ingredients are all cooling in nature as well.


 Now you realise how easy it is to make thandai at home. It doesn't take much time or effort as well.

Happy holi to you all and please do let me know whenever you try this recipe.

Cheers...

a rose flavored sugar free kaju katli and a regular kaju katli...


Yes two ways with Kaju katli, the famous Cashew nut fudge that is the most loved mithai all over India.  Probably more so because it has a better shelf life than any other good mithai. Stays well for a month or so. And both these versions of kaju katli are microwave cooked.


I made this no sugar added version which has some lactose in the form of the milk powder I added to bind, this one is flavored with rose petals and rose water. Lactose sweetens the kaju katli lightly. Rose petals and rose water make this kaju katli quite fragrant.

 The other one is a regular sugary kaju katli but with less sugar than the commercially available ones, no flavor is used in this one because the flavor of Cashew needs to shine when it's on it's own.


 Lesser sugar means poor binding and darker color. Sugar binds the cashew paste really well and makes it lighter in color after cooking, but this dark looking kaju katli has great cashew taste, sweetening is medium to light I would say. For some people it will be light, to me it is perfect.

Even the milk powder and cashew version, is lightly sweetened, with a hint of milk too. I personally do not like milk or khoya burfi or fudge so this one would not be my favorites, but the husband likes this milky one better. Different choices you see.

ingredients for rose flavored, no added sugar kaju katli...


broken cashew nuts 4/5 cup or 87 gm (see the picture on weighing scale)
milk powder 3/4 cup or 66 gm
rose water 2 tbsp
full fat milk 1/4 cup
dried rose petals 1 tbsp or more

procedure...

Powder the cashew nuts finely, it might start getting lumpy and oily in the end so take care not to make it cashew butter. Just stop when the powder starts getting crumbly.

Add the weighed milk powder and about 1/4th cup milk and a tbsp of rosewater in a microwave safe glass bowl, mine was a Borosil one.


Mix everything well. The milk powder slowly dissolves and allows a sticky paste to be formed.

Now microwave for 1.30 minutes, the paste will fluff up in the microwave. Take out and stir and mix well again. See how it looks in stages. The mixture is microwaved for 1.30 minutes each time, taken out and stirred with a spoon. Repeated 3-4 times till the paste forms a ball.


Add the rose petals in last, mix well and let it cool till you can handle it with bare hands. It becomes very oily as the fats separate.

Keep a parchment paper ready folded like a book. Place the ball of cashew paste on one half of the parchment and cover with the other half. Roll out with the help of a rolling pin.


You would want a perfectly square or rectangular sheet of rolled out fudge so make sure you fold the parchment paper inwards from the open edges. See pictures to understand. Roll out the fudge to fill in the corners as well. The thickness should be the same all over.

Lift this rolled out fudge along with the parchment paper casing, place it on a appropriately sized tray and refrigerate till cold.

Measure with a scale if required and cut into squares or diamonds.


There is a hint of milk in this kaju katli, and that's where the rose saves it.
Rose flavored kaju katli with a hint of milk that you might miss if uninitiated.

ingredients for the regular kaju katli...

broken cashew nuts 2 cups or 220 gm
sugar 3/4 cup or 100 gm
you might want to add green cardamom or saffron, but I like it unadulterated cashew flavor

procedure....

This one is a cashew and sugar fudge, the regular kaju kali. Sugar helps in binding the paste and since I have used minimal sugar the texture is not very smooth. But taste wise it is a better version of a commercially made Kaju katli. A very intense taste of cashew just lightly sweetened.

The cashew nuts are soaked in water, just enough to cover them all, for 2 hours minimum.

Then they are blended till they make a smooth paste, add some of soaking water.


Now add the sugar and cook it in a thick base pan or in a wide glass bowl in microwave. If cooking in pan, keep stirring and cook till it becomes a sticky ball. If doing in microwave, take out and stir every 2 minutes for about 5 times and then every 1 minute 2-3 times.


Stirring and mixing each time you take the mixture out. It should make a sticky ball in the end, and when smoothened with the back of a spoon, it should get a smooth surface. See picture.


Let it cool till it can be handled with bare hands, Make a smooth ball place on a parchment paper covered with the other half and roll out into a rectangle.


Now on the rolling out steps will be like the rose flavored kaju katli. Refrigerate to cool and then cut into desired shapes.


A little darker, a little softer kaju katli that you would get in stores, but a lot tastier that that. And the bhang ki thandai in the picture is also coming soon on the blog..


Wishing you all a happy holi with a colorful post.


Do let me know which one you tried. The good thing is, you can cook them both in pan also. Do shoot me a question if you want to cook this in a pan, I'll let you know what to expect. It's easy any which way.

Cheers..

Friday, March 22, 2013

angoor ki chutney | green grapes chutney with ginger...


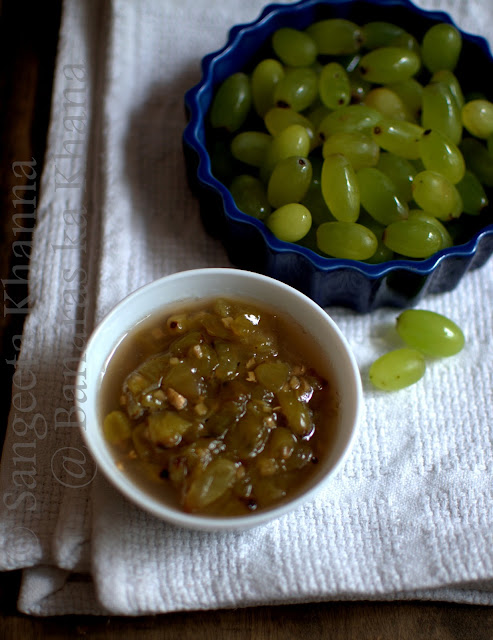
Angoor ki chutney or green grapes chutney is no less than the Mango chutney we love with our Indian meals or with crackers and cheese. While I myself don't eat much chutneys and jams, Arvind loves them. He loves the jams, marmalade and such chutneys more than fresh fruits sometimes. I am more for the fresh fruit but then such chutneys are a good way to use up any leftover fruits or when you buy in bulk and can't consume so much fresh. I do buy fruits and vegetables in huge bulk sometimes, being greedy for fresh produce always. This tendency makes me guilty of wasting them a few times as well, though I try and give away the extra to the house help.

angoor ki chutney or launji

This chutney is an Indian way of using fruits for making a sweet and savory, sometimes hot with chilies preserve. Also called as launji, this type of chutney can be made with any sour fruit or vegetbale, some neutral vegetable also make good launji and raw papaya launji is as good as kachhe aam ki launji, the recipes will differ obviously.

Khatte angoor ki launji may have some roasted cumin powder too, but we all make them the way we like. Some people love a hint of garam masala too in this angoor ki chutney or launji, even I like it occasionally.

This tomato chutney is more popular as a daily thing. Basically a condiment that is served along with an Indian thali meal, it serves the purpose of a palate cleanser. More popular in the central states of India, I have seen Bengali families serving such chutneys (cooked with more sugar content) at the end of the meal, just before desserts.

There are food traditions and there are recipes, modern life doesn't give us many chances to eat traditionally laid out meals but we enjoy the taste elements in bit and pieces. Like this chutney will be on a toast some day, on a cracker with cheese some other day and will be had with a paratha meal some other time.

I kept the sugar content lesser in this chutney, it still keeps well for a week at room temperature, for longer shelf life it's better to refrigerate. The chutney is a basic jam with lesser sugar content and lesser degree of set. More sugar added will cause the chutney to set like a jam as sugar causes the pectin the fruit to gel.

ingredients...

green grapes 500 gm
finely chopped or grated ginger root 2 tbsp
salt 1/4 tsp
sugar 100 gm
water 1 cup or a little more (depends on how juicy the grapes are, smaller grapes might need a few tablespoons more of water)

procedure...

Chop the grapes in halves or as you like.

Mix all the ingredients in a wide and thick bottomed pan and cook on a medium flame. The mixture will come to a boil, start frothing and then bubbling merrily while it reduces.

You should keep a watch on the liquidity of the cooking mixture as if the flame is high it would dehydrate faster and might need some more water added. Total cooking time on medium heat would be around 25 minutes but you just have to stir it in between and keep an eye. You can do other chores on the sly.

angoor ki chutney or launji


Easy isn't it?

You can always add some whole black peppercorns to this chutney, some roasted fennel seeds powder or a mix of roasted fennel and fenugreek. Some red chilly powder will be awesome too if you like a kick.

Check out a few more such chutneys with different ingredients, may be you would get an idea how these chutneys can transform a meal...

Khajoor tamatar ki chutney

Plum chutney

Mango chutney 

Date and ginger chutney with tamarind 

Tamatar ki mithi chutney

We Indians made the fruit jams spicier and tangier. I hope you would love having these chutneys with your meals. So try these if you haven't had them earlier. Those who know these chutney, know what I am talking about.

Cheers.

Sunday, March 17, 2013

laal mirch ka bharva achaar | pickled stuffed red chilies : UP special...


stuffed red chilli pickle

 Laal mirch ka bharva achar or just call it bhari laal mirch. Almost everyone knows it what it is when you say bhari laal mirch in Banaras or any part of UP. Many pickle brands and small time pickle makers run a thriving business thanks to Bharva laal mirch. I have seen people getting this pickle packed in large quantities to be taken to different parts of the world. Such is the power of those familiar taste that you had sometime in your childhood.

I have known a few people who would consume one large bharva laal mirch everyday. It is almost like ajinomoto in some people's lives. Addictive taste maker that it is.

Although I am not among those people who would crave badly for this pickle, sometimes my mom used to send it to me and even that would get distributed to friends who liked it. But I had some wonderful lovely memories of making of this pickle at my parent's place. It was always prepared by my grandmother and she would call me to sit by her and sometimes help her stuffing these red chilies. I used to wear surgical gloves while stuffing these and used to wonder how my daadi's hands never burned by the chilly heat. And now after so many years my hands have seen many moons, many chores and they burn no more. Of course I take care not to touch the innards of any chilies. If I touch my face or eyes it is a different story altogether.

Daadi would make stuffing equipment by cutting Neem ka datun (Neem sticks used as a toothbrush) neatly and would use it as a pressing instrument to push all the spice mix inside the hollow of red chilies. We shared many stories stuffing those laal mirch. I know about my grandfather only due to such chit chat with my daadi. Her hands would do the work deftly while she would keep on talking about the British raj and how the Angrez (Englishmen) ruled and destroyed. Both my grandparents were freedom fighters, grandfather couldn't see a free India in his lifetime. But that is another story.

stuffed red chilli pickle

This laal mirch ka achar was a long due recipe to be posted here and I had bought these chilies a few times this season, but making Orange chilly marmalade came into picture and then I made another jam with Tamarind and this chilly. Both these were made repeatedly this season to gift them away as well. Lastly, when I suspected these chilies will be off from the markets this season, I decided to call my mom to ask for the spice ratio to confirm what was on my mind. Made the pickle in the next hour and called her in the evening to tell her how lovely it is smelling, just like daadi used to make it.

fresh red peppers for pickle

I pickled only 5 large red chilies as we don't eat pickles much and I did not have much time to stuff many chilies. It took me only 30 minutes including clicking the pictures. 

Multiply the recipe if using more chilies but the amount of the masala used depends on how large and fat the chilies are. So go by your 'eyeballing the ingredients' experience and use the extra spice mix for a mixed up pickle like I have told in the end.

ingredients...


fresh red peppers and spices for pickle


5 large and light weight red chilies

2 tbsp amchoor powder
1 tbsp red chilly powder
3 tbsp black mustard seeds
1 tbsp fennel seeds (motti saunf)
1 tbsp fenugreek seeds
1 tbsp ajwain seeds (bishop's weed)
2 tsp kalonji seeds (nigella seeds)
2.5 tbsp salt or to taste


1/4 cup mustard oil (use the best quality available)

A clean sterilized glass jar that can hold the chilies arranged vertically.

A note on choosing the right chilies for this pickle :

 Get the lightweight for it's size chilies as those will have lesser seeds and the seeds would come out easily. It the chilies are tightly packed with seeds it will be tough to remove the seeds and the chilies may get damaged during hollowing them. But if you don't get such hollow chilies, you can always make the mixed up chilly pickle suggested in the end of this post.

Procedure...

First wash the chilies well and let them get dry. I kept them in sun for about 15 minutes, lining the basket with tissue paper.

preparing fresh red peppers for pickle

Cut off the crown of the chilly, discarding the green stalk and some of the red part to make a smooth round opening at the top.

Using a sharp pointed knife hollow out the innards of the chilies, including all the seeds.

Wear surgical gloves or kitchen gloves if your skin is sensitive to chilies.


preparing fresh red peppers for pickle

Now make a coarse powder of all the other ingredients except the oil. Chop off the bits of red chilly clinging to the green stalks and add to the grinding mixture. It makes the mixture moist and keeps it glued together. Add a tbsp of mustard oil when everything has been coarsely powdered and run the mixie or food processor once again for a couple of seconds.

See how the ground mix looks like. Now stuff each chilly with the spice mix. I used a small spoon meant for weaning babies. The ones that come with baby feeders.

Basically anything that can be used to press the spice mixture down into the chilies.

preparing spices and stuffing the red peppers for bharva mirch ka achar

Drizzle mustard oil with the help of a spoon into each of the stuffed chilies. About a tsp of mustard oil goes into each one of them.

Now is the time to arrange all of the chilies into the glass jar. Drizzle more mustard oil into each chilly if it can still hold some. Keep the jar in sun with lid on.

You can drizzle some more oil into each chilly everyday, taking care not to spill any oil outside as that oil wouldn't help the pickle in any way.

Some people like to fill the jar with mustard oil to drown all the stuffed chilies, I find it a wasting activity as this oil wont be used for anything if you don't make Litti chokha frequently. This pickle is used in the masala of Litti chokha and some people like this oil too into the spice mix made for Litti chokha.

Here is a picture of my mom's red chilly pickle of the last year, that has turned a deep shade of red, the top one in the picture.

The freshly made pickle is bright red. Smelling awesome and reminding me of my daadi, left side one.

laal mirch ka bharva achar

In the small jar on the bottom right, you can see the mixed chilly pickle. Mixed as in all the spices and chopped red chilly is mixed and put up into the jar.

See how it is done. All mixed up and drizzled with mustard oil and then filled into a small jar. You can always chop and add some green chilly to the same spice mix if you wish.

laal mirch ka bharva achar

Pictures tell the whole story. We tasted this mixed one today and loved it. This mixed pickle is ready within 3 days while the stuffed one would take some time when it can be broken easily and enjoyed the way it was done back home many years ago. The skin of the chilly becomes softer so you can break off a half inch piece from top of the chilly and have with a meal. That's how it is normally served. One whole stuffed chilly pickle is broken into half inch or bigger pieces and served individually.

That's why it is sensible to make a little of this mixed chilly pickle as well so you can taste it after 2-3 days.

Best with daal chawal meals. Some people use it to mix in alu paratha stuffing, Sattu paratha stuffing or even with matthhis. I have seen some people having it with Thekua in Bihar. Ah yes, this pickle is as common in Bihar as it is in UP. A shared inheritance.

I felt so good making this pickle that eating it with my meals will be special now. I know my daadi will visit me from heavens whenever I'll have it.

The pickle has a shelf life of a couple of years.

Please do let me know if you make this pickle. It is special.

Wednesday, March 13, 2013

dahi wala gosht or dhaba style mutton curry...


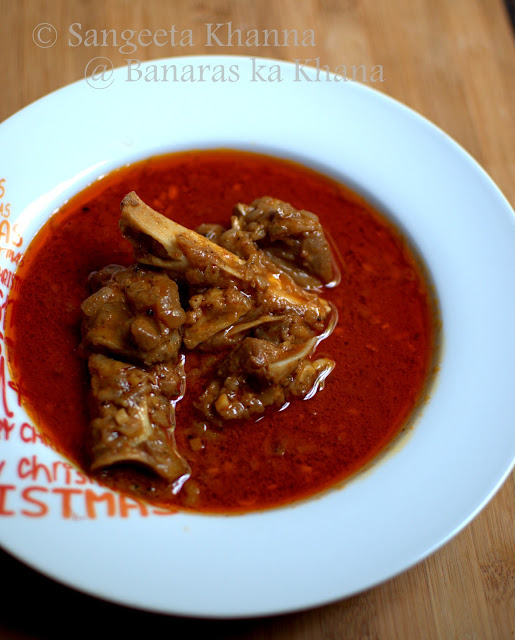
Dahi wala gosht means meat cooked with yogurt and dhabe wala mutton means the mutton curry one gets in highway eateries. This is yet another rustic mutton curry that doesn't involve many steps in the cooking procedure. The highway eateries cook large amounts of meats with balanced spicing but the cooking procedure is not complicated. Almost all of them cook the marinated meat in just one step, but they do slow cook all meat as a rule. At least an hour's marination time and about 2-3 hours cooking time makes sure the cooked meat curry is truly melt in your mouth type with a rich gelatinous sauce clinging to the meat. Some of them cook the meats overnight but you can always cook small quantity at home for approximately 2 hours with great results.

dahi wala gosht or dhaba style mutton curry

You normally get kulchas with such mutton curries in dhabas, at home you can choose what kind of bread you need with it. Such meals do not require any side dishes, just some raw onion on the side as they serve in the dhabas will be perfect.

You would be glad to know that this recipe is just 2 steps, just mix all ingredients first and rest the mixture (the marinated mutton) for a couple of hours. Then heat ghee and cook the mutton on very low flame tossing and turning once in a while in between.

ingredients..
(serves 2-4)
mutton pieces on bone mixed cuts 500 gm
yogurt 250 gm
finely chopped or minced onion 3/4 cup
minced garlic 1 tbsp
minced ginger 1.5 tbsp
special garam masala* 2 tsp
*(or just pound 6 green cardamoms, 6 cloves, 2 inch cinnamon and 1 fat black cardamom together)
kashmiri red chilly powder 1 tbsp or to taste


ghee 1/2 cup
whole coriander seeds 2 tsp
whole cumin seeds 2 tsp
whole black pepper corns 2 tsp

procedure...

Mix the mutton pieces with all the ingredients of the first list. Marinate for 2 hours or overnight.

dahi wala gosht or dhaba style mutton curry

At the time of cooking heat the ghee in a wide heavy bottom kadhai, and tip in the whole spices.

Wait till they sizzle and then slide in the marinated mutton slowly. Bhuno the mixture on low flame slowly, turning the meat once in about every couple of minutes in the beginning for 20 minutes and then cover the kadhai with a lid and let it simmer.

Check after every 15 minutes and keep adding 1/4 cup of water every time you feel it is getting dry. Be aware after an hour's time of cooking the meat as it might stick to the bottom if your kadhai/pan is not thick enough and the flame is not calibrated to cook very slowly according to the thickness of the pan.

Just keep simmering the mixture and watch when the meat is about to fall off the bone. The gravy starts looking almost gelatinous after 1.45 to 2 hours of cooking and it can be ready any minute after that.

Adjust seasoning and consistency of the gravy by adding a little water if you wish. You might want to throw in a few slit green chilies at this time. They taste great but coriander greens should be avoided as this meat tastes better without dhaniya patta.

dahi wala gosht or dhaba style mutton curry

This dhaba style meat will be one of the most delicious mutton recipes you have tried. You can always cook it in slow cooker if you use one. I normally like to keep stirring or feeling my curries when I cook, so the long cooking time is not a problem if I am home and want a therapeutic cooking time. After all the treat of slow cooking is immensely yummy meat.

The flavors are not too overpowering spicy, the yogurt makes the curry a little towards tart but the chilly heat and the spices complement the yogurt and slow cooked gelatin extraction kind of gravy really well. Everything that was chopped finely or not so finely gets soft and silky after slow cooking.

Sponge off the gravy with some freshly baked whole wheat naan or roomali roti.

You would love to cook this for crowds too. It is one of those crowd-pleasers and does not need much equipment to be cooked.

Cheers...

home made paneer, the kind that can be cut into neat cubes...


Freshly made paneer is incomparable. Homemade makes it really the best available option. See how the paneer is porous and so soft that it can bend and take a new shape while it is still hot. I took this picture while the paneer was still hot. Just pick up a cube a eat it to believe how different and how much better it is from the store bought paneer.

You can make paneer within 20 minutes time if you need about 200 gm of paneer. This time is mostly the time required to bring one Liter of 3% milk to boil. After that it takes only about 2 minutes to curdle and then 2 more minutes to strain the whey and get the paneer. That is just about 5 minutes of your time when your hands will be engaged into real work. The time when the milk is brought to boil, can always be used to do other chores in the kitchen.

To make paneer, bring the milk to boil but watch the milk as soon as a thin layer of fat starts accumulating on top and starts making wrinkles and bubbles from the sides.The temperature should be around 90-95 C if you are using a milk thermometer. The curdling of milk at this temperature results in softer and more porous paneer as the milk solids coagulate slowly. The acid (lemon juice or vinegar) is also added slowly so the curdling is slow. Keep stirring the curdling milk so you can see the whey separating and know when it is ready to pass through the colander.


Things required...
1 liter of 3% milk
2 tbsp of white vinegar or Lime juice or 3 tbsp of sour yogurt diluted with a little water
a deep bowl shaped sieve or muslin lined colander

If the temperature is too hot or the acid (vinegar, lime juice or yogurt) is added too quickly, the milk solids coagulate quickly, leaving no pores and the paneer turns hard. So take care to let the paneer curdle slowly, taking about a minute's time and then pour the contents of the pan through a muslin lined colander. I use a steel sieve which can be fitted on another pan to drain the whey.


The contents of the pan are emptied into the sieve, the coagulated milk solids (paneer) is propped up in the middle, if it has spread all across the sieve or colander, and then it is tossed once and turned upside down so you get an almost smooth finish even when you are making a small quantity. For larger quantity you always get smooth finish as the weight of the paneer made, makes sure it gets smooth by the force of gravity.

The paneer can be transferred to a bowl if making a small quantity, to make sure it takes a shape that can be cut into nice cubes. It will keep releasing some whey and does not need to be hung to drip. Just take out form the bowl and cut it into pieces of desired size and shape.

Or mash and knead to make Rasgulle.


How about making some fresh palak paneer?

For that I would steam spinach while the milk boils, puree it nicely, add butter and salt n pepper to the green puree and then mix with paneer when it is ready and simmer for a couple of minutes. Quick and tasty meal is ready.

And do not waste the whey. It is a great source of proteins so use it to knead dough, make pancake batters or use it o make soups or drink it as it is. It is a great mild laxative that nourishes your gut as well. Making paneer at home has double benefits you see.

Have you been scared of making paneer at home? Did this post help you?
Please do write to me if it did.

Saturday, March 9, 2013

harey chane ka nimona | a typical UP curry made with green garbanzo beans...


Talking about traditional UP curries one thinks of a spicy hot curry with deep colors and robust flavors. Winter and spring time curries are more spicy than the summer curries. Seasonal produce is used in the most appropriate way. I have been cooking spicy curries this winter more than ever. 

Harey chane ka nimona was also cooked for the love of eastern UP style curries. I have been talking about nimona a lot on this blog and noticed that a few of my friends and readers tried out my nimona recipes and wanted more of them. Of course variations of it. I knew how addictive these curries are. And all of them so different from each other in final flavors. 

This Harey chane ka nimona is yet another version of a lentil curry made using a paste of the lentil. Fresh green chickpeas or garbanzo beans are used for making this nimona but soaked green or brown chickpeas can also be used. This one a little more spicier than the other ones. The reason is, chana or chickpeas is loved in the spicier avatar in Eastern UP. The curry is enjoyed most with plain boiled rice or sometimes chapati. 

ingredients...
(2-4 servings)

fresh green chickpeas 300 gm 
boiled, cooled and cubed potatoes 1 cup

to be made into a smooth paste...
garlic 3-4 cloves
ginger roughly chopped 1 tbsp
whole dry red chilies 2-3 or to taste
whole cumin 2 tsp
whole peppercorns 2 tsp or lesser if you don't want it too peppery hot
whole coriander seeds 1 tbsp
scissor cut tejpatta 2 
turmeric powder 1 tsp

mustard oil 2 tbsp
whole cumin seeds 1/2 tsp

procedure....

Grind half of the green chickpeas into a coarse paste. Keep aside

Heat oil in a heavy based pan and tip in the cumin seeds. Let them crackle.

Add the cubed potatoes and half of the whole green chickpeas. Stir fry for a couple of minutes. Add the masala paste and bhuno for about 5 minutes or till the masala gets aromatic. Add salt to taste and mix well.

Add the coarse paste of green chickpeas, mix well and bhuno for a couple of minutes more. The paste now becomes a little lumpy but wont stick to the pan if you keep the flame on the lower side. Just let everything mixed up so the spices are soaked in.

Add about 3 cups of water, cover the pan and simmer the curry for about 10 minutes. Adding more water if required.


Serve hot with plain boiled rice. Some people like it with parathas or pooris. It is a tasty spicy curry that can go well with any traditional bread or rice preparation.

Simple home cooked meals used to be frugal most of the times as the lady of the house was the only one contributing to the kitchen or cooking most of the times. I am talking about middle class Indian households, the way food traditions are formed. So one curry and one daal used to be cooked mostly, sometimes the daal and curry was rolled into one with such curries like nimona. It made sense as taste and nutrition both were taken care of.

Joint families used to have more elaborate meals I have seen. Many more hands to contribute to the cooking process and many more choices to be catered to. In nuclear families, elaborate meals were prepared only on weekends or on festivals. Who cared when frugal was so yummy.

Monday, March 4, 2013

mutton curry UP home style...


Meat curries in UP mean mutton curries essentially in Hindu homes. Made spicy using home ground spices or whole spices sometimes, simmered in heavy bottomed pans for hours in leisurely times and pressure cooked when the meal needs to be quicker if not instant. But the flavors of the spices remain the same for most conservative food snobs of the state. They wont 'like' a mutton curry enough if it is not done 'their' way. I know because my dad is one of those snobs. And he was the one who used to cook mutton curry at home and later when I started eating meats, taught me as well.

 Spice blends are different in all Indian states and we immediately locate the origin of a dish by the whiff of the complex bouquet of spice blend used in a particular dish. All spices are Indian but they create a infinite range of combinations and permutations. Isn't that a wonderful thing to experience living in a country that is known for spices. Spice blends are like perfumery. The more robust spices are the base flavors and the delicate aromatic ones make the tasting notes that hit the palate first. The meats and vegetables add to the bouquet and we get a unique meal in every little home across the country. The homes where homemade spice blends are used I mean. Many packaged spice blends have made the curries taste similar in some homes though, still the amount of fats used, the additional seasoning makes a difference. So if you didn't pick up the MDH or Everest blends for mutton curry, trust me to get a nice home style mutton curry with this recipe.

The addition of potatoes is mine as I have seen a few friends of mine loving potatoes in a mutton curry, and the husband loves them too. My dad would shrink his nose at the potatoes I know. Skip them if you don't want them.

Note that the final taste of this mutton curry depends on the curry powder blend too which is homemade in my case. Try and powder the spices in the same ratio and combination when you are making a UP style curry. Ready made packed curry powders are different.


ingredients...

(2-4 servings, depending on the side dishes served along with it)

mutton, curry cut (on bone, preferably from shoulders but any bony cuts would work fine) 300 gm
a large potato with skin, scrubbed clean and cubed
ginger julienne 2-3 tbsp
sliced garlic cloves 1.5 tbsp
thinly sliced onions 1 cup
turmeric powder 1 tsp
everyday curry powder 1 tbsp
special garam masala 1 tsp
salt to taste

mustard oil 1/3 cup
cumin seeds 1 tsp
tejpatta 2-3 leaves*
whole red chilies broken and seeds removed about 10 or to taste

chopped coriander greens 2-3 tbsp or to taste


procedure...

  • Heat mustard oil in a wide and thick base kadhai. Tip in the cumin seeds and wait till they crackle. Add the chopped ginger and garlic, saving 1/2 tbsp ginger julienne for garnish and let them fry for 30 seconds. Add Tejpatta, whole red chilies broken and seeds removed, and then add the sliced onions immediately. Add 1/2 tsp salt (more to be added later) and fry the onion till browned well.

*I added 4 cloves and one black cardamom at this step as well, the husband doen't like whole spices in his curries so I keep the whole spices minimal most of the times, You might like to add a stick of cinnamon too.
  • The mutton will be added at this step, mix well with everything and keep turning the pieces to let them cook from all sides. This bhunoing process will go on for about 25 minutes on low flame so the mutton pieces keep browning slowly, absorbing the flavors of the ingredients. You might need to quench the dryness with a tbsp of water every now and then but keep the mixture dry all this while. Since the flame is low, you can do a few chores in the kitchen while the meat is cooking.
If cooking in a pressure cooker, this bhunoing step will be minimised to 10 minutes.


  • Add the cubed potatoes and the powdered spices along with 2 tbs of water so the powdered spices do not get burnt and aromatic oils get absorbed into the half cooked mutton pieces. Keep the flame low and keep bhunoing for about 10 minutes more. Add salt and about a cup of water, cover the kadhai with a well fitting lid and let it simmer for 20 minutes or till the mutton gets completely cooked, the meat should be ready to fall off the bone, but should not be already detached from the bone.
If pressure cooking, just bhuno the spices and cook for another 20 minutes. Potatoes should not be added when pressure cooking as they disintegrate and interfere with the taste of the curry when pressure cooked.


  • Adjust the consistency of the curry, add more water or dry up on higher flame if required. Check seasoning and adjust. Add the green coriander leaves and serve hot. The ginger julienne make a nice garnish, they taste great in the curry as well.


As I told you, I am not too fond of the potatoes in this mutton curry, the husband loves them ans I add them sometimes just to add some carbs to the curry when required. They do not hamper the taste of the mutton curry if added in small amount.

This is a robustly spicy mutton curry, you get the top notes of clove, green cardamon and cinnamon, tejpatta makes an appearance in the aromas as well. Browned onions and the black pepper, black cardamom and cumin make it robust and deep in flavors. The spiciness of this mutton curry is deeply satisfying in a meal. You would feel like having more of the gravy and all your spice craving will be sated once you have it. Just don't load up your plate with too much roti or rice as it would make you feel heavy and dull after the meal.
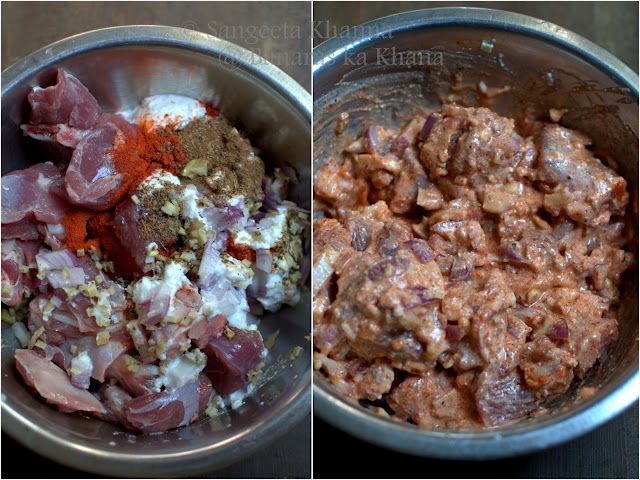
Another UP home style mutton curry is made in a different way. First boiling the mutton and making a yakhni, then bhunoing the boiled mutton with spices and proceeding to simmer the curry with spices. I have posted this mutton curry in the post where spice powders and their therapeutic uses are discussed. It is long post and you would have to scroll down to find that mutton curry at the bottom.