Monday, September 23, 2013

mooli aur turai ki subzi | a plain curry with radish and sponge gourds


Some one was talking about mooli aur turai ki subzi the other day and I couldn't resist making it the very next day. This is a simple soup like curry with radish and sponge gourd slices stewed together with a light tempering of cumin seeds and green or red chilly. The simple clean flavors of both the frugal vegetables is to die for. Although, in this age and in this place (the national capital) nothing is frugal. Radishes and sponge gourds both come for Rs 60 a kilo, but the dish originated as a frugal meal I am sure. Also, I remember having it in hot summer days, this is supposed to be cooling and light , especially if taken with rice. I have tried this curry in a proper soup form and it was great. With a little boiled rice added to the soup it is a very light detox type meal. All desi, traditional flavors and super healthy. The curry is known as nenua mooli ki subzi in eastern UP, you might like to see nenua chana ki subzi and nenua chana daal ki subzi and nenua pyaz ki subzi in reference to this.

Interestingly, my MIL also used to make this curry and in exactly the same way as my mother. Arvind's family is punjabi but they have stayed in UP for generations now, and have imbibed many local flavors as their own. Actually all the other three types of nenua ki subzi was made exactly the same way in every home I have been to. No one played with the recipes to spoil them as these were classics.

Some people like to have plain rice with this mooli nenua ki subzi and some like it more with roti, there are some people who just hate mooli so this curry is not for them. This flavor is an 'all or none' kinda food, you like it and crave for it or you just hate it and can't stand it. If you have had this curry in your childhood and been craving for it, here is this easy recipe that will take you back in time.

ingredients..

one large radish (long white variety if possible) about 200 gm
5 large sponge gourds about 600 gm
2 hot green chilies or to taste
one hot dry red chilly
1 tsp cumin seeds
1 tsp turmeric powder
salt to taste
2 tbsp mustard oil (do not replace this oil with any other is possible, the authentic taste is something you would love)

procedure...

Peel, wash and slice the radish after slitting it length wise, so you get half moons or quarters. Thin round slices are also good.

Peel, wash and slice sponge gourd the same way you did with mooli (radish).

Heat the oil in a wide pan (kadhai) and tip in the cumin seeds and both types of chilies. Let them all splutter and then add the turmeric powder and immediately cover it with the sliced vegetables all at once. Add salt, stir and mix everything.

Cover and let it simmer for about 25 minutes. Stirring once in a while in between. The vegetables are  watery in this case so you wont need to add any water, the fresh vegetables are so watery that the contents of the pan become all liquid after 10 minutes or so. Cook till everything is soft and the consistency you prefer. Some people like it soupy and some people like it dry, almost looking like a scramble of sorts. Your choice.

The curry has a hint of mooli but it doesn't stink as many think. I love mooli any which way but you have a fair chance with this curry even if you hate mooli. Try once and see if you can make peace with mooli this way.

Cheers.


Wednesday, September 18, 2013

Besan ki pinni | a chickpea flour fudge with almonds, gum tragacanth and pistachios | Indian homemade mithai

besan ki pinni recipe

I grew up eating this besan ki pinni. And it used to be a round huge ball dripping with ghee, interspersed with few nuts and I remember my tiny hands would be full struggling with this pinni. Well, it's weird talking about my tiny hands as I have really huge hands as an adult, but those days are etched in my mind. This used to be a school lunch box thing and I remember I used to wait for the turn of besan ki pinni in my lunch box. I still remember that aroma more than the ones I cook now. Such are memories and such are the ways we connect with our food.

Besan ki pinni was made freshly those days. It was a way to fortify a warming sweet besan ka halwa, and to keep it for longer duration too probably, as there is not much difference in the ingredients apart from the tragacanth gum (gond) and the amount of nuts used. Some recipes use added khoya or evaporated milk in it and that makes the pinni quite rich. I like the roasted besan flavours more so no khoya for me. Moisture in pinni is definitely lesser than the halwa.

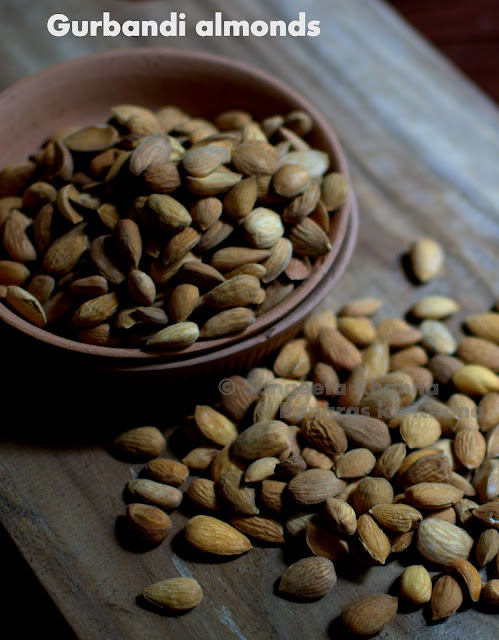
I like adding the gurbandi almonds (small, more rounded variety with high fat content) to such desserts as the flavour is much better than regular almonds.

gurbandi badaam

These are some of the desi desserts that I like. I love anything made using besan (chickpea flour) by the way. I saw the besan ki pinni transforming as I grew up. It was being made into bars or squares, looked like a yellow nut studded fudge and was easier to shape. I adapted this shape when I started making pinnis, as it was easier to set in a flat tray rather than making balls with hot cooked pinni mix.

And when we recently tasted pinni again at The Claridges dhaba, I reminded myself to make some pinni soon. And here it is.

ingredients :

Besan (chickpea flour) 250 gm
ghee 100 gm
almonds 100 gm (I used Gurbandi almonds, small in size and higher fat content)
pistachios 10-15 gm
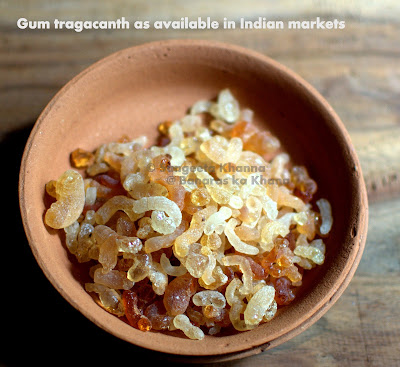
*gum tragacanth 40 gm (optional)
sugar 100 gm (I used 60 gm as we like it very mildly sweet)
milk 1/3 cup

*Gum tragacanth adds a nice bite and mouth feel to the pinni and has health benefits as well.
In folk medicine it has been used for a laxative, persistent cough, diarrhea, and as an aphrodesiac. Modern pharmaceutical uses include an adhesive agent for pills and tablets, and for emulsifying oil droplets in lotions, creams and pastes. Its superior water absorbing qualities make it an excellent thickening agent. Gum tragacanth is used in many everyday commercial products, from cosmetics and toothpaste to jellies and salad dressings. ~ source.

edible gum

procedure :

Fry the gum tragacanth (gond, if using) in hot ghee and let them fluff up. Remove using a slotted spoon and save. See how it looks after frying.

deep fried edible gum

Let it cool and crush lightly.

Make a coarse powder of the fried gum and almonds in food processor or mixie.

crushed almonds

Now heat the remaining ghee and dump the besan in it. Roast the besan on low flame till nice and brown, the sign is the aroma of bhuna besan (roasted chickpea flour) and you see the ghee starts separating from the roasted besan. If using lesser ghee like this recipe, you start with a dry sandy mixture while roasting the besan, and then it starts coming together while it gets roasted.

You can mix the besan with ghee nicely, rubbing with your fingers and bake in the oven at 180 C for about 20 minutes or till it gets browned. Stirring the besan a couple of times in between.

Add the sugar and the coarse powder of gum and almonds to this mixture and stir to mix well. Now add the milk slowly and keep folding the slightly wet mixture so it all comes together like a crumbled cake. You might use up a bit more milk that suggested in the recipe.

 Dump it all into a flat tray or plate, whatever is convenient and press using a wide blade of knife or the back of a steel plate.

Sprinkle chopped pistachios over it and press down again, I used a small wooden chopping board that fits inside this tray. Let this tray rest overnight, or at least for 2 hours, cling wrapped or covered properly.

besan ki pinni recipe

It gets set and looks like this.

besan ki pinni recipe

Cut this set pinni in desired shapes and enjoy at room temperature. It keeps well for about 3 days at room temperature and for about 2 weeks when refrigerated. You would like to warm it up in microwave if refrigerated, before you serve it. Warm is better for me, the ghee in the pinni hardens it when refrigerated. Some like it hard too, so you can decide for yourself.

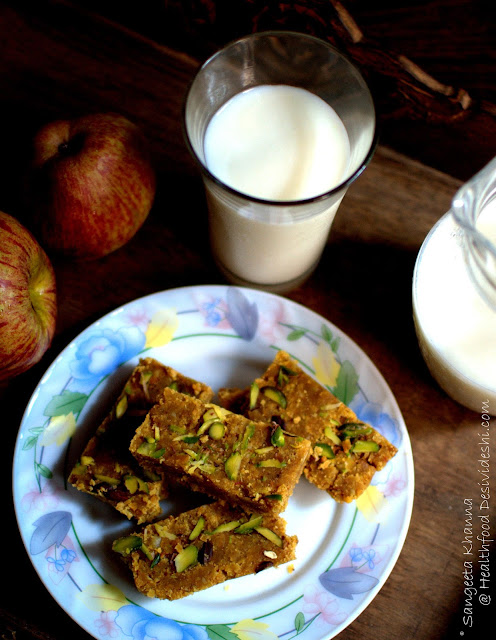
Besan ki pinni is a traditional breakfast dish also, taken with milk and some fruit it makes a healthy choice. A desi gluten free granola bar I would say. Lightly sweetened and studded with healthy nuts.

besan ki pinni

 Either in the shape of such bars or laddoos, these are a sweet treat everyone would like and at any time. But I would recommend it in small portions as a dessert.

For a breakfast you can have a large portion as it is a protein rich bar that way. I have a cheats recipe with this pinni as well. Sometimes I just dunk one bar in a very hot glass of milk and dissolve it. It makes a nice warming drink when you are not well. Or a porridge consistency if not a drink.

besan ki pinni

Try that, You will be surprised with how it comforts you. And do you realise it is one of the best gluten free Indian mithais that can be made at home? It can be made lactose free too if you skip using milk.

Do let me know when you try this besan ki pinni. This is one healthy dessert if you keep the sugar minimal. I would have used raw sugar but I had used up my stock when I decided to make besan ki pinni.

Next time raw sugar it will be, darker pinni, richer taste. And this pinni is not the ghee dripping types, much leaner I would say :-)

Friday, September 13, 2013

modak, patholi, patole or pitha : a steamed rice dumpling with coconut jaggery stuffing, wrapped in turmeric leaves...


Haldi patra pitha for bengalis, patholi for Konkanis and patole for Maharashtrians, this wonderfully aromatic steamed sweet stuffed dumpling is something that definitely evolved in the oriental-tropical world. You would see a Kaa noom sword side in Thailand which is another variation of the same rice dumpling. How food connects the world.

Steamed desserts have a certain charm to them. Especially if the steamed desserts are made of rice with a coconut and jaggery stuffing. I don't know if you have tried any of those modaks and pithas but I took to them like fish takes to water as soon I got introduced to these sweet nothings. These were not made at my mother's place although a steamed round modak was made occasionally. I learnt this turmeric leaf wrapped modak or pitha on Sanjeev Kapoor's show more than a decade ago and steamed this aromatic treat the same day. There have been many repeats since then. That I grow turmeric in my garden helps, else you would have to get hold of some turmeric leaves if you want this subtle aroma.

This year interestingly, I couldn't replant my turmeric tubers and was missing having them. So when I saw turmeric growing in the backyard of a friend's place I immediately got a few for myself. That greedy for food I am. Made these the very next day.


The recipe is simple and you can make this dumpling by using raw rice paste as this patole recipe, but I made it with a cooked rice dough because I wanted the taste of ukdiche modak redolent with the aroma of turmeric leaves. And that's what I did.


To make the rice flour dumpling this way.. Cook the rice flour with twice the amount of water. For a cup of rice flour you need 2 cups of water and 1/2 tsp salt. Boil the water and salt in a pan and dump the rice flour at once into it as soon as the water starts boiling. DO NOT stir, cover the pot and let it simmer for 3-4 minutes. Take the pan off heat, open the lid and holding the pan with a mitten clad left hand, whisk the rice flour vigorously with right hand. The whole process takes about 10 minutes for this quantity. Use a wire whisk for convenience.


Now mix this lumpy dough with the help of a sturdy spatula or spoon, till the mixture becomes smooth and looks like a malleable dough. You would be able to make small balls out of it as soon as it is colder.


You can make the stuffing in the meantime. Half a fresh coconut peeled, sliced and coarsely shredded in food processor, added with jaggery to taste is cooked till everything incorporates together. I microwaved it for 2 minutes. And I used a raw rich brown sugar which made my work easy.


Now spread the clean turmeric leaves, grease them with ghee and flatten a rice dough ball over it. Place a generous amount of coconut jaggery mix over it and fold it nicely so the dumpling becomes half moon shape.


A little bit of leaked stuffing is not a problem, as the turmeric leaf is going to wrap around the dumpling.


 Shape and wrap all dumplings and place them all on a ghee greased plate. I used a ceramic plate as I was microwaving them all together. You can use a perforated steel plate if you are steaming the dumplings in steamer.

It needs to be microwaved covered so I normally cover the plate with an inverted bowl. These required a 5 minute microwaving time. Just go by how many or how big your dumplings are, and a little raw dumplings wont be a problem since everything is cooked anyways.


 But steaming them for some time helps the dumpling to hold better. The rice starches settle down to hold the stuffing better and you can pick up the patholi or pitha in your hands to have a bite.


 This was heavenly. The turmeric leaf marks look really gorgeous.

How simple cooking techniques can make food so exotic, I wonder how our ancestors experimented with simple ingredients to cook such wonderful food. The slightly salted rice dumpling with a rich sweetness of jaggery and aroma and taste of coconut is something that satiates the senses immensely.

Please note that a modern baked dessert with all the butter, sugar and flour would NOT make you feel sated, it would make you want another sweet once the multiple helping dessert is over. With these modaks, you eat many of them and feel blissfully sated. And do not crave for more sweet once they are over. There is a reason for it. Real food makes your system behave well.

PS : Note that the turmeric leaves need to be cleaned really well, soak them, rinse them and wipe the leaves both sides with a clean muslin twice. The urban dust on them is not easy to get rid of.

Thursday, September 12, 2013

mung ki sookhi daal made two ways...


Mung ki sookhi daal is something that has a texture of hummus, smooth creamy on the palate and yet separate grains of this wonderful lentil make this daal really unique from regular daal recipes.

Yes, this is one of the few simple recipes of daal that taste so different from the regular fare. Daal is such a versatile dish in Indian cuisine and gets so many treatments depending on what state it belongs to. This sookhi mung ki daal is more of a north India thing, made in UP, Punjab, probably Bihar as well. I have seen a variation of sookhi mung ki daal in Bengali families too, they make a mung daal sheddho (boiled mash) which is a nice mash of boiled mung daal, more like a hummus with mustard oil or ghee and some chopped green chilly, chopped onion and sometimes a hint of dhaniya patta.

Our daals definitely get different flavors form different states, even different families of the same state or city.

So this sookhi mung ki daal is a little difficult to achieve and many people just don't cook it because it ends up being a solid gooyi mess or the cooked lentils feel too dry.

I cook this sookhi mung ki daal two ways depending on how dry I like it and if I am adding coriander greens or fresh baby spinach to it. If you want to mix some hopped greens in the daal it needs to have a little liquid so the chopped coriander greens are incorporated well into it.


ingredients :
(2-3 large servings)

split mung daal 1 cup
turmeric powder 1/2 tsp
salt to taste
water 2 cups + 1/2 cup
ghee 2 tbsp
red chilly flakes 1/2 tsp or more to taste
asafoetida a pinch
cumin seeds 2 tsp
chopped garlic 1 tsp
coriander greens chopped 1/2 cup Or baby spinach, no need to chop those tender leaves

procedure :

Pressure cook the mung daal with the said amount of water, salt and turmeric powder. Cook only till the whistle blows and then take the cooker off the heat. Let it cool on it's own.

Heat ghee in a small pan and add the asafoetida, chopped garlic and cumin seeds, wait till everything gets browned a bit. Add the chilly flakes and pour it all into the cooked daal along with 1/2 cup water. Add half of the coriander greens (or spinach if using) and give it a good mix. Simmer for 3-5 minutes till everything is incorporated and daal is a thick consistency.

Garnish with more coriander greens and serve hot. We love it with ragi or whole wheat rotis , pita crisps and even with rice. Being an absilute daal lover I can have it as a meal.

The leftovers are diluted with water, and some rolled out ragi dough (cut into strips) is added to make it into a nice daal dhokli meal.


My comfort food, I plan daal leftovers for this.

And now is the absolutely dry version of sookhi mung ki daal. For this one I pressure cook the daal twice and the cooked lentil looks separate but you can't mix it further as it would result in a hummus like paste. Not that it would taste bad, but it wont be suitable for our dal roti meals. You are supposed to 'spoon' the daal using a piece of roti and enjoy this bite with utter bliss.


ingredients :

split mung daal 1 cup
water 2 cups
turmeric powder 1/2 tsp
salt to taste
asafoetida solution (1 tbsp water+ a pinch of asafoetida)
tejpatta 2
ghee 2 tbsp and some more to serve
cumin seeds 2 tsp
red chilly powder 1 tsp or to taste

preparation :

Pressure cook the mung daal with salt, turmeric powder, tejpatta, asafoetida solution and the said amount of water. Cook only till the first whistle blows and take off heat, let it cool on it's own.

Heat ghee in a small pan, add the cumin seeds and let them brown and get aromatic, taking care not to burn them. Take the pan off heat, add the chilly powder and let the chilly disperse in the ghee as it cooks. Pour this tadka as soon as the pressure cooker cools down. Mix well and cover the lid again and pressure cook again till the first whistle. You might need to add 1/4 cup of water before the second round of pressure cooking, if you don't see enough liquid to cook it again.

Serve hot with a drizzle of ghee. This is very aromatic mung ki daal and the ghee makes it even better.

Have it with roti and some subzi and raita/salad on the side. And do let me know if you liked it.

Friday, September 6, 2013

okra stir fry with coconut and ginger | bhindi nariyal ki subzi...


Okra or ladies fingers are called bhindi or bhendi in Indian languages. This is a favorite vegetable in my household for two reasons. One I don't have to peel them and secondly the husband likes them. Ah and there is another reason too, both of us can eat this vegetable on it's own most of the times. So I cook a lot of okra when I do and we rarely have any leftovers.

This is one of those okra recipe that you can eat in large servings. More so if you love coconut. And this is one of those okra recipes that don't get slimy after cooking, even if you just cook the vegetable mildly, not fried to death.

ingredients...

okra/ladies fingers/bhindi 400 gm
dry red chilies 2-3 broken
sliced garlic pods 2 tsp or to taste
ginger julienne 1 tbsp or more
grated fresh coconut 3/4 cup
turmeric powder 1/2 tsp
mustard or sesame oil or use olive oil if you wish 1 tbsp or a little more depending on what kind of pan you are using

lime juice to taste (optional)

procedure...

Wash and drain the okra and let them get dry before chopping them. Remove the cap (the stalk) and slit lengthwise twice at cross angles so it is quartered. Chop the whole thing from the middle if the okra is too long.

Heat oil in a pan (or kadhai) and tip in the broken red chilies and sliced garlic. Wait till the garlic gets slightly aromatic and pinkish (not brown) and add the sliced okra. Add salt and stir fry on medium flame for about 5 minutes.

Add the salt and turmeric powder and stir fry for another 5 minutes or so. The okra shouldn't brown but get cooked.

Add the grated coconut and ginger julienne, mix well, cook for another couple of minutes and take it off heat. Serve hot or at room temperature. Lime juice can be added after adjusting seasoning.

Goes well with an Indian meal as a side dish. Simple flavors, freshness of coconut and ginger is the first thing that this brings to the palate, the mild heat of chilly and garlic complements really well.