Showing posts with label mutton. Show all posts

Friday, November 24, 2017

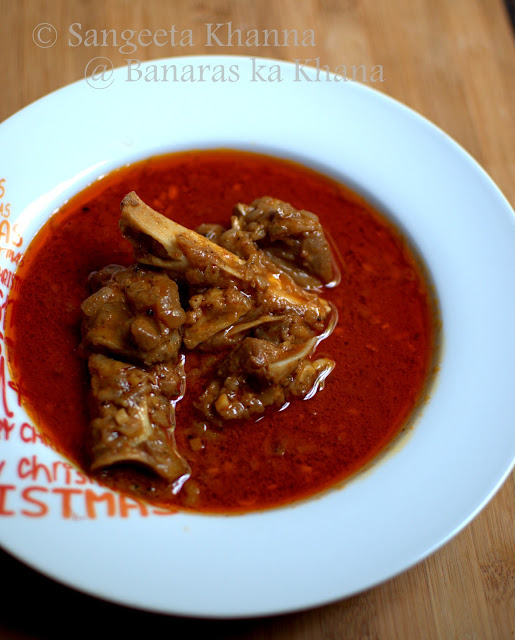
recipe of shaljam patta gosht | mutton curry with turnip leaves


Shaljam patta gosht was served at my Banaras ka Khana festival last year at ITC Maurya. Since this time we showcased the Ganga Jamuni tehzeeb of Banaras and teamed up with Rana Safvi to bring some food from Muslim homes as well, this homely recipe of shaljam patta gosht was included as I always prefer serving seasonal foods from the region in my food festivals.

Shaljam patta gosht is made almost similarly in many Muslim homes, Some people like to add a hot ghee tadka with ginger julienne and red chillies or green chilies over each serving and some have it as it is after the slow cooking. Use of garam masala is rare for this everyday recipe but some add whole spices too. Some people have started cooking it in one step pressure cooker process but I feel the slow cooking suits this delicate recipe better. My recipe is based on my trials after talking to a few Muslim friends from Banaras and other places close by. 

Shaljam or shalgam is the humble turnip that many people hate for reasons beyond my understanding. I find it a very flavourful vegetable that has a delicate flavour and pairs well with many other ingredients really well. So while shalgam matar ki subzi remains my favourite and the Kashmiri style gogji nadur keeps repeating in my kitchen, bhien shalgam matar ki subzi is loved as much but I am yet to perfect my shalgam gosht.

shaljam patta gosht

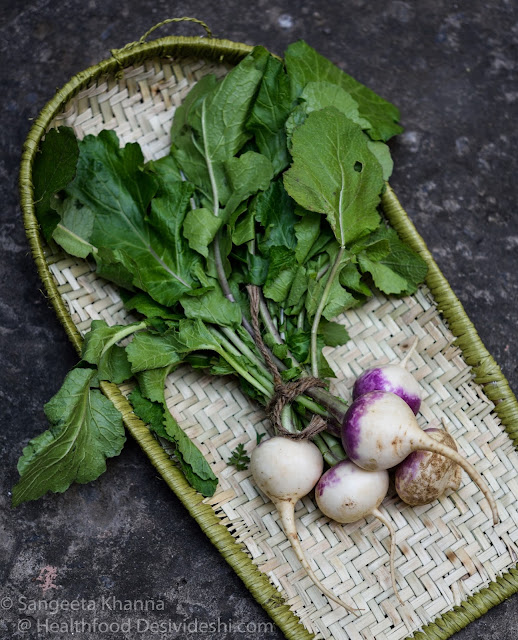
The shaljam patta gosht is an everyday meat curry that uses leaves of turnips. It will be appropriate to mention that turnip leaves are many times more nutritious than the more common spinach and has one of the highest amounts of iron and calcium. Normally I would get it from Tijara farm as getting turnips with leaves is next to impossible in Delhi.

The other day Atiya Zaidi tweeted about shaljam patta gosht and I couldn't resist but look for turnip leaves in our weekly market. While I couldn't find any turnip leaves as usual, my quest was so intense that I saw a sack of medium sized fresh turnips being opened and the sack was sealed using the leaves from the same turnips as a cushioning material. I requested the subziwala to give me those leaves and he relented after initial hesitation. There I was, the leaves were very fresh to be cooked with my shaljam patta gosht.

ingredients 
(3-4 servings)
500 gm mutton on bone and some fat
1/2 cup finely chopped onions
2 tbsp mustard oil
300 gm turnip leaves chopped finely*
5 whole dry red chilies
3 tejpatta 
salt to taste

*The turnip leaves should ideally be from baby turnips but I have always used the leaves from medium sized turnips as I never find baby turnips, thankfully the shaljam patta gosht has always turned out great. If using baby turnips you can use the turnips chopped along the leaves too. 

turnips with leaves

ingredients to make a fine paste together
1 tbsp minced garlic
1 tbsp minced ginger
1/4 cup chopped onion
1 tbsp coriander powder
1 tbsp cumin powder
1 tsp pepper powder
1 tsp turmeric powder
1/4 tsp red chili powder
 
procedure 

Heat the mustard oil in a pressure cooker pan and add 1/2 cup chopped onions along with the whole dry red chilies and tejpatta. Fry them on medium heat till they get brown. Make a paste of the ingredients listed under paste while the onions brown.

Once the onions are browned, add the paste and get ready for some slow bhunoing for 20 minutes. keep the flame low and keep bhunoing the masala till it gets dry and sticks to the bottom leaving the oil on the sides.

Splash 1 tbsp water in the masala and bhuno again to deglaze, so it slows down the bhunoing process and brings out the complex flavours of the simple spices used.

Bhunoing is the key to the taste of many such mutton curries as our elders have stressed upon.

When you see the masala getting a deep shade of brown and aromatic, add the mutton pieces and keep bhunoing for 20 minutes more on low flame. Keep turning the meat along with the spices so the fats are rendered into the masala slowly and the meat absorbs the spices well.

Add the turnip leaves, mix the leaves well with the meat and let them release their juices. Once the leaves are wilted you can bhuno the meat mix for 5-7 minutes more. I often get the leaves steamed to make them limp so that I can refrigerate the in my borosil boxes, so I use steamed leaves from the fridge.

Add 1/4 cup of water (no more please), salt to taste and cover the lid. Keep the gas flame low and let the meat cook on very low flame till pressure builds up on its own, it takes about 40 minutes in a 2.5 liter pressure cooker. Once the whistle blows up you can switch off the gas and let the pressure release before opening the cooker.

Note that the cooking time can vary depending on the quality of meat, the flame strength and the size of pressure cooker so adjust accordingly. New cooks often err on this aspect and end up with under cooked or overcooked meat but that's how we learn.

You would see loads of leaves covering all the meat but trust me that is where the taste is. This cooking process ensures that the fats and gelatin from the bones melds well with the leaves and the turnip leaves flavour the meat with their own signature aromas.

Shaljam patta gosht tastes even better the next day so make double the amount you need for one meal. This is one mutton curry that can be eaten 3-4 times a week and is worth cooking in bulk and stock in the fridge.

Friday, January 23, 2015

chukandar gosht | mutton stew with beet roots and leaves


Chukandar gosht or mutton stewed with beet roots and leaves is one dish that looks really good on the table. Meats stewed slowly with vegetables is a Muslim way of cooking meats as much as I understand and that might be because it might have been the only way to eat vegetables in a primarily meat eating culture. I had never seen such meat stews being cooked in my family with added vegetables although spinach and fenugreek leaves were occasional additions to the meat curries cooked at home, sometimes a potato would be added for someone who doesn't like too much meat. Gobhi keema musallam and keema matar was common but any mushy vegetables were not at all considered for meat. I was a vegetarian back then.

chukandar gosht recipe

Later when I learned about shalgam gosht, arbi gosht and bhindi gosht etc being cooked regularly at some of my friends places, I figured that would be a better way to eat meats. Then I started adding one odd vegetable to the Indian style meat stews but was not confident with adding a strong tasting vegetable to the meats. Then I started cooking rajma with beetroots some 6-7 years ago and everyone used to love it although I am guilty of not sharing the recipe of that rajma too.

Bringing beetroots to the meat stews was the next step and we loved this new avatar of Indian meat stew with beetroots and leaves. So much so whenever I find beets along with the greens attached, I think of a mutton stew. I sometimes cook this stew with just the leaves and sometimes add cubed beet roots as well. I must admit the version with just the leaves is appreciated more by majority of people I have come across.

This recipe is not quick but is fairly simple to cook. Cook this chukandar gosht when you have more work to do in the kitchen and this stew keeps cooking on the sly. I had learnt this recipe long back reading some Pakistani blog written in a very casual way but it was so good after tweaking the spices to my taste that I kept repeating it and forgot where I picked up.

chukandar gosht recipe

ingredients 
(2 servings or 3 small)
mutton on bone (from shoulders or raan) 300 gm
beetroots with leaves 2 pieces (about 300 gm total)
tejpatta 3-4
ginger garlic paste 2 tbsp
dry whole red chillies 3-4 or more (keep it slightly hot to balance the sweetness of beetroots)
everyday garam masala 1 tbsp
yogurt 1/4 cup
special garam masala 1 tsp
mustard oil 2 tbsp or less if you can manage
sliced onions 2 (about 150 gm)
salt to taste
finely chopped green chillies and fresh ginger root to garnish

chukandar gosht recipe

procedure 

Rinse, clean and chop the beet leaves roughly. Peel, rinse and dice the beetroots. Keep aside. (You can choose not to add the beet root chunks if you think they will be too sweet for the stew. You would need to tone down the spices in that case).

Put the mutton, beet leaves and tejpatta in a large stockpot along with a liter of water and cook on low flame for an hour or more, till the meat is cooked perfectly. Add salt after skimming any greyish matter that floats on the surface initially. You can pressure cook this mix in one step if you find it convenient.

Once cooked, fish out all the mutton pieces, remove the tejpatta and liquidise the stock along with the cooked beet leaves. Keep aside.

Heat mustard oil in a pan (preferably cast iron kadhai) and fry the sliced onions till browned well. Drain and make a paste along with the everyday curry powder and yogurt. Keep aside.

In the remaining oil add the broken dry red chillies and let them sizzle for a while to release flavours into the oil. Now tip in the ginger garlic paste and fry till pinkish. Add the onion, yogurt paste and fry in low flame till it gets glazed well or releases oil (if using more oil).

Add the cooked mutton pieces and bhuno till everything gets mixed well and the mutton pieces get a nice browning. Add the special garam masala, the beet root chunks and bhuno for 5-10 minutes. Add the pureed mix, some water if required and simmer till the beet root chunks are cooked well. This step can also be done in pressure cooker, being cautious of overcooking.

Serve hot with chopped green chillies and ginger. It tastes great with khameeri roti or kulcha and some sirke wala pyaz or sliced mooli.

chukandar gosht recipe

Sometimes I cook mutton with spinach almost the same way, specially when the spinach is large and mature. This kind of masala suits well for added fibrous pureed leaves in the gravy. Basically a bit higher chilly and ginger heat to be toned down by the sweeter beets and yogurt. This curry has a unique taste that can convert beetroot haters. Some might not convert but most of them will for sure.

Please try this chukandar gosht and tell me if you like. Cook it with paneer or kala chana if you want a vegetarian version, you won't be disappointed.

Sunday, December 21, 2014

gogji mutton | a simple stew with turnips and mutton cooked the Kashmiri way


I don't know if a true blue Kashmiri would approve of this stew but for me this Gogji Mutton curry speaks of winters. This simple stew is so good for a winter dinner, so warming that you would feel blessed if you get good turnips in your part of the world just for this mutton stew if not the vegetarian version called Gogji Nadir. I have adapted this gogji nadir according to my taste but I am sure the soul of the stew is not compromised with.

I have been cooking this gogji mutton for a couple of years and have learnt a trick to make the thin soupy gravy look almost milky in appearance and pack a punch of flavours that feels impossible with just three ingredients. Yes, apart from the mutton, there are only three ingredients that make the flavours so comforting. Mustard oil, green chillies of the thick skin variety (bajji chillies of Bangalore or Rajasthani pakoda chillies) and turnips. These three ingredients create magic in this stew trust me.

It so happens that I always cook this stew for dinners and once it is ready we both can't wait too much to be able to click decent pictures to be shared on the blog. But this time I sneaked a couple of pictures while cooking and one picture of the plate that I served for myself. The pictures are still bad but I wanted you all to create this simple Kashmiri stew this winter if you have not tasted it already.

Note how this recipe helps make an almost milky soupy gravy in this stew. The instructions typed in bold letters are the pointers. But don't worry even if the gravy looks watery, as the taste will not be affected much even in that case.


ingredients...
(2-3 servings, depending on what is served with it)

mutton on bone (curry cut) 200-250 gm
fresh turnips 250 gm
fat variety green chillies (Anahiem or any mild hot chillies) 3-5
mustard oil 1 tbsp
salt to taste
water 1.5 L

procedure...

Add the mutton and a little salt to the water in a deep stock pot (or handi) and cook on medium flame for an hour or till the mutton is almost done. Or pressure cook the mutton with a litle salt with 1 L of water.

Remove the stalks, clean and chop the turnips in irregular shaped thick slices. Try and not peel the turnips as some of the flavour will be lost if you do so. Chop the chillies in 1 inch long pieces and keep aside.

When the mutton is almost done, heat mustrad oil in a deep pan till smoking point. Now add the chopped chillies and turnips all at once and toss and stir fry till a few blisters appear on the chillies and the turnips look glazed and blemished.

This is the time the cooked mutton along with the hot stock will be poured right into the hot cooking turnips. By adding the hot mutton stock into the already sizzling turnips and chillies will make the stock look milky within seconds. Now check and adjust seasoning and simmer till the turnips are fully don, soft and disintegrate when pressed.

Serve hot with plain boiled rice. Some plain home made yogurt or raita works with it but we don't care about it when we need a hot stew in our hands, preferably served in bowls.


Less rice and more of this stew is my idea of a great home cooked meal on winter nights. Meals that we cook while watching TV and the home smells of a good stew being slow cooked in the kitchen. This stew is so aromatic that the neighbors can often get to know what is cooking, that too with such humble ingredients and not a single spice used. Simplicity brings the best from some foods. Gogji mutton is one of best example of such foods.

Hope you would try this recipe if it is not a family favourite already. There are more recipes of turnips cooked with mutton in the Mughlai way and that has it's own charm, suited for a different kind of meal but gogji mutton will always be my all time favourite light mutton stews.


Wednesday, May 14, 2014

monji haak from Kashmir and mutton monji haak to make it non vegetarian : ganth gobhi ki kashmiri subzi


Monji haak or monji haakh is a simple stew from Kashmir that makes beautiful use of the bulb and greens of knol khol (kohl rabi or ganth gobhi). The simplest of recipes can be the tastiest and this monji haak is one of those examples. I followed Anita's recipe a few years ago once and never cooked knol khol any other way. Even when we had loads of ganth gobhi growing in the garden, I would always cook this monji haak either plain or with boiled or poached eggs or with mutton. We love this simple and flavourful stew any which way. Another version of monji haak cooked with a little rice and a stew with knol khol and lotus stem, called monji nadru are slight variations of this recipe.

Ganth gobhi stands tall in the garden. We had about 40 of them this season.


Ganth gobhi (knol khol) leaves are so fragrant and delicious that it can't be wasted. Sadly, many people throw away the leaves and use the bulb part only. Even my gardener often discards the leaves but he has now understood that I like the leaves more than the bulb. I hardly throw any part of this vegetable if it is freshly plucked. only the hard woody base is peeled off if the knol khol is mature.


The curry is a simple recipe but I must let you know that following a simple recipe to the T is very important. As each ingredient and each little step in the recipe adds something to make it special, you can't afford to miss anything. Once you follow the recipe once and know how it turns out, you can make necessary changes to suit it to your taste.

ingredients for the monji haak
(serves 2-3, large portions)

Ganth gobhi (knol khol) 2-3 with leaves (about 600 gm)
green chillies broken 2-3 or to taste
hing 1 pinch
mustard oil 1 tbsp
salt to taste
water 2 cups

procedure

Peel the hard woody parts of the knol khol if it is mature or use it whole. Slice the bulb in half moons, the stems in one inch pieces and the leaves in large shreds. Keep aside.

Heat mustard oil in a pressure cooker pan (or a deep stockpot or kadhai), tip in the hing and add the slices of the vegetable. Toss and fry till you see few brownish patches on the margins. Add the stems and leaves at once, the green chillies and salt and toss and cook for a few minutes more.

Add the water and pressure cook for 5 minutes after the first whistle blows. Let it cool on it's own, open the lid and serve hot with plain boiled rice or as a side dish to any Indian meal.

You can adjust the consistency by adding more water or by reducing the water as per choice.

If cooking it in a stock pot or kadhai, cook covered till the leaves and slices are all thoroughly coked. It takes about 25-30 minutes or more if the ganth gobhi is mature.


To make mutton monji haak, boil 300 gm of mutton (with bone) in 500 ml water and salt to taste for a couple of hours in a stock pot, adding a little more water of required. Or pressure cook for 30 minutes. Keep aside.

Now follow the steps of cooking the ganth gobhi as above recipe of monji haak and instead of adding water, add the cooked mutton with the stock and cook again till the vegetable is cooked well. Serve as required.

We eat our meats in watery stews like this in summers and love the way it tastes so rich and yet so light on the tummy. I recently tried a lauki ka shorba with mutton after reading good reviews of a recipe from Rampur and that also became our favourite. The recipe will be shared soon.

Monji haak remains a favourite not just for being a simple stew or a patle rasse ki subzi as we call it, it is because I love the taste of ganth gobhi so much. It is a vegetable I look forward to. I still have a few left from our winter vegetables crop and they will also be cooked into this flavourful monji haak.

Did I tell you we both love this mutton monji haak as a stand alone dinner? Yes we do.

Monday, March 3, 2014

achari mirch wala keema | minced meat curry with pickled (stuffed) red chillies


Pickled red chillies is a favourite with many UP wallahs and we like it with daal chawal, with parathas and with just anything we are eating. Recently a dear friend loved it with her curd rice and then I also tried it that way, only to be charmed all over again by this humble traditional pickle that this laal mirch ka bharva achar is.

This recent tryst with one of my favourite pickles reminded me of a paneer curry I had at Shangri-La Hotel recently, the curry was cooked with a hint of the same red chilly pickle. I had planned to cook the curry with minced meat and now it was impossible to resist the recipe. We both loved this hot keema curry that had chillies of three types making the chilly flavours deep and potent. With a light raita and fluffy khameeri rotis this curry was just out of this world.

I make another keema curry with green chillies and loads of garlic and that one is totally a different thing. That lasun mirch wala keema is a creamy and mild curry with prominent aromas of garlic and chillies but this achari mirch wala keema is hot and robust. Using ghee for cooking makes it tastier as flavours are well rounded up with a bit of fat. I used just a tbsp of ghee but even that makes a good difference.


ingredients..
(serves 2-3)
mutton mince (keema) 300 gm
finely diced onions 1/2 cup
chopped garlic 2 tbsp
broken dry red chillies (choose hot or mild, or skip if you can;t handle too hot) 2-3
minced ginger 1 tbsp
everyday curry powder 2 tsp
turmeric powder 1/2 tsp
ghee 1 tbsp
salt to taste (3/4 tsp)
fresh red chillies (pickling variety) 2
hung curd 2 tbsp
bharva mirch ka achar 1 inch piece

procedure

Heat the ghee in a pan (kadhai) and tip in the chopped ginger and garlic. Fry these till they get aromatic and then add the chopped onion, fry them too till they are pinkish brown.

Add the spice powders and mix them well. Add the mutton mince (the keema), salt and stir fry till the keema gets almost cooked. It takes about 10-12 minutes.

Half length wise, deseed and slice the fresh red chillies and add to the cooking mixture. Add the hung curd and mix well. Bhuno (stir fry) till the mixture gets almost dry, it takes about 5 minutes.

Add 1/2 cup of water, cover and simmer the curry for 5 minutes. Adjust consistency by adding a little more water of required, check seasoning and serve hot.


It doesn't need any garnish but you can use slivered bell peppers if you wish. Even chopped coriander greens are not required but you can add them for another dimension in flavours.

You can add a little magaz paste (melon seeds paste) to this curry if you want it a bit creamy and the heat milder. Magaz paste also increases the volume of the curry so much so that an added 2-3 tbsp of magaz paste will result in an extra cup of the curry with same ingredients.


You might like to have a squirt of lime juice if you are not having any raita with this curry. Otherwise this curry just needs a good fluffy khameeri roti or a soft roomali roti and a light cucumber raita or may be a raw tomato salsa type salad.

Wednesday, January 15, 2014

Lasun mirch wala keema | a mutton mince curry with chilly and garlic


Lasun mirch wala keema is not as intensely garlicky or intensely hot as the name suggests. So relax. This a creamy curry with pleasant notes of garlic and green chilly peppers where you get sweeter taste of chillies more than the heat. This mutton mince curry with loads of garlic and green chillies is soul satisfying type of food if you believe me. It replaces our soup dinners in winters many times and we fall for kadak mixed grains roti with it, although we eat more of the curry and less roti, the curry is so addictive good.

Green chillies come in all shapes and sizes, with different heat levels and we use them for differently in our food. We are spoiled for the chilly peppers varieties now a days, Jalapenos, Anaheim, Serrano, Poblanos and Cayenne are some of the varieties visible in the markets. I usually get a small bag of all of them and keep using them to make pickles, stuffed chillies etc. But I mostly like them to be used in my soups or stir fries depending on how hot they are and how much flavour they pack for the recipe. So when I need the rich chilly flavours and lesser heat I use the Anahiem or Jalapenos or a mix of these two.

Go for the larger and wider chillies if you want the sweet flavours of chillies in your recipes, especially if you live in India and the chillies are not labeled by their names in the local markets.

This lasun mirch wala keema recipe I was planning to cook this winter and yet something or the other kept distracting me from this keema recipe. I make a nice mirchi gosht too but this lasun mirch wala keema is a totally different bouquet of flavours. Just a few spices are used and a nut paste makes this dish a rich meal without many side dishes. You wont need much when this lasum mirch wala keema is in the menu.


ingredients
(2-4 servings depending on side dishes)

keema (mutton mince) 300 gm
garlic cloves 50 gm
mild variety of green chillies 80-100 gm
melon seeds 50 gm
cashew nuts 20 gm
whole coriander seeds 1 tsp
cinnamon stick 1 inch piece
green cardamoms 2
chopped coriander greens and stems 100 gm
ghee 1 tbsp or 15 gm
salt to taste ; 1 tsp will be good enough

procedure

Soak the melon seeds and cashews in hot water for 10 minutes and make a fine paste. Keep aside.

Mince the garlic and slice the green chillies. Keep aside.

Heat ghee in a thick base pan, preferably a handi and tip in the whole spices in it. Wait till the spices get lightly aromatic, taking care not to brown them. Add the minced garlic and sliced chillies at once and keep stirring till it all looks translucent. Do not brown the garlic or chillies, we want them to be just a bit translucent.

Add the keema and the chopped stems of coriander greens. Save the chopped coriander leaves to be added in the last phase of finishing the dish. Stir fry for a minute and add 2 cups of water, bring to a soft boil and then simmer for about half an hour, preferably covered but take care not to let it spill.

Add the nut paste and coriander leaves. Adjust the gravy consistency by adding some water if required, or simmer without the lid to reduce if you feel like.

Simmer again after adding the nut paste till the fats float on the surface. This is the time the dish is ready. Serve hot with any Indian style bread, roti or naan.


We generally don't need any accompaniments with this lasun mirch wala keema. It is an indulgence to be enjoyed in singularity.


Saturday, July 27, 2013

gosht dopyaza or mutton dopyaza (UP style), a simple home style mutton curry...


Dopyaza was a dish made using a lot of onions (apparently double the onions than meat) at my place and it had a few vegetarian versions too. Alu dopyaza was most common as an additional curry and parwal dopyaza was made during summers when we all wanted something spicy yet light. Paneer dopyaza was the easiest paneer curry that tasted yum with just about anything. The good thing is, the basic cooking procedure and spices are the same in all these dopyaza type recipes. Only cooking time changes with the main ingredient used. I must add the nomenclature of a dopyaza is probably disputed as some people say dopyaza is a curry where meat and vegetables are cooked together and there is no link with the amount of onion used. In our family, it was a pyaz (onion) connection only that we knew. So doguna pyaz...double the onion it is for us.

gosht dopyaza or mutton dopyaza recipe

Kathal ka dopyaza is a much loved recipe here on the blog though I cook that rarely. Bhindi dopyaza is a dry subzi that I still make quite frequently and I just checked again to my horror that I haven't posted it yet. Chicken or murgh dopyaza was most common non vegetarian option back home as it cooks faster than mutton probably. I wouldn't know exact reasons as I used to hate all non vegetarian food back then. Yes, I am a convert now and see how :-)

This mutton dopyaza recipe would make a few of my friends happy as they have been asking for more non vegetarian recipes to be posted. I am guilty of infrequent posts and rare non vegetarian recipes already, found these pictures in the old albums and decided to post the recipe quickly. The recipe is slow cooked, so takes about an hour and some more to cook but you don't need to do much preparation for this curry especially if you are chopping the onions in the food processor.

This is a gravy type curry but the gravy is not uniformly creamy. The onion caramelize during the slow cooking process and cook to become a smooth coating around the meat. The fats separate after the long cooking time and the spices lend their aroma to every single fiber of meat. This is the uniqueness of this recipe, the onion rich gravy that is a bit sweetish yet heavy with the aromatic spices. Heat can be controlled by adjusting the quantities of chilies, black peppercorns and ginger. All three provide a depth of heat in this curry, where onion has lend enough sweetness to round up the spices.

gosht dopyaza or mutton dopyaza recipe

ingredients...
(2 large servings)

goat meat/mutton 300 gm (I prefer shoulder pieces on bone)
sliced red onions 400 gm (or 4-5 large Indian red onions)
5 dry red chilies broken or more to taste
ginger julienne 2 tbsp
sliced garlic 1 tbsp
2 black cardamoms
3 green cardamoms
6 cloves
2 tsp black pepper corns, or to taste
2 inch piece of cinnamon broken
a thin sliver of mace
salt to taste
mustard oil or ghee 2 tbsp

procedure...

The dry red chilies lend a very nice flavor to this onion-centric curry so the use is very important. Do not replace red chilies with green chilies in this recipe and I suggest you use more red chilies than you think will be enough, as the amount of onion neutralizes the chilly heat quite a bit. If you don;t want the heat, just empty all the seeds and discard, the aroma of chilly will be nice that way, without making the curry too hot.

Crush the spices lightly, not disintegrating them in the process. You just need to macerate the spices while cooking, so a light handed pounding will be enough.

Heat oil or ghee in a thick base pan or kadhai.
I normally use my handi shaped pressure cooker pan and do the cooking without using the pressure lid. It is a slow cooked dish so takes about an hour and half, be prepared to do some more chores around the kitchen in the meantime.

Add the red chilies, ginger and garlic to it and wait till everything gets aromatic and the color changes a bit. No more than 30 seconds and then tip in all the onion and the whole spices that you have crushed lightly. Add the salt too and keep stirring on medium heat till the onion starts getting pinkish.

Add the meat, mix well, cover and cook for 10 minutes. Stir and mix, cover and cook on lowest flame. Keeps stirring after every 10 minutes and place an iron skillet (or tawa) below the cooking pan if you think the curry might stick to the base. It has never happened with me so relax, it's not a possibility if you are using the right pan.

The curry is done once the fats are separated and the meat is cooked through. The onions are almost homogenized by now and make a nice gravy without a drop of water being added to the curry.


gosht dopyaza or mutton dopyaza recipe

Serve with any chapati or paratha or naan. We had it with mixed grain kulcha and a pumpkin and mint stir fry salad. The kulchas were ignored royally until we needed a few bits of it to polish off this dopyaza gravy. This curry is so aromatic that you would start feeling hungry as soon as it arrives at the table, and would would be guilty of tasting a few chink of eat if you are cooking it. A statutory warning.

Do let me know whenever you try this eastern UP style dopyaza. Some people call a similar recipe Ishtoo but they add some more spices in it and make it a bit runny. Ishtoo is made when someone needs a soup like curry during a flu or cough and cold or during rainy season. But no seasonal constraints for healthy people who can have it any time. 

Friday, June 21, 2013

a mughlai meal and the possibilities of a great take home nawabi zayeka...


I heart regional cuisines and any chance to taste foods from a distinct Indian regional cuisine allures me like a magnet. Mughlai is one such cuisine I have been very very curious about. The robust flavors of Hyderabad mughlai, the meats and the different ways they cook their meats with vegetables make me extremely curious. Awadhi mughlai is a delicate balance of flavors and Bengal mughlai is another shoot off from the main stock. Then there is Punjabi mughlai, Kashmiri Muslim cuisine and even Bohri Muslim cuisine. I am not sure if we would categorize Moplah as mughlai but it always amazes to witness such diversity.

I want to learn more and experiment more with this cuisine as I love my spices and have started loving my meats too in the past decade. Although I advocate using spices and even meats according to seasons and moods.

A Hyderabad foodie and caterer Sadia Durrani invited a few of us at Cal bloggers table to showcase her food. We all lapped it up as it was a nice opportunity to taste home cooked mughlai cuisine. We braved the hot sun to reach Sadia's home and taste the food, it was a hot summer day but it did not deter us carnivores at Cal bloggers table.

The table at Sadia's place was laid with old fashioned elegant wares and the food was served with much anticipation. All of us carnivores had great expectations and we clicked a few pictures of all the dishes before we dug into them. The tandoori rotis and sheermal was ordered from outside but everything else was cooked at home.


Fluffy breads like these tandoori rotis are the best way to enjoy the thick gravies these meat dishes are cooked in. The soda tandoori roti at Al Jawahar is the best I have eaten with the korma they serve, the mutton ishtoo and the nihari of course.


At Sadia's place also, I took a piece of Nihari first. I am so smitten with this slow cooked meat dish that it always tempts me to go to purani dilli every few weeks. I liked Sadia's nihari quite a lot too. Tender falling off the bone meat, the spices imbibed well in every fiber of the meat and juices of the meat seeped well into the gravy. Just as it should be, all flavors melded together well.


Gosht dopyaza was also done really well. The sweetness of onions balanced by well cooked tomatoes and overall balanced flavors. Some recipes of dopyaza used curds instead of tomatoes and some don't use any souring agent but all dopyaza varieties taste wonderful if cooked nicely. Well cooked meat that must have been cooked for a couple of hours, it didn't look like pressure cooked which kills the flavors of the meat in my opinion. This dish can be a good party staple for Delhi crowd I am sure.

I had taken a quarter of roti and used it as a palate cleanser only, I can't eat much roti with meats dishes as it makes me feel stuffed. And here I had to taste all of the dishes served. I was biting into my roti judiciously.


Sadia had arranged the kebabs prettily and I was very curious about the sesame coating and seemingly 'deep fried' kebabs rather than the shallow fried as we do it the 'awadhi shami kebab' way. I had never had deep fried kebabs earlier. Sadia's reason for deep frying the kebab is it's ability to retain the shape probably as she has to pack the stuff and hand it over to customers who would carry it home and by the time the kebabs are eaten it will be around 30 minutes at least after deep frying them. Although the shami kebabs we get packed from Dastarkhwan (in Lucknow) wrapped in ulte tawe ka paratha gets all shapeless, is still yummy to the core.

Anyhow, the kebabs were nice and crisp on the crust and melt in the mouth type inside. There was a stuffing of broken nuts and probably a little hung curd like it is done in shikampur kebabs, the texture was also much moist than the traditional shami kebab I have eaten till now. I found them really tasty, the sesame coating tasted great too, I wont go into the argument of what kind of kebab it will be, or it will be a hybrid. Something that tastes good, uses good ingredients is good enough for me.


The dish I tasted after the kebab was the awadhi murgh. The taste was good as a chicken curry but I failed to feel any awadhi spicing in it. May be everything was cooked with a bit more of chilly and the chilly had overpowered awadhi spicing. This awadhi murgh was a nice chicken curry but not awadhi for me.

I can eat quite a good amount of spices and chilly but by this time I had started feeling the heat that hit me. I was sweating like I had never before in this whole summer for sure. I wish Sadia had served some vegetables along with all the meats as well. Some lightness both in constitution as well as in taste was required and was missed sorely.


This achari murgh looked quite attractive and proved it's worth too. Very well balanced pickling spices , the right amount of sourness added by curds and nicely tenderised well seasoned chicken.  I would definitely try and recreate this recipe as I liked it as much as I like my murgh achari tikka.


This badami korma was nice too, but by the time I had this, it was clear that Sadia loves super spicy food. A korma should be very delicate to my understanding. The spicing is just a lingering aroma that you get apart form the smooth nut paste and the meat flavors. This korma was too spicy for it's name. Although I would like it if I am eating just one meat dish in the meal and there are loads of vegetables around my plate. Look how sorely I missed vegetables.


 And the last of the meat dishes I tasted was the laal maas. It was good, definitely spicy but not the best laal maas I have had. Average laal maas I would say as otherwise too I like laal maas only for the red chilly capsaicin flavoring it has. I think it would have been superbly good if it was cooked in ghee. I knew what I was missing in this laal maas, I inquired and found out all the dishes were cooked in refined oil. I wasn't expecting this.

I know many many great cooks use refined vegetable oils for cooking but I would prefer the good old mustard, sesame, coconut oils for my desi foods and ghee would rate the highest.


She served murgh dum biryani as well and we had high expectations for the biryani. Although I would say chicken doesn't make biryani at all, but still a biryani should have some flavors of the meat stock in the rice and the overall aroma that is so characteristic. It lacked everything. The rice was sticky and overcooked and I didn't find any flavor that would confirm it's a biryani. It would have gone by the name of pilaf probably.


The kheer looked good and tasted perfect. With the earthen aroma of the terracotta bowls this was a kheer one finds in wedding parties mostly. Perfectly cooked rice, reduced milk and whatever it takes to make a fairly good kheer. Not the best I have had but good.

Overall, it was a nice meaty meal. I liked most of them, but felt it would have been a lot better if it was cooked in ghee or mustard oil. Slow cooked meats don't use much ghee anyways but the flavor that develops is unmistakably rich. Ghee also cuts the heat of chilly that we all found so hard hitting.

I would emphasize one point that a meal can be predominantly meats but there should be enough options of vegetables and some cooling type raitas when there are so many meat dishes on the menu. I would have loved even a bhindi gosht or turai gosht for that matter.

A meal ordered from Sadia costs about INR 1000 for two. I would definitely order nihari and murgh achari form her if I do. May be the gosht dopyaza and lal maas as well. I think one can request her to keep the spicing low or cook the meats in ghee to get a better experience. She is an awesome mughlai cook I must say. Preparing so many dishes and serving them in one go is not easy for most of us. Apart from me,  Ruchira, Parul, Mukta and Sid khullar were also there to taste this spread.

You can contact Sadia on her fb page called Nawabi zayeka here and call her at 08588960966 to order your preferred dishes.

Wednesday, March 13, 2013

dahi wala gosht or dhaba style mutton curry...


Dahi wala gosht means meat cooked with yogurt and dhabe wala mutton means the mutton curry one gets in highway eateries. This is yet another rustic mutton curry that doesn't involve many steps in the cooking procedure. The highway eateries cook large amounts of meats with balanced spicing but the cooking procedure is not complicated. Almost all of them cook the marinated meat in just one step, but they do slow cook all meat as a rule. At least an hour's marination time and about 2-3 hours cooking time makes sure the cooked meat curry is truly melt in your mouth type with a rich gelatinous sauce clinging to the meat. Some of them cook the meats overnight but you can always cook small quantity at home for approximately 2 hours with great results.

dahi wala gosht or dhaba style mutton curry

You normally get kulchas with such mutton curries in dhabas, at home you can choose what kind of bread you need with it. Such meals do not require any side dishes, just some raw onion on the side as they serve in the dhabas will be perfect.

You would be glad to know that this recipe is just 2 steps, just mix all ingredients first and rest the mixture (the marinated mutton) for a couple of hours. Then heat ghee and cook the mutton on very low flame tossing and turning once in a while in between.

ingredients..
(serves 2-4)
mutton pieces on bone mixed cuts 500 gm
yogurt 250 gm
finely chopped or minced onion 3/4 cup
minced garlic 1 tbsp
minced ginger 1.5 tbsp
special garam masala* 2 tsp
*(or just pound 6 green cardamoms, 6 cloves, 2 inch cinnamon and 1 fat black cardamom together)
kashmiri red chilly powder 1 tbsp or to taste


ghee 1/2 cup
whole coriander seeds 2 tsp
whole cumin seeds 2 tsp
whole black pepper corns 2 tsp

procedure...

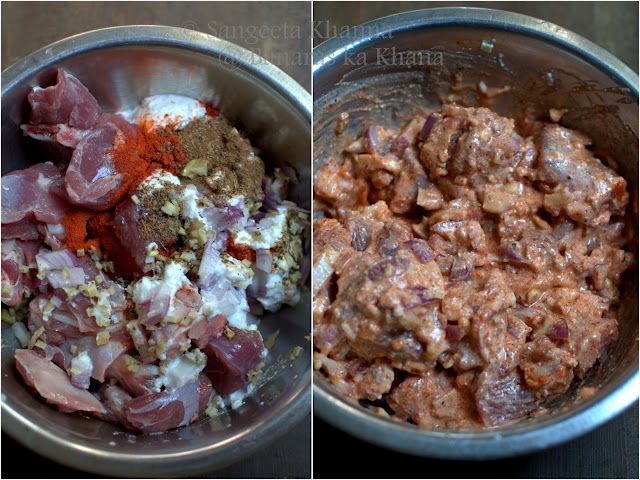
Mix the mutton pieces with all the ingredients of the first list. Marinate for 2 hours or overnight.

dahi wala gosht or dhaba style mutton curry

At the time of cooking heat the ghee in a wide heavy bottom kadhai, and tip in the whole spices.

Wait till they sizzle and then slide in the marinated mutton slowly. Bhuno the mixture on low flame slowly, turning the meat once in about every couple of minutes in the beginning for 20 minutes and then cover the kadhai with a lid and let it simmer.

Check after every 15 minutes and keep adding 1/4 cup of water every time you feel it is getting dry. Be aware after an hour's time of cooking the meat as it might stick to the bottom if your kadhai/pan is not thick enough and the flame is not calibrated to cook very slowly according to the thickness of the pan.

Just keep simmering the mixture and watch when the meat is about to fall off the bone. The gravy starts looking almost gelatinous after 1.45 to 2 hours of cooking and it can be ready any minute after that.

Adjust seasoning and consistency of the gravy by adding a little water if you wish. You might want to throw in a few slit green chilies at this time. They taste great but coriander greens should be avoided as this meat tastes better without dhaniya patta.

dahi wala gosht or dhaba style mutton curry

This dhaba style meat will be one of the most delicious mutton recipes you have tried. You can always cook it in slow cooker if you use one. I normally like to keep stirring or feeling my curries when I cook, so the long cooking time is not a problem if I am home and want a therapeutic cooking time. After all the treat of slow cooking is immensely yummy meat.

The flavors are not too overpowering spicy, the yogurt makes the curry a little towards tart but the chilly heat and the spices complement the yogurt and slow cooked gelatin extraction kind of gravy really well. Everything that was chopped finely or not so finely gets soft and silky after slow cooking.

Sponge off the gravy with some freshly baked whole wheat naan or roomali roti.

You would love to cook this for crowds too. It is one of those crowd-pleasers and does not need much equipment to be cooked.

Cheers...

Monday, March 4, 2013

mutton curry UP home style...


Meat curries in UP mean mutton curries essentially in Hindu homes. Made spicy using home ground spices or whole spices sometimes, simmered in heavy bottomed pans for hours in leisurely times and pressure cooked when the meal needs to be quicker if not instant. But the flavors of the spices remain the same for most conservative food snobs of the state. They wont 'like' a mutton curry enough if it is not done 'their' way. I know because my dad is one of those snobs. And he was the one who used to cook mutton curry at home and later when I started eating meats, taught me as well.

 Spice blends are different in all Indian states and we immediately locate the origin of a dish by the whiff of the complex bouquet of spice blend used in a particular dish. All spices are Indian but they create a infinite range of combinations and permutations. Isn't that a wonderful thing to experience living in a country that is known for spices. Spice blends are like perfumery. The more robust spices are the base flavors and the delicate aromatic ones make the tasting notes that hit the palate first. The meats and vegetables add to the bouquet and we get a unique meal in every little home across the country. The homes where homemade spice blends are used I mean. Many packaged spice blends have made the curries taste similar in some homes though, still the amount of fats used, the additional seasoning makes a difference. So if you didn't pick up the MDH or Everest blends for mutton curry, trust me to get a nice home style mutton curry with this recipe.

The addition of potatoes is mine as I have seen a few friends of mine loving potatoes in a mutton curry, and the husband loves them too. My dad would shrink his nose at the potatoes I know. Skip them if you don't want them.

Note that the final taste of this mutton curry depends on the curry powder blend too which is homemade in my case. Try and powder the spices in the same ratio and combination when you are making a UP style curry. Ready made packed curry powders are different.


ingredients...

(2-4 servings, depending on the side dishes served along with it)

mutton, curry cut (on bone, preferably from shoulders but any bony cuts would work fine) 300 gm
a large potato with skin, scrubbed clean and cubed
ginger julienne 2-3 tbsp
sliced garlic cloves 1.5 tbsp
thinly sliced onions 1 cup
turmeric powder 1 tsp
everyday curry powder 1 tbsp
special garam masala 1 tsp
salt to taste

mustard oil 1/3 cup
cumin seeds 1 tsp
tejpatta 2-3 leaves*
whole red chilies broken and seeds removed about 10 or to taste

chopped coriander greens 2-3 tbsp or to taste


procedure...

  • Heat mustard oil in a wide and thick base kadhai. Tip in the cumin seeds and wait till they crackle. Add the chopped ginger and garlic, saving 1/2 tbsp ginger julienne for garnish and let them fry for 30 seconds. Add Tejpatta, whole red chilies broken and seeds removed, and then add the sliced onions immediately. Add 1/2 tsp salt (more to be added later) and fry the onion till browned well.

*I added 4 cloves and one black cardamom at this step as well, the husband doen't like whole spices in his curries so I keep the whole spices minimal most of the times, You might like to add a stick of cinnamon too.
  • The mutton will be added at this step, mix well with everything and keep turning the pieces to let them cook from all sides. This bhunoing process will go on for about 25 minutes on low flame so the mutton pieces keep browning slowly, absorbing the flavors of the ingredients. You might need to quench the dryness with a tbsp of water every now and then but keep the mixture dry all this while. Since the flame is low, you can do a few chores in the kitchen while the meat is cooking.
If cooking in a pressure cooker, this bhunoing step will be minimised to 10 minutes.


  • Add the cubed potatoes and the powdered spices along with 2 tbs of water so the powdered spices do not get burnt and aromatic oils get absorbed into the half cooked mutton pieces. Keep the flame low and keep bhunoing for about 10 minutes more. Add salt and about a cup of water, cover the kadhai with a well fitting lid and let it simmer for 20 minutes or till the mutton gets completely cooked, the meat should be ready to fall off the bone, but should not be already detached from the bone.
If pressure cooking, just bhuno the spices and cook for another 20 minutes. Potatoes should not be added when pressure cooking as they disintegrate and interfere with the taste of the curry when pressure cooked.


  • Adjust the consistency of the curry, add more water or dry up on higher flame if required. Check seasoning and adjust. Add the green coriander leaves and serve hot. The ginger julienne make a nice garnish, they taste great in the curry as well.


As I told you, I am not too fond of the potatoes in this mutton curry, the husband loves them ans I add them sometimes just to add some carbs to the curry when required. They do not hamper the taste of the mutton curry if added in small amount.

This is a robustly spicy mutton curry, you get the top notes of clove, green cardamon and cinnamon, tejpatta makes an appearance in the aromas as well. Browned onions and the black pepper, black cardamom and cumin make it robust and deep in flavors. The spiciness of this mutton curry is deeply satisfying in a meal. You would feel like having more of the gravy and all your spice craving will be sated once you have it. Just don't load up your plate with too much roti or rice as it would make you feel heavy and dull after the meal.

Another UP home style mutton curry is made in a different way. First boiling the mutton and making a yakhni, then bhunoing the boiled mutton with spices and proceeding to simmer the curry with spices. I have posted this mutton curry in the post where spice powders and their therapeutic uses are discussed. It is long post and you would have to scroll down to find that mutton curry at the bottom.


Wednesday, December 26, 2012

Awadhi mutton biryani made simple ....


Biryani can be simple but not quick to tell you the truth. The meat needs it's own cooking time and then you have to cook the biryani on dum (in a sealed pot) so the flavors become one. All the spices and meat and the fragrant basmati rice get a new identity in a biryani as they all meld into each other. Yes, you should be able to taste the meat in the rice and the rice aroma should seep into the meat. It sounds difficult but the cooking technique ensures it is done nicely and effectively. This post would introduce you with the cooking procedure required to cook a brilliant biryani. The spices can always be optimised to your own taste.

You can always choose your spice blends if you don't like some strong robust flavors in your biryani or add some fragrant flavors like mint or an overdoes of green cardamom if you wish, but take care to treat the spices and herbs in a way that the aromatics are not destroyed in the cooking process. You want them all to get imbibed into the rice and meat if you are looking for a biryani.

Awadhi biryani starts with making a 'yakhni' of the meat. Yakhni is a stock that includes some spices along with mutton pieces to be boiled with water for about 1.5 hours or more. This slow boiling allows the stock to be rich in flavors. I prefer adding a piece of fat to this simmering stock so the flavors get intensified. Using bony pieces of mutton is advised for making biryani, you would like to add a few bones to the broth/stock/yakhni if you planning to cook a biryani with boneless mutton pieces for convenience in eating.

So there are three steps in making a biryani, the first involves making of the yakhni, practically the first in the procedure as it takes the longest time and you can do other prep work while this is being cooked. 

Then comes the cooking of rice with a few aromatic spices and the cooked yakhni. It is actually cooked into the meat stock and only till 3/4th done.

The next step is to flash fry the cooked mutton pieces along with another fresh batch of spices and ginger etc and then layering the cooked meat with 3/4 cooked rice with a sprinkling of saffron and herbs if you wish. This layered arrangement is cooked on dum, that is in a sealed pot on very low heat for about half an hour or more. Depending on the quantity.

I cook biryanis in large amounts most of the times when I have to entertain guests and that is the reason why I have never been able to click decent pictures. This time I cooked it for just the two of us, actually for 2 servings as small quantity of biryani is not worth doing. I clicked pictures as soon as I opened the dum pot, the wafting aromas making me weak in the knee, I actually tasted the biryani right then. Later I proceeded to make the raita and salad to serve with it and forgot again to click pictures of the serving plates. The mint raita and a tomato-onion kachumber salad is missing in these pictures. A well made biryani does that to you.


Nicely separated, well cooked, well soaked rice and succulent pieces of meat, aromas to make you hungrier than ever, you would know when you cook this.

ingredients...
(2-4 servings | 2 hours cooking time)

mutton pieces on bone 500 gm
basmati rice 1 cup

spices for the yakhni...
black cardamom 1
green cardamoms 2
cloves 5-6
tejpatta 5-6
black pepper corns 20

spices for the boiling rice..
cloves 2
green cardamom 2
cinnamon stick one inch long
tejpatta 2

spices and other ingredients for the stir frying of boiled mutton pieces..
cumin seeds 2 tsp
pepper corns 20
black cardamom 1
shahi jeera 1 tsp
cinnamon 2 one inch sticks
dry red chillies 5-6 (broken)
fresh ginger root chopped into thin julienne 3 tbsp
ghee or mutton fat scummed from the broth 2 tbsp
some people add turmeric powder at this stage to get a golden yellow color on the biryani, I skip this, use 1/2 tsp turmeric powder if you wish

spices and other ingredients required during layering of biryani..
nutmeg freshly grated a pinch
saffron strands 2 pinches
mint leaves (optional, I didn't use, a mint raita served with it is a better option I say)
fried onion slices (optional, I didn't use this time)


procedure...

Add the mutton pieces to about half a liter of water and give it a quick boil. Drain the water immediately, fill the pot with 3-4 cups of water again and add the spices mentioned in the list for yakhni. Let the broth simmer for 90 minutes.

Fish out the meat pieces from the yakhni once it is cooked. Strain the yakhni and discard all the whole spices. Add 2 cups of this yakhni to the washed and drained rice with the required spices and cook on low flame till 3/4 done. It takes about 25 minutes if done on absolutely low flame for this quantity.

Meanwhile, heat ghee in a pan which you would use for dum cooking also. I use my heavy cast iron kadhai when the quantity is less, basically any pot that has a heavy base and a tight fitting lid would do.
Add all the ingredients together into the hot ghee and fry till the spices get aromatic. Add the boiled mutton pieces and flash fry just for 3-4 minutes. You might like to add 2-3 pinches of a strong garam masala if you wish at this point. Do not fry the mutton pieces more than 3-4 minutes else they become dehydrated. Wait till the rice is cooked (only 3/4th done stage).

Now layer the meat pieces with the cooked rice in the same pot. For a small quantity you can just fold them all together, do not mix thoroughly. Sprinkle the freshly grated nutmeg, mint and fried onion if using and the saffron too. Place the lid to seal and cook on very low flame for another 30 minutes.

You can use dough to seal your pot if are not sure of sealing it properly. Remove the dum pot from heat after 30 minutes and serve immediately. This biryani can be served after 2-3 hours after reheating in the same pot or into the microwave. The flavors get better after a while but the aromatic experience of opening the sealed pot at the dining table comes when you have it right away.


 A cooling raita and a tomato and onion salsa/kachumber  type salad is what we like with our biryani.

You can have it as part of a lavish spread but a raita and a roughly chopped and mixed, preferably dressed salad is a must in my opinion. I know some people who can have biryani on it's own and even for breakfast.

Very soon I am going to bake a nice biryani in an Earthen pot I bought from Trade fair, seasoning the pot is falling prey to my habit of procrastination. Enjoy this biryani till then.


Tuesday, December 18, 2012

Hyderabad special meal at The Park and a recipe of Safaid Korma and Akhrot ke kulchey...

Hyderabad food brings a smile on my face as I love spicy food in general. Biryani and Haleem comes to my mind immediately and then there is a complete blank. Ah yes, Double ka meetha and Khubani ka meetha I love to indulge into occasionally. We decided to go for a Hyderabadi dinner one evening last week and were expecting a spicy affair. I was surprised to know there is so much more to Hyderabad cuisine when Chef Tarun Verma introduced the menu at Aish at the Fire restaurant in The Park.

Our meal started with amuse bouche, a masala papad followed by a dahi ka golgappa served rather dramatically in a miniature tagine. Loved this along with the appalams.


Among the starters I liked Magaz ka pakoda /lamb brain fritters (575), pattey ki machhi, a steamed fish similar to Patrani machhi (825) and a shikampuri kabab, lamb kabab with a hung curd center (695) though I could not find any yogurt filling.. Pathar ka gosht (695)was nicely smoky and soft. I liked it as it was different from grilled kababs and still smoky.

Among the vegetarian starters you might like to taste the khajoor paneer ke dhol (425), a rolled up slice of paneer with a stuffing of dates and spices, I found it a bit too sweet. Some more spice and herbs would have balanced the flavors well as it was nicely soft and well rolled. Other vegetarian starters were not at all good.

Few mains were liked too. I found akhrot ke kulchey (145) really good. Walnuts are my favorite nuts and this naan was just too good for my palate. A thin white gravy of safaid korma (725) was quite a surprising element. Very delicate flavors and not at all spicy, contrary to what I think of hyderabad food, this korma was really nice though the gravy could have been thicker. I loved the akhrot ke kulchey with safed korma. Tried these at home, recipe in the end of this post..


Haleem (745)was good, a nice pasty Haleem that is made with large pieces of meat and cooked for hours so the fibers break. Nice flavors the way I like in Haleem. Apart from that Palakura pappu (425) was a nice yellow daal with few bits of greens but nothing great. Vegetarian dishes were an absolute disappointment.

Desserts were out rightly disappointing. Badam ka halwa (425) was very mediocre.  Chocolate double ka meetha (425) was a disaster as a real thick slice of bread with chocolate was not even soaked in syrup properly. Khubani ka meetha was a joke as dried apricots topped with whipped cream do not make khubani ka meetha. I was not expecting this from a five star hotel. The presentation was good though.

I would suggest you to go if you like Safaid korma and akhrot ka naan, haleem and some non vegetarian starters but avoid any desserts from the hyderabadi menu. The gulkand rasmalai (425) they served was a lot better and refreshing with slivers of dehydrated paan and gulkand.

The good thing is that I am bringing the recipe of Safaid korma by Chef Tarun Verma. Here it is for you to try and let me know if you like it...


ingredients...
mutton curry cut 1 kilo
cinnamon stick 5 gm
almonds boiled, peeled and blended 200 gm
ginger garlic paste 40 gm
full cream milk 2 liter
cinnamon powder 5 gm
green cardamom powder 5 gm
salt to taste
ghee 50 gm

I quartered the recipe as it was being cooked for just the two of us..

procedure..

Wash mutton pieces and put to boil with ginger garlic paste and cinnamon sticks. Keep skimming the surface or change the boiling water twice. This helps in keeping the color of the gravy white and flavor really delicate.

Simmer the mutton pieces till done. Took an hour for me.

Reduce the milk to half and add the mutton pieces with the stock to it.

Add the cardamom and cinnamon powders. Boil till you get the right consistency of the gravy.

Finish with cinnamon powder and ghee and serve hot with any kulcha or naan you fancy.

I made whole wheat Akhrot ke kulchey with this. Knead whole flour wheat flour with a pinch of soda bi carb, pinch of salt (for every half cup of flour) and a tbsp of chopped Walnuts and knead using warm milk. Let the dough rest for 5 minutes, then roll out and bake Kulche on a griddle or in an oven.

See how to bake Delhi street style kulche here..


For these kulchey I just rolled up small balls of this dough to make oblong breads and slapped it on to a hot griddle. Let it cook one side and then grilled the kulcha on open flame on the other side. It becomes perfectly soft inside and a bit crisp and firm on the surface. With the nutty crunch of Walnuts, these Kulchey are yummy with just anything you wish.

Who would have thought I would share a delicately flavored (and not hot and spicy) recipe from Hyderabad? Having said that, I am not sure if this recipe is authentic as a few such curries are cooked in Banaras as well. So have good food no matter where it belongs to.

Cheers..