Showing posts with label dill greens/sowa bhaji. Show all posts

Wednesday, February 15, 2017

alu sowa ki bhujia | a warm fragrant stri fry with potatoes and dill leaves


Sowa or Soya is Dill leaves and is also known by the name of Shepu, a fragrant winter herb that is used liberally all over UP. Sowa methi is a popular combination of flavours and works great when making a sookhi subzi with alu, even the sowa methi ka paratha is so good you never get bored of this herb. But the most popular will be this alu sowa ki bhujia and even alu sowa ki subzi with minor variations.

dill leaves or sowa bhaji

We have been enjoying a lot of sowa this season too and had alu sowa in many variations. It will not be fair if I don't share all those alu sowa recipes here.

Here is the alu sowa ki bhujia to start with. It tastes great with Indian meals in general, great with plain hot parathas, dal chawal meals but you would be surprised to see the response when you serve it like a warm or even cold salad. Potato and dill salad like this can be had on its own and can become a sandwich stiffing.

alu sowa ki bhujia

Alu sowa ki bhujia 

ingredients 
(served 2-4 depending on side dishes)
2 large boiled potatoes cooled to room temperature or refrigerated
1.5 cup chopped dill leaves (1 cup is good too)
1 tbsp mustard oil
1/4 tsp cumin seeds
1/4 tsp methi (fenugreek) seeds
chopped green chillies to taste
1/2 tsp turmeric powder
salt to taste
amchoor powder a few pinches (optional)

procedure 

Peel and cube the potatoes in bite sized pieces.

Heat oil in a pan or kadhai. Add the cumin seeds and methi seeds and wait till they turn aromatic and pinkish brown. Add in the green chillies and the cubed potatoes in quick succession. Toss and fry on low heat till the potatoes get some brown spots and get dehydrated a little.

Add salt, turmeric powder and toss and stir for a couple of minutes, add the chopped dill leaves and keep tossing and mixing till the dill leaves get wilted completely and coat the potatoes well.

Adjust seasoning.

Sprinkle amchoor powder as per taste if using.

Serve hot right away or serve it cold. It is great any which way.

The other type of alu sowa ki subzi is cooked using raw potatoes and is more of a creamy mash infused with lot of dill leaves. I use all the tender stems of dill in this version too.

Alu sowa ki subzi

ingredients 

2 medium sized potatoes peeled and cubed
1 cup chopped dill leaves
1/2 cup tender dill stems chopped roughly
chopped green chillies to taste
1 tbsp mustard oil
1/4 tsp methi (fenugreek) seeds
1/2 tsp turmeric powder
1/4 tsp pepper powder
salt to taste

procedure 

Heat the mustard oil and tip in the methi seeds. Wait till it becomes aromatic. Add the green chillies and cubed potatoes, mix salt and turmeric powder, cover with a filling lid and cook on low flame for 6-7 minutes or till the potatoes are cooked.

Now add the tender stems of dill, mix well, add pepper powder and cover again to cook for 2-3 minutes.

Add the dill leaves, toss and mix. Thrash with a wooden spatula a few times to make the potatoes mush up a little. The dill flavour will infuse beautifully in the potatoes. 

alu sowa ki subzi

Serve hot or cold, as a subzi or a salad or any which way you want.

Served with some grilled piri piri chicken wings we loved it for dinner last week. The leftover was used in alu paratha the next day and that was great too.

Make some alu sowa ki bhujia or alu sowa ki subzi while the season lasts. Dill freezes well in ziplock bags so you can save some of the season's bounty but the new winter potatoes cannot be saved.

Make some alu sowa now, bhujia or subzi you can decide according to your taste.


Wednesday, February 4, 2015

everyday subzi : baingan sowa-methi ki subzi


Baingan or brinjal is one of the favourite vegetables I can eat in any form. Not only because I love baingan myself but also because baingan responds so well to different treatments given to it. Grill it to make eggplant salads or crustless aubergine pizza, fry it to make beguni or sarson wala baingan fry, mash it to make bharta or raita, puree it to make baba ganoush or just curry it with just anything you like. I love the Japanese style grilled aubergine as well. Alu baingan palak is one traditional subzi on eastern UP that is cooked in winters in almost every home but this baingan subzi with sowa and methi is not that common in eastern UP. It is more of a western UP combination. Those who like it get this subzi made several times during the season and sowa methi combination is used to bring the best from the winter brinjals and green peas. And this is one of the lightest curries one can cook.

I cook this curry quite often for dinner and have it like my soup dinners but some time in last month I cooked this one in day time and clicked a few pictures. And when I posted this urad daal sowa ke pakode, it reminded Nupur about the sowa baingan ki subzi and she enquired about it in the comments. Sowa baingana and sowa-methi baingan is cooked similarly and people keep using different ratios of both these leafy greens in this subzi, sometimes even skipping one of these.


It was a pleasant coincidence that I had already clicked pictures of this recipe and I promptly promised her about it. Although I got quite late in sharing it, but better late than never.So here is the baingan sowa-methi ki subzi for you Nupur.

ingredients..
(2-3 servings)

one large round brinjal (or any fleshy variety) about 300 gm
cleaned washed and chopped methi (fenugreek) greens 200 gm
cleaned washed and chopped sowa bhaji (dill greens) 150-200 gm
finely minced green chillies, ginger and garlic 2 tsp each
chopped tomatoes 100 gm or one large tomato (optional)
green peas 100 gm (optional)
mustard oil 1 tbsp
fenugreek seeds 1/4 tsp
mustard seeds 1/4 tsp
fennel seeds 1/4 tsp
hing (asafoetida) a pinch

preparation...

Heat the oil in a pan or pressure cooker pan. I often use pressure cooker for such mushy subzis (especially for brinjal) because it cooks faster and doesn't dehydrate the subzi too much.

Tip in the hing, fennel, mustard seeds and fenugreek seeds in the oil and wait till the splutter and get aromatic. Add the minced ginger, garlic and green chillies next and cook till sizzling but not browned.

Add the peas, brinjal and the chopped greens. Mix well to coat everything. Add salt and chopped tomatoes if using and top up with 3-4 tbsp of water. Cover with the lid and pressure cook till the whistle blows. Take off from the flame and let the pressure cooker cool down on its own. Mix well and serve hot.

If cooking in a pan, just let the subzi cook on low flame covered, stirring once a while for about 20 minutes. It will be mushy and muddled up after cooking and that is how it is supposed to look.


The duo of methi and sowa taste really good in this curry. Most people add a few potato cubes to it too and some of them even skip adding the brinjal and make it just with potatoes. But the crux of the matter is that this subzi doesn't have any other spices than the tempering essentials. The aroma of this curry is dominant with a mix of methi-sowa, brinjal being the base to absorb all the goodness. Some people like this curry all mushed up in a texture similar to bharta. Make it the way you like it, most likely you must be familiar with this subzi if you have lived in UP somewhere.

We enjoyed this baingan sowa methi with some whole wheat mini kulchas and buttermilk on a weekend afternoon, watching TV and talked of our simple meals of childhood.

When we live away from home and miss the seasonal foods, these are some of the flavours that are missed the most. The freshness of winter produce is best captured in this kind of subzis back home. I have heard my friends saying the baingan and saag of Banaras tastes so different from what we get elsewhere. That is called the taste of home and this subzi represents that for me.

I am sure it brings back memories from home if you have come here just to read about baingan sowa-methi ki subzi. Go shop for some baingan and sowa methi and cook this subzi. Soulful food doesn't cost a bomb.

Wednesday, January 28, 2015

urad daal aur sowa ke pakode | lentil fritters with dill leaves


Daal ke pakode is a winter snack made with tea or coffee in the evenings or for weekend breakfasts in many homes. Weekend breakfast mostly becomes a brunch for us but we normally don't cook elaborated meals on weekends and make something that we enjoy eating in leisure but simpler to cook. So mostly it is something like a platter of hot pakode or crisp cooked methi or alu ke paranthe in this season or a huge bowl of salad in summers. Newspapers and such comforting meals make our weekend mornings very relaxed, usually very late mornings in fact, stretching out well till afternoon.

I had soaked urad ki daal (split and skinned black beans) last week to make some kanji vada to be soaked in the kanji that was fermenting on my kitchen counter and a relaxed Saturday brunch of sowa wale daal ke pakode. But on Friday evening one of Arvind's friends called and came to visit us on a short notice for tea. I decided to quickly fry some daal ke pakode and harey lasun ki chutney with chai and as it turned out, this snack became our dinner that day. Not that I am complaining, I did fry some plain vadas and soaked them in the kanji to make the much craved for kanji vadas.


Sowa bhaji is a fragrant leafy green that is usually mixed with spinach or methi (fenugreek greens) to make saag or stir fries. We love it in our daals, raw chutneys and even in lehsun sagga. It was after a long time I made pakodas with these dill greens. All of us loved this impromptu meal of pakodas.

ingredients 
(enough pakodas for a gathering where no one minds portions)

urad daal 1.5 cup soaked overnight or minimum 3 hours
chopped dill greens 2 cups packed
minced green chillies 2 tsp or to taste
minced or grated fresh ginger root 1 tbsp or a bit more
coarse pepper powder 1 tsp
anardana powder 1-2 tsp (optional)
salt to taste
mustard oil for deep frying

procedure 

Discard the soaking water and grind the soaked daal to a smooth paste. Whip some more while still in the mixie jar to make the batter light. Do not add water while making this paste else the batter will get runny and the pakodas would absorb too much oil while frying.

Mix this batter with all the other ingredients except the oil and start frying right away. Keeping it for long makes the batter runny and it absorbs more oil while frying.

Heat the oil in a deep kadhai and fry small portions of the batter to make pakodas. You can use a rounded dessert spoon or soup spoon to scoop the batter and drop it in hot oil to make pakodas, depending on what size of pakodas you want.

Take care to fry them at medium flame so they cook thoroughly, these pakodas do not soak much oil as urad daal is quite sticky and the surface of the pakodas get sealed quickly in the hot oil.

Serve hot with any green chutney but this green garlic chutney works really well with this dill flavoured daal ke pakode.


To make this green garlic chutney mix a cup of chopped green garlic (leaves and some of the bulbs) with a cup of chopped green coriander leaves along with 3-4 green chillies, 1 tsp chopped ginger, salt to taste and lime juice to taste. The chutney is so good you would want to make it everyday with all your meals. We eat too much green garlic in this season.

These urad daal ke pakode are irresistible. I suggest you to make it a meal always as such snacks feel guilty if one is heading for a meal after this. Or serve it as starters for an elaborate meal for guests and see how fast they fly.

Friday, September 28, 2012

Harey lehsun ka achaar | Lehsun-sagga...


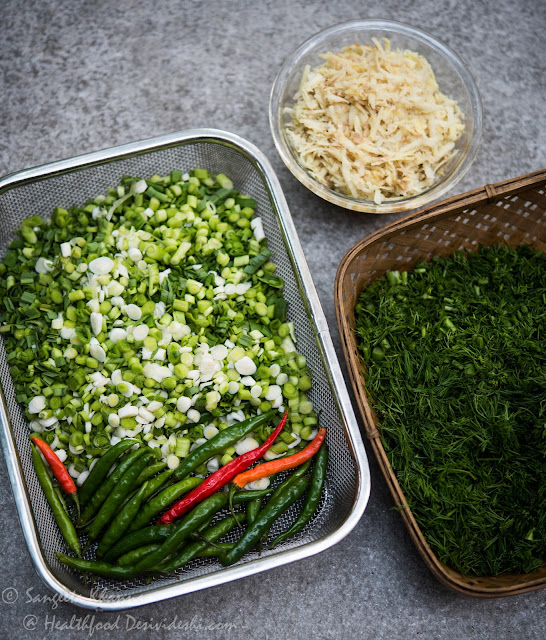
Garlic greens and Dill leaves come together in winters and there is a genius recipe that makes use of both these aromatic herbs together.

Lehsunsagga.

recipe of hare lehsun ka achar or lehsunsagga

Yes, this is the name of an intriguing pickle of Garlic greens. The green garlic shoots or hara lasun as it is called in HIndi. Made into a fresh chutney or a pickled chutney, called as achar as it keeps well for the whole year. A childhood favorite, my grandmother used to make it quite frequently and it was considered healthy being green and being the ever so popular condiment that is Garlic. A good measure of Ginger in it and a lot of aromatic Dill greens, it was the most favored pickle till it lasted. Yes it lasted just a few weeks thanks to a few greedy prying eyes to the glass jar. My Daadi would clean a large bunch of greens once again and chop it, pound it in the stone mortar and pestle to get a nice flaky texture in the pickle.

When I stared pickling, it was a challenge to get it right because chopping the greens finely didn't work to get that texture, blending them in the food processor just chutnified them and killed that achar feel of it. But I was hell bent upon bringing that texture of flaky greens of garlic, macerated well but not too smooth to loose a tangy bite. Got it right with a chopper attachment of my Morphy Richards hand blender. The chopper did a fine job when the green were put into it after chopping them. Later I would do the whole hog of using a stone mortar and pestle too to get the texture right.

Long story cut short, I tried every method in the book to macerate the chopped garlic greens well so they seep well into the Dill aromas and the Ginger heat.

recipe of hare lehsun ka achar or lehsunsagga

I have taken a few step wise pictures last year of the making of this pickle, but couldn't find them in my albums when I started looking for them. Someone on a foodie group on facebook wanted the recipe and I decided to post it without those pictures.

The pictures have been added later**

recipe of hare lehsun ka achar or lehsunsagga

ingredients...

Garlic greens cleaned 200 gm
Dill greens 200 gm
fresh ginger grated 200 gm
green chilies 50-100 gm depending on how hot you would like it
salt to taste (ideally 15% of the total weight of the other ingredients to preserve it)
lime juice 1/4 cup
mustard oil 1 tbsp (optional)

an electronic chopper or a stone mortar and pestle so the chopped herbs can be thrashed to macerate

recipe of hare lehsun ka achar or lehsunsagga

procedure...

Make a tight bundle of all garlic greens and the dill greens together in your hand and chop them all together on a wooden chopping board or any which way you are comfortable chopping them. Retain the thick but soft stems of Dill greens, just discard the woody stems if it has. Discard the fat white bulb if the garlic greens have it at the base, use it for other recipes.

Make a coarse paste of the green chillies and ginger too if you wish. I prefer the ginger to be chopped very fine. You might like to grate the ginger. Keep these two aside.

Now whiz the chopped greens into a chopper by pulsing action so it doesn't get smooth, just macerated. Or put it all into a stone Mortar n pestle and thrash the whole mixture for about 5 minutes or till the texture is your preference. Adding salt while doing it would help the maceration process. Add mustard oil if using. Mustard oil tastes great when this pickle is consumed within a month, after that the raw mustard oil aroma vanishes.

Now mix everything together in a sterilised glass mixing bowl, I sometimes use even stainless steel bowl to mix.

recipe of hare lehsun ka achar or lehsunsagga

Pour lime juice over it and press down to make sure all the liquid released acts as a brining medium. No need to sun this pickle, gets ready instantly if you like the sharp flavors. The sharpness gets milder as the pickle ages.

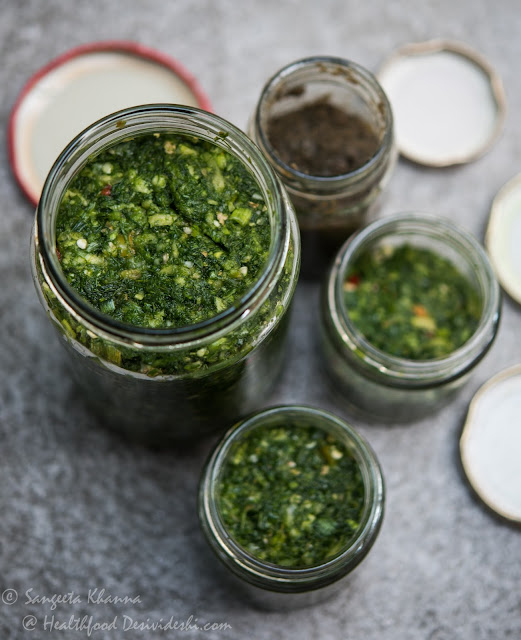
The lehsunsagga gets more sour, more mild and more dull in color as it ages but this pickled chutney ages really well and the olive green coloured lehsunsagga in one of these jars is 6 years old and still tastes great.

recipe of hare lehsun ka achar or lehsunsagga

This olive coloured sample is 6 years old garlic greens pickle, the Lehsun-sagga, still as fragrant as the dill stays aromatic, the garlic sharpness has mellowed down.

recipe of hare lehsun ka achar or lehsunsagga

The green pickle can be used as a chutney, as a pickle in sandwiches and burgers, even in some salad dressings. Sometimes a generous dollop of this pickle is mixed with boiled potatoes to make an instant Aloo paratha.

Don't miss getting some green garlic shoots and Dill greens (Suwaa bhaji or soya ka saag) together and take out half an hour from your busy routine to make this. You would love yourself for making it. Believe me.