Showing posts with label jain recipes. Show all posts

Sunday, August 7, 2016

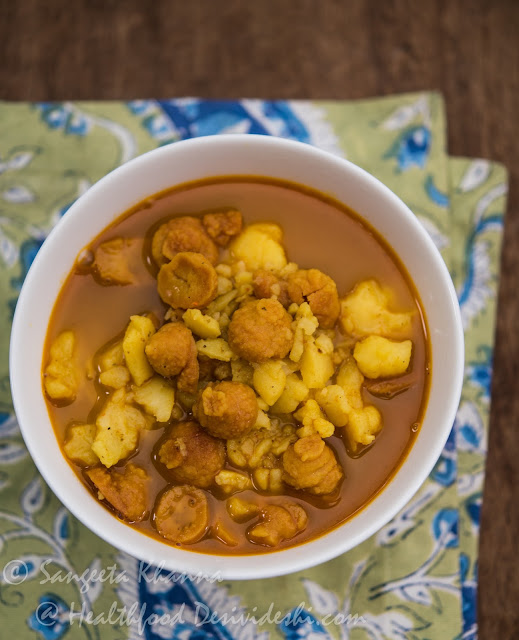
everyday curries : alu mungodi ki subzi | sattvic khana


Alu mungodi ki subzi is stuff made of nostalgia. Such simpler curries have become so rare these days thanks to the deluge of 'butter masalas' and 'navratan kormas' of the vegetarian world, and of course because no one makes Badiyan or Mungodi at home any more.

No restaurants serve it either. 

alu mungodi ki subzi

Thankfully we do get mungodi and badiyan in the markets, made by small scale industries and home based units and some of them are really good.

Badiyan making is an age old tradition all over the country. Badiyan or dried lentil cakes, if I try to translate this unique wonder, are made of lentil paste with is fermented, then mixed with some grated gourd type vegetable according to the regional choice, some spices and then the paste is shaped like small pellets to sun dry. The pellets puff up to become planoconvex shaped while they dry and then are stored for the whole year. 

Badiyan are generally made of urad dal paste and are made into several curries like this pyaz badiyon ki subzi and even a badiyon ki chutney. I have always believed the badiyan brought the umami factor in Indian curries, the process of making badiyan ensured the lentil paste gets a flavour boost when fermented and sun dried.

Apart from the Badiyan, there is a type called Mungodi which is made of plain mung dal paste and is not spiced. The mungodi has a flavour of its own, something like when mung gets a mild hint of umami and yet retains its mungness. You know what I mean. 

mungodi

Mungodi can be sun dried or even can be made fresh for some curries. This mungodi wali lauki is made with freshly made mungodis. But freshly made mungodi lacks the umami kick, please note.

The alu mungodi ki subzi is preferred by those who like eating no onion garlic curries or is made often for meals after a puja at home.

One of the kachori walas in Banaras makes such a delicious mungodi ki subzi that I often crave for it. I know I have to recreate it soon.

I shared that the hawan at Kiradu temple complex commenced with a sattvic meal and how much I loved that meal. Alu mungodi ki subzi was on the menu apart from the mirchi ka kutta and I couldn't help but make it again at home. My mother in law used to make alu mungodi and lauki mungodi a lot and I actually started loving it a lot after having tasted her version.

After having a slightly different but equally delicious version of alu mungodi by Suryagarh chefs, I decided to make my MIL's version as that is what makes it more homely for me. 


ingredients 
(2-3 servings)

2 large boiled and cooled potatoes (about 250 gm)
1/2 cup dried mungodis
1 tbsp everyday curry powder 
(or a mix of coriander, cumin, peppercorns and Indian bay leaf powder)
1/4 tsp red chilli powder
2 green chillies broken
1 tsp turmeric powder
pinch of hing (asafoetida)
1/4 tsp cumin seeds (optional, I don't use)
1 tsp crushed or minced ginger (optional, I use it always) 
1/4 tsp amchoor powder 
1.5 tbsp mustard oil
salt to taste 

preparation

Crush the boiled potatoes with fingers. It should break into uneven pieces, and some completely crushed coarse mash.

Heat the mustard oil in a deep pan and shallow fry the mungodis in it till lightly browned. Remove from the fried mungodis from oil and keep aside.

Tip in the hing and cumin seeds if using, in the remaining oil. Once the oil is well infused add the crushed ginger. Stir to cook for a couple of seconds.

Now take the pan off heat for a moment and add all the powdered spices at once, stir to mix well so the spices infuse but do not get burnt. Within seconds dump all the crushed potatoes in the pan and stir well to mix. Return to heat and stir for a couple of minutes.  

Add salt to taste, 2 cups of water and all the fried mungodis. Let the curry come to a rolling boil. Now lower the heat and let the alu mungodi subzi simmer for about 20 minutes, covered with a lid, or till the mungodis get soft and almost double up in size.

Finish with amchoor powder, adjust seasoning and consistency, serve hot with rotis, pooris or plain parathas along with other side dishes if required.

alu mungodi ki subzi

Some people add tomatoes to the alu mungodi ki subzi but I like this version with amchoor. You may want to garnish it with green coriander leaves but please refrain as it interferes with the delicately flavoured mungodis. But if you love your dhaniya patta go ahead and top it with some greens.

This kind of badi or mungodi subzis were a staple during rainy season when other green vegetables were not easily available in older times. That is the reason there is no tomato or dhaniya patta used traditionally for alu mungodi ki subzi but there are versions made in winter season when mungodi is paired with spinach and cabbage too.

One can always adjust this alu mungodi ki subzi to taste. The Suryagarh version is cooked with raw potatoes and it had a different consistency and slightly different taste too.

Thursday, October 7, 2010

everyday subzi: guar dhokli ki subzi | cluster beans curry with besan dumplings


There are a few unusual beans which my dad has actually conditioned all of us siblings to like. Guar  or cluster beans and bakla or fava beans are the ones which nobody seems to like but I do buy them whenever I get to see them in the market.

Guar is also known as guwar and this guar dhokli ki subzi is one of my favourite now.

guar dhokli ki subzi

Although  cook with these beans frequently, I have not posted any recipes apart from this one with bakla. We get good quality guar fali easily here in Delhi and I make many variations cooked with curds, with sesame, with garlic and green chillies etc. Still I keep looking for new recipes as Arvind does not like this vegetable much (only the sesame version he used to like earlier).

I asked for a gujrati style recipe from a fellow blogger Parita and she had posted this recipe of guar dhokri last year (I was pestering her so much). It's actually an easy and delicious recipe, made without any garlic and onion. The use of dhoklis, the chick pea dumplings in this curry makes it a keeper recipe. I made a few changes in the recipe to suit our taste, added ginger and tomato puree and the result was very very good, all the guar curries I used to make earlier were dryish in consistency, this one being a gravy curry was great with rice and chapati both.

guar dhokli ki subzi

ingredients...
for the curry..
guar beans stringed and chopped in 2 cm pieces 250 gm
asafoetida or hing 2 pinches 
cumin seeds 1 tsp
finely chopped ginger 1 tbsp
finely chopped green chillies 1 tsp
red chilly powder 1/2 tsp
coriander powder 1 tsp
cumin powder 1 tsp
black pepper powder 1 tsp
turmeric powder 1/2 tsp
tomato puree 2 tbsp
salt to taste
green coriander chopped 1 tbsp for garnishing (i did not use this)
mustard oil 1.5 tbsp

for the dhokli...
besan or chick pea flour 1 cup
cumin , black pepper , and coriander powders 1 tsp each 
red chilly and turmeric powder 1/2 tsp each
soda bi carb 1/4 tsp
salt to taste
1 tbsp oil

guar dhokli ki subzi


procedure...
  
Prepare the dhoklis first (I made them while stir frying the guar but if you cannot handle both the things together it is advisable to make the dhoklis ahead.

Mix all the ingredients for dhokli and add a little water to make a stiff dough, roll the dough with oiled hands into a sausage like roll and cut thin roundels with a knife.

guar dhokli ki subzi

These slices of dough can be shaped into round discs and kept aside, or this step can be done while working on the kadai.

Heat mustard oil in a kadai and throw in the crushed asafoetida (I use the crystallized resin form) or the powder. Add the cumin seeds and wait till they crackle, throw in the chopped green chillies and chopped ginger and wait for a couple of seconds..

Now put in all the chopped guar beans and stir fry on medium flame till they look a bit translucent..

Add all the powder spices and salt to taste and stir fry till the spices turn aromatic....takes about 4-5 minutes on low flame . If using more oil for cooking , this step can be done at high flame and takes about 2 minutes.

Add the tomato puree and keep stirring for a minute or two.

Add enough water (I added about 500 ml) and the prepared dhoklis. Let it boil vigorously, the dumplings fluff up immediately as they have soda bi carb in it. I added 2 crushed dhoklis as suggested by Parita to thicken the gravy.

Boil to reduce the gravy and garnish with chopped green coriander if using...

guar dhokli ki subzi

This guar dhokli ki subzi was great with rice as well as chapatis. The steps of the recipe look a little cumbersome but it's really easy as there is no onion garlic to peel and chop and there is no paste to be made.

Dhoklis (or gatte) can take some time but if you do it simultaneously it's really a quick recipe. The dhokli was a new addition for me, I make gatte ki subzi and thought it must be like gatte having the same ingredients, but it tastes different when it is cooked differently.

Dhoklis complemented very well with the guar and this gravy. Do try this recipe if you don't like guar and want to include it in your daily meals.

Cheers...

Tuesday, September 7, 2010

khoya matar makhana or khoya matar paneer paneer : Banaras special curry


Khoya matar makhana is a special curry and we were introduced to this exotic sounding curry when we shifted to Banaras after my dad's transfer from Chandigarh. Somehow my mother never made this khoya matar makhana but she would often make a version of matar paneer that was close to the original khoya matar. In fact many Banaras families make their matar paneer with khoya in it because it gives them the pleasure of both.

Khoya matar makhana is a wonderfully rich and yet subtle flavoured curry. Very creamy in a different way and sweetish spicy, so much different from the usual Punjabi curries we had grown accustomed to. I am not very sure if this curry belongs to Banaras but that was the place we had it for the first time and till date I have never tasted it anywhere else.

That Banaras loves it's khoya and milk products so much I am pretty sure in my heart that khoya matar makhana evolved in Banaras, taking makhana from the neighboring state Bihar.

khoya matar paneer recipe

Yes the reason why I believe this curry belongs to Banaras is that the people of this city are obsessed with khoya, there is a whole market dedicated to khoya named khoya gali near chowk area, and that's not all, there is one kachori gali too and you know how famous is banarasi kachori ....

Like many other banaras special curries, khoya matar does not use any onion garlic and can be a fasting curry too during navratras. I will post a navratra version of this curry sometime.....

Coming back to the recipe, this curry is a creamy rich looking special kinda curry but surprisingly it is not high on fat like those those shahi sounding creamy buttery curries.

Yes, milk powder has very low fat content if you use skimmed milk powder and this khoya is made from that. Also as I have used paneer for this recipe that too has fat in it but overall this curry is lower on fat than the other creamy buttery paneer curries. Nevertheless, this curry is medium rich when fat level is considered although I find it topping the scale of deliciousness.

ingredients....

khoya 1 teacup loosely packed ( I used home made khoya )
green peas (I used frozen this time) 1 cup ( 2.5 cups when not using paneer )
paneer chopped into small cubes 1 cup ( optional as the original recipe is khoya matar makhana)
Use a cup and half of shallow fried makhana if not using paneer
raw tomato puree 1 cup freshly made with raw tomatoes (this is not part of the original recipe, do not use if making khoya matar makhana)
bay leaf 1 no.
salt to taste
khoya matar paneer recipe ghee 1 tbsp
milk 1 cup (optional, I used water instead )
  
to be made into a paste...
ginger 1 inch piece
green cardamoms 2 nos.
black cardamom 1 no.
cinnamon 1 inch piece
cloves 4 nos.
cumin seeds 1 tsp
black pepper corns 1 tsp
red chilly powder 1-2 tsp

preparation....

Make a paste of the ingredients listed for paste with little water..

Pour ghee in a kadai and add the fresh tomato puree if using, bay leaf, the masala paste and salt to taste.

Now heat the mixture over medium flame and stir to bhuno it a bit....ghee will be separated within a couple of minutes.

Now add the khoya in it. In the meantime I microwaved the peas for 2 minutes, they can be boiled on gas stove too.

khoya matar paneer recipe

Bhuno is the process of dry roasting such a mixture especially a masala paste, so bhuno again till the khoya masala mix bubbles a bit...

khoya matar paneer recipe

Add a cup of water or milk ( adding milk will result in a whiter curry but a bit more rich ) or water , the cooked peas and cubes paneer ...

khoya matar paneer recipe

and let it boil covered till the ghee floats on top...the whole cooking process takes less than 10 minutes...

khoya matar paneer recipe

Serve hot with naan or chapati. The curry is creamy in a different way and the granular texture of khoya makes a surprising gravy. A little sweet and a little spicy and it tastes very good with any plain roti, naan, rumali roti or kulcha.....

khoya matar paneer recipe


Enjoy this quick yet rich curry and think of the ghats of Banaras. Khoya matar makhana or khoya matar paneer both will become your favourite ways to indulge in Indian khana.


Monday, August 30, 2010

Chhole recipe | a simple recipe for that authentic punjabi taste...


Authentic punjabi chhole recipe?

What would you call authentic chhole when there are more than a dozen Chhole kulche walas selling delicious chhole, each one is different from the other and each one is such that you can call as authentic as it can be. So for me chhole is authentic as long as it tastes 'punjabi', no wonder when I say this as I have tasted a few bihari and bengali versions of chhole and those have been far from tasting like chhole. Authentic punjabi chhole is something where the taste of chickpeas should not be overpowered by spices and the gravy should be thick and coating consistency and blackish in color, the chickpeas melting in the mouth and the spiciness just enough to complement the buttery textured chhole......

authentic punjabi chhole

While the Bihari version is loaded with onion and garlic and garam masala (good to taste but not like chhole), the Bengali version which they do not call chhole but ghugni is different too, I loved the ghugni with keema in it called 'mangsho'r ghugni'. I am sure there is a version including curry patta and tamarind and that too must be tasty but it should be named something else, not chhole. As there is Sundal, there is a tamarind-curry patta chickpeas too.

Coming to the 'chhole' chhole, here is my version which has fetched me many complements, people have been comparing it to the popular chhole walas of the city. Also, this chhole has been complemented for not causing flatulence though I do not add any saunf or ajwain to the recipe.

Cooking the chhole till it gets buttery is the key, the chickpeas should get cracked and should look like falling apart. Also, look for the smallest sized white chickpeas available, smaller the chickpeas tastier it is. Read on......

ingredients...

chickpeas/garbanzo beans/ kabuli chana 250 gm ( I use the smaller variety )
soak the chickpeas overnight
split chick peas/ chana daal 2 tbsp
ginger root 2 inch piece
whole dry red chillies 4-5 or to taste
coriander seeds 1 tbsp
cumin seeds 2 tsp
black pepper corns 2 tsp
bay leaves 2-3 nos.
cloves 4 nos.
black cardamom 2 nos.
amchoor powder 2 tsp or more if needed
salt to taste
mustard oil 1 tbsp

procedure...

Mix the soaked chickpeas with chana daal, add salt to taste and cook in a pressure cooker with enough water to be an inch from the surface, 20-25 minutes under pressure should be enough for cooking.

Sometimes when the cooking water is hard the chickpea takes more time to cook so use filtered water to cook. Adding a pinch of soda bi carb helps to cook the chickpeas thoroughly, as they should get cracked n about to fall apart.....this is an important point while making chhole n should not be ignored.


soft boiled chhole

Scissor cut the dry red chillies and bay leaves into very small bits and chop the ginger too. Now grind all the whole spices in the spice grinder jar of your mixie, adding little water to make a fine paste.

Heat oil in a iron kadai and pour the spice paste into the hot oil, fry till oil is released form the mixture.

authentic punjabi chhole recipe

Now pour the cooked chhole into the kadai and add water if needed, add the amchoor powder, adjust salt if needed and let it cook for about 30 - 40 minutes on low heat. This step is important too as it will lend a nice deep brown color to the chhole and the taste of the spices will blend well with the mushed up cooked chana daal, making a gravy of coating consistency. the chana daal gives a creaminess to the gravy and keeps it milder even if the masala looks very rich in color n texture.

authentic punjabi chhole recipe

Serve hot with sliced onions, bhatoora or kulcha is the bread to go with it but it can be enjoyed as it is topped with finely chopped onions and an assortment of chutneys, like a chaat.

authentic punjabi chhole recipe

We enjoyed it with fried bhatoore, made with yeasted dough, using half maida (all purpose flour) and half whole wheat flour, the bhatooras turn really fluffy and soft that way and do not soak oil like the traditionally made bhatooras. The bhatooras are not authentic for that matter.

It is a hearty Sunday brunch and we are set for the day, there is no lunch on Sundays most of the times in my home. I make a large bowl of fruit salad for lunch if the breakfast had been lighter, but if it is chhole bhatoore, even the fruit salad is out of question.

A free Sunday for a leisurely reading session or a nice outing without feeling hungry and grabbing a burger, makes sense for us.

Even chhole chawal with some vegetable added on the side is my favourite meal.

authentic punjabi chhole


Some people add a tea bag to the boiling chhole, that can be done if you don't have an iron skillet or kadai. Adding amla powder or even pomegranate skin can make it dark but they all hamper the taste. I have had good results with unsweetened cocoa powder though, using 1 tsp for this quantity. Try it if you like and tell me if you find it useful.

This recipe does not use onion, garlic, turmeric and tomatoes. The absence of tomatoes adds to the dark color too. Tomatoes are a common addition to chhole as many people in this part of the world cannot do without tomatoes, I feel tomatoes interfere with the taste of chhole and amchoor or dark anardana powder from the hills is a better souring agent for Chhole.

What do you feel ???


Saturday, August 28, 2010

vegetable biryani with fenugreek leaves

I had to prepare a Sunday lunch without the use of onion and garlic couple of weeks ago. It was a rainy Sunday and somebody was coming for a pakoda party on a very short notice. I made lots of corn pakodas with a hot and tangy chutney accompanied by tea for a late breakfast. It was great as the soft drizzle outside the window made it very very pleasant.

After this heavy breakfast the lunch had to be lighter as well as less time consuming. I had quickly planned for a vegetable biryani and had already chopped the vegetables. When you are not using onions and garlic the chopping becomes easier. Some beans and carrots were chopped finely and potatoes in cubes. I have a jar full of dried fenugreek leaves from the last season and that is super flavorful, you can use kasuri methi but the flavors will be slightly different.

Fresh methi will be better so use a cup of tightly packed fresh methi leaves for each tablespoon of dried leaves. That's it.


The pictures I took when i had actually started eating, it was so delicious that I wanted to share it here. Ihis was the first time I made the fenugreek pulav or birayani kind of rice without onion and garlic and it turned out great.

I make a low calorie high fiber version of this rice which is great too but this one is rich and qualifies to be called a biryani by every means. Yhe rice grains are white and lightly coated with the masala seasoning, fragrant with the whole spices and the dried fenugreek leaves and every piece of the vegetables retain their individual texture and taste ......

Yes I made it using the layering technique, only the layering was done hastily and roughly.

Ingredients...
(to serve 5-6 adults)
basmati rice 2 cups (I used basmati tukda)
finely chopped carrots 1 cup
finely chopped french beans 1 cup
potatoes peeled and cut in 3/4 inch cubes .. 2 cups
thin strips of ginger 2 tbsp
whole dry red chilies 4-5 nos. ( as per taste )
dried fenugreek leaves 2 tbsp
black cardamom 2 pods
green cardamom 3 pods
inch long cinnamon sticks 4 nos.
star anise 1 no. ( i used 4-5 pieces of broken stars )
cumin seeds 1 tsp
shahjeera 1 tsp
black peppercorns 2 tsp
cloves 8 nos.
bay leaves 2-3 nos.
a pinch of freshly grated nutmeg
aromatic garam masala 1 tsp ( optional )
ghee 1/2 cup
salt to taste 

procedure...
Wash the rice and soak in 4 cups of water. Keep aside.

Prepare for the other ingredients and just as you start cooking the other ingredients, cook the rice either in microwave or on the other burner of your gas stove, add a bay leaf and a stick of cinnamon to the cooking rice. Watch when you are cooking the veggies on the other side and you need the rice cooked al dante'...

Heat ghee in a wide pan (with a tight lid as the pan needs to cook on dum). Add the cumin seeds, ginger and potato cubes first in the hot ghee, stir for a couple of minutes till you get a ginger aroma, now add all the whole spices reserving a stick of cinnamon and one bay leaf. Add 2 pinches of salt for the potatoes and toss and fry till the potatoes become 3/4 cooked.

Frying potatoes this way results in firm yet porous potatoes in a biryani (or a tahiri), this way the potatoes retain their shape and yet absorb all the subtle masala taste. The only way I like potatoes in rice preparations.

Meanwhile, start cooking the rice on the other side of the stove or in microwave as suggested earlier. The rice will cooked along with aromatic cinnamon and bay leaf. Take care to cook it 3/4 done and the rice will not be completely dry and fluffy yet.

To the cooking potatoes add all the chopped veggies (I sometimes add soya nuggets too) and fry adding salt to taste within 3-4 minutes the veggies will be almost cooked and it is time to add the dried methi leaves. Keep  stirring till the aroma of fenugreek fills the kitchen, sprinkle the garam masala and nutmeg powders and mix.

The rice should be cooked to desired level till this point, if rice still needs some time to be cooked you can put the flame off for the veggies, cover the pan and wait till the rice is ready.

Pour half of the rice in to the veggies pan, turn lightly to mix them roughly and pour the remaining rice, fluff up one last time and cover with a tight lid. Cook on very low flame for a good 10 minutes, placing a hot griddle below the biryani pan may be a good idea if it is not thick based.

It can be served immediately after removing from heat, but needs to be fluffed up before serving. It is very very aromatic as soon as you open the lid and the perfect accompaniment is a cool raita.

It was a pineapple, onion and boondi raita seasoned with salt pepper n dried mint powder this time....


This picture is taken with the leftover we enjoyed the next day and it was as good as the freshly made biryani. Potatoes in a tahiri or biryani is the husband's choice and fenugreek is mine. It is great if it is medium hot and the aroma of the spices is preserved by dum cooking.

If using fresh fenugreek leaves you will notice the color of the prepared rice is bright green and it looks more like a tahiri or pulav. The taste will be fresh but the aroma and texture of finished rice will be entirely different from this preparation. I have posted a soya methi tahiri using a paste of dill leaves and fenugreek leaves and that's a completely different recipe, a healthier version though.

Vegetarians have their own pulaos, tahiris and biryanis and since one pot rice meals always make comforting food it doesn't matter whether some biryani enthusiast approves it as a biryani or scorns it as a tahiri. They would know if they taste it.

Go make some no onion garlic vegetable biryani right now. 


Thursday, November 26, 2009

matar ka nimona version 3 | tender green peas nimona recipe


I have shared a rustic and more robust version of matar ka nimona earlier and in that post I had promised to post this delicate version of the dish. This version is made with the absolutely tender peas and the frozen ones are not suitable for this, the natural sweetness of peas takes the center stage here and the green pigment from peas is extracted in the ghee which floats on top.

The bright green colour that floats into this version of matar ka nimona makes it really aromatic and tasty with all the tenderness of early season peas. Incidentally peas are obscenely costly right now, that is, Rs.100 a kilo, but those who love this nimona  wouldn't bother about the expense.

matar ka nimona recipe

Matar ka nimona is a fairly unheard of recipe. Purely a banarasi recipe made in some parts of eastern UP too, I make this version of matar k nimona in three versions depending on how tender the peas are as when they are the tender most, they need to be kept simple in seasoning and that is when they are the best  ...


matar ka nimona recipe

Other two recipes are here, you can try any version according to the spice level you want and the type of peas you get, or the meal you want to make it for. It can be a main course or a side dish, and the version I am sharing now can be had for fasting days too as it is devoid of onion garlic and is made in ghee. Many Banaras people do fast on Mondays for Shiv ji and eat kadhi chawal, or nimona chawal for dinner after a day long fruits only diet. I made it quite hot with green chillies and ginger but it can be adjusted to personal taste.

ingredients ...

tender peas 1.5 cup
ginger 1.5 inch piece chopped
green chilies 3-4 or more chopped
coriander seeds 1tsp, cumin 3/4 tsp and black pepper 3/4 tsp powdered with 1 bay leaf
( all this can be wet ground in the mixie ..i used my everyday curry masala made with same proportions of the spices)
green coriander leaves chopped with stems 3/4 cup (stems are to be kept separately)
salt to taste
ghee 1 tbsp (no substitutes)
cumin seeds 1/2 tsp

procedure... 

Make a coarse paste of ginger n green chillies in a mixie jar and in the same jar put all the peas and grind till a coarse paste is made, some peas can remain whole too...


Heat ghee in a kadai and throw in the cumin seeds and let the splutter, put off the heat and throw in the spice powders and mix well....


After this add the peas paste and mix, start coking on medium heat, stirring frequently.....

matar ka nimona recipe matar ka nimona recipe

 fry for a while, for 2 minutes on medium heat it should become glossy after frying well.....

matar ka nimona recipe

Pour 1.5 cup of water in it and the chopped stems of coriander leaves and let the slurry like mixture boil for 2 minutes. It has been half cooked already and just needs to get the flavors of spices and coriander stems infused nicely.

matar ka nimona recipe matar ka nimona recipe

I used less ghee than is used traditionally so the ghee does not come on top after boiling. But as soon as the cooking is done (coriander leaves will be added in the last minute) and you cover the kadai and rest it for  while, you can see the ghee floating on top with a lovely green color.

This green rogan (rogan = floating oil over any curry) is the indication of most fragrant and flavorful curry made with simple ingredients....

matar ka nimona recipe matar ka nimona recipe

We enjoyed it with thin, soft and hot chapatis for dinner and it was a treat for the senses. Literally...

This version of matar ka nimona takes just about 10 minutes to cook if you are cooking for 2, you can plan the cooking accordingly. If you plan to cook for about 6-8 people you can expect about 20 minutes for this recipe as the time taken to heat up the larger quantity takes a little more time.

Make this simpler yet more aromatic version of matar ka nimona and let me know if it becomes a family favourite.

Waiting to hear from you.


Friday, July 17, 2009

paneer safeda | white paneer curry in a cashewnut gravy


Paneer is the only special treat for vegetarians or one of the few protein rich foods for them. At least it is perceived like this here in India. And a whole lot of paneer recipes are made in Indian homes, mostly because it blends well with all types of flavors, just like eggs and potatoes.  But strangely enough I have not posted many recipes of paneer here although I keep cooking with paneer quite often due to the ease of cooking a quick curry it provides. But when I made this safeda paneer or paneer safeda, which is actually paneer in a white gravy, I could not stop myself from posting it here almost immediately, well that is within 5 days after making it. Can't get quicker than this :-)

Paneer safeda is made in many versions using different types of nuts for their subtle flavors and the taste differs in each of those versions. This recipe is a simple and quick one, like all my recipes which is good for everyday cooking and the flavors are so exotic that it is fit for a formal dinner as a main course dish. Actually last time when I made this dish for a large family get together of 20 people I choose this dish because a few extended family members did not eat garlic and onion. And I had to cook a no fuss recipe because there were many more dishes to be taken care of for a 7 course meal for 20. No need to tell that this dish became the talking point at the table. Simple delicate flavours and rich tasting curry. Many of them asked for the recipe and when I told how simple it is, they were surprised.

This paneer safeda is a Jain recipe (without onion and garlic) but a few other versions make use of onions and a bit of garlic too. Some call it Doodhiya paneer or Chandni paneer with minimal variations like using chopped almonds and saffron as a garnish or finely chopped green chillies and minced ginger as a garnish.

We prefer paneer safeda in it's pure white form. Just like this one.


As I mentioned, paneer safeda is a special recipe meant for formal dinners, more because it is a bit rich tasting due to the use of nut paste. Also because it presents delicately flavored aroma of spices that is appreciated well in most Banaras homes. And paneer safeda goes well with butter naan or roomali roti, more reason to be erved for such north Indian meals.

This time I served it with thin whole wheat chapatis which complemented the dish very well. Note that this recipe is certainly rich because it uses cashew nuts, but it is not a fatty paneer curry which gives you those guilt pangs after a cozy dinner. The amount of cashews per serving is very low, that is about cashews and the amount of fat (I used fresh cream as a cooking medium) is also low, that is 1/2 tbsp of fresh cream per serving. Yeah I calculated the amounts carefully this time and now you know how a rich gravy can be healthy too. Read on...

ingredients..
( serves 4)
paneer 250 gm
cashews 20 nos.
fresh cream (I used fresh malai from whole milk) 2 tbsp
salt to taste

masala made in to a paste
black pepper corns 20 nos. (white peppercorns are better but i didn't have)
green cardamom 3 nos.
black cardamom 1 no.
cinnamon stick 1 inch long
cloves 5 nos.
fresh ginger root 1 inch piece
bay leaf 2 nos. ( scissor cut into fine shreds)

all these ingredients are to be made into a paste with some water in a spice grinder .

procedure..

Cube the paneer into rectangular pieces and keep aside.

Make a fine paste of cashews with some water and keep aside. Cashews can be soaked for a few hours for making fine paste but do it instantly most of the times. You just have to run the grinder for a few more minutes if you are grinding dry cashews along with the spices.

Now pour the fresh cream into the pan (I used a steel kadhai) and filter the masala paste right into the kadhai. Place a sieve on top of the kadhai and pour the masala paste into it and let all the masala extract pour into the kadhai. Reserve the masala  solids to flavor some daal etc., I usually make some sabut masoor daal too with this curry and the same masala gets used in the daal. Sometimes I add the masala solids to kali daal or chane ki daal.

Coming back to the white gravy, now keep the kadhai on flame and let the mixture come to a soft boil.


Now pour in the cashew paste and let it simmer again. It just takes 5-6 minutes....


I took all these pictures because this is an unconventional way of making a gravy and I wanted the procedure to be more clear....

Now add salt and the paneer pieces and let it simmer again, just for 2 minutes more. Cover the kadhai, put off the flame and let it rest for 5 minutes so that the flavors get seeped in..


Serve hot with any kind of flat bread....we did not have any side dish this time as it was meant to be a light but special dinner It truly was so. You would agree when you try this paneer safeda at home.


Enjoy the curry that is often called Chandni subzi or Chandni paneer, doodhiya paneer. Most common name known in Banaras is paneer safeda.

If you don't filter the masala paste for this curry its not a problem. Only that the curry will not be as white and smooth as the picture above. I cooked paneer safeda again sometime back for a dinner and there was quite a lot of leftover curry. This time I did not filter the masala paste and the curry was a bit grainy and a little darker as seen in the picture below. But that taste was unmistakably the same.


Incidentally I cooked sabut masoor ki daal too even though there was no masala solids after filtration. Some foods become such an inseparable pairing in families that they keep repeating together always.
I hope you would like paneer safeda the way we do. Try it and let me know.

Cheers.