Saturday, October 29, 2016

recipe of sooran ke laddu | a sweetmeat made of elephant foot yam, Diwali special mithai


Sooran ka laddu is an unusual recipe of mithai. Even I heard of sooran ka laddu quite late but being in Banaras I wouldn't have stayed ignorant for long. One or two tiny sooran ke laddu used to be served as part of the elaborate prasad in one of the temples in Banaras that my mother used to go and later I got to know that Sri Ram Bhandar would make sooran ke laddu every Diwali for their elite patrons.


Note that Sri Ram Bhandar is the oldest known sweet shop in Banaras and it has been patronised by aristocrats for more than a century. Read more about it here.

Sooran or zamikand is an underground corm that is used as a vegetable almost all over India. It is considered very good for gut health and several recipes like sooran ka chokha, sooran ki subzi, sooran ki chutney, sooran ke kabab and sooran ka achar are relished in eastern UP, Bihar, Jharkhand and even Bengal. Sooran ke kofte and sooran ka bhuna bharta is also made by several families.

I had not seen this vegetable elsewhere till I tasted a dish called sooranache kaap in Maharshtra several years ago and then I understood how popular this vegetable is in other parts of the country too. More recently I tasted a recipe called senai kizangu poriyal in Tamilnadu too. Everyone seems to be liking sooran going by the way it is served with a little extra pomp.

A native variety with several small bulbils on it's surface is quite tasty when cooked right. But the native sooran variety is very itchy while chopping it and even after cooking if it has not been cooked with proper method. It needs a lot of sour elements in the curry to neutralise the itchiness caused by oxalate crystals.

The smooth skin variety of sooran is called as Bambaiyya sooran in UP and is mildly itchy sometimes and that one is used to make this sooran ka laddu.

I have used milk powder to make khoya for this recipe as getting pure khoya is not possible anymore. You can reduce milk to make khoya if you wish.

ingredients 
(makes about 2 dozen laddus)

200 gm sooran peeled cleaned and grated into shreds
200 gm milk powder
1/4 cup milk 
100 gm desiccated coconut
60 gm sugar or powder jaggery or more as per taste (I used organic powdered jaggery)
a generous pinch of green cardamom powder (optional, I did not use)
80-100 ml ghee

procedure 

Heat the ghee in a kadhai and add the grated sooran in it. Fry it in low flame till the grated suran turns brown and crisp. Strain the sooran with the help of a perforated spatula and crush it. you can blend it in the mixer if needed.

In the same kadhai, in the remaining ghee, add the milk and milk powder together keeping the flame low, and cook till the mixture becomes khoya. Brown it lightly.

Now add the crushed sooran and sugar or jaggery and bhuno a little more to combine. Add the desiccated coconut slowly to bring the mixture to a consistency that can be easily made into laddu.

Cool a little and make laddus. Roll them in desiccated coconut and arrange in the container you are planning to store the laddus.


These sooran ke laddu keep well at room temperature for 2 weeks.

You don't really get to taste much of sooran in these laddus but it was a way of mithai loving Banarasis to eat sooran as a ritual on the day of Diwali.

I hope you try this recipe this Diwali.

I like the traditions not just because they make our festivals bright and happy, some of these involving food produce also have helped conserve a particular plant species too. Think about it, the way we are getting produce from all over the world, everything available round the year and the way food is dictated by fashions and trends, the rituals could revive the native flora in a fantastic way.

Buy some sooran this Diwali and make sooran ka laddu. 


Monday, October 24, 2016

spiced amla jam or my grandmother's Chyawanprash recipe


Remembering my grandmother again as I talk about the 'Chyawanprash' she used to make every winter. While we used to hate the commercial Chyawanprash manufactured and marketed by a reputed Ayurvedic pharmacy, we would lap up the jam like light coloured Chyawanprash made by dadi.

spiced amla jam or chyawanprash

One heaped spoonful of this Chyawanprash with milk or even without milk used to be a winter guard against all worldly trouble. Well, being sick was the only worldly trouble we knew at that time.

I started making this Chyawanprash when I discovered that Arvind was very prone to catching cold and flu during winters and a jar or two was always shared with friends who needed it for their kids' winter ailments. I always got good reviews of this Chyawanprash even from kids but somehow we both lost interest in this and stared enjoying the savoury Amla chutney, another recipe of my grandmother with almost similar health benefits.

This amla pickle also gets consumed every winter.

I feel blessed to have inherited this legacy of my grandmother.

Now when I make this Chyawanprash I call it spiced Amla jam as I don't add ghee to it. The original recipe used ghee and a lot more spices and herbs. So it is better calling it a spiced Amla jam, it makes a great spread on toast or crisp paratha. We just eat a spoonful of this jam with our breakfast these days.

Recently I made 50 jars of this spiced amla jam for Eat with India, an initiative that encourages people to cook and eat regional Indian food. They included this jam and my kanji in their Diwali gift hamper. This was the first time I made such a large quantity of jam and kanji, 50 jars each, consuming about 15 kilos of amla and 8 kilos of beetroots.

ingredients 
(makes about 1.6 kilos of jam)

1 kilo amla
200 gm fresh ginger  cleaned and sliced
700 gm jaggery (use pure dark jaggery without impurities)
2 black cardamoms (badi elaichi)
8 green cardamoms (chhoti elaichi)
2 inch piece of cinnamon (dalchini)
8 pieces of long pepper (pippali)
1/2 tsp all spice berries (kababchini)
1 tbsp black peppercorns
1/2 tsp of nagkesar 
20 cloves 
1 tsp banslochan (I could not get it here)
1 gm saffron (optional, I did not use)
a generous pinch of nutmeg powder 

500 ml water
sterilized jars to fill the jam

spices for chyawanprash

procedure

Cook amla in pressure cooker with 500 ml water till it becomes very soft and disintegrates. If cooking in an open pan you may need more water and more time. In pressure cooker it takes 20 minutes after the first whistle.

Mash the amla while still hot and remove all seeds. Make a paste in mixie if you want a really smooth jam. I just mashed it nicely. Note that it doesn't mash well when cold.

Make a paste of the ginger and mix with the amla mash.

Make a fine powder of all the spices together.

Mix everything in a thick base stock pot or use the pressure cooker pan (without the lid) to cook the jam. Keep stirring and cook till the jam reduces to a thick consistency. It starts getting a light shine when cooked well. 

Fill in the jars while hot and screw the lid tightly.

spiced amla jam or chyawanprash

You can sterilise the closed jars by immersing them in boiling water for at least 10 minutes. This ensures the shelf life to be a year. Otherwise just refrigerate the jam.

This spiced amla jam or Chyawanprash helps improve immunity and many minor health issues like respiratory tract infections and joint pains. But the taste is so good that you can make it just for the taste too.

Do not worry about the sugar content as this chyawanprash is so rich in anti oxidants and minerals that it is worth having the sugar with it. Also, since it is consumed in small amount (about 10-15 gm in one serving) the sugar consumption is not much.

You can use good quality molasses instead of jaggery but do not replace jaggery with sugar in this chyawanprash recipe. There is no need to use honey as some recipe suggest.

Please make it this winter and see how everyone starts loving this spiced amla jam, don't call it Chyawanprash if your family has been hating the commercial Chyawanprash already.

Spiced amla jam works better on the dining table. But make sure you don't take generous helpings of this spiced jam as it can be too 'drying' for the system. Having a spoonful of this with full fat milk everyday is the traditional way and I follow that.


Friday, October 21, 2016

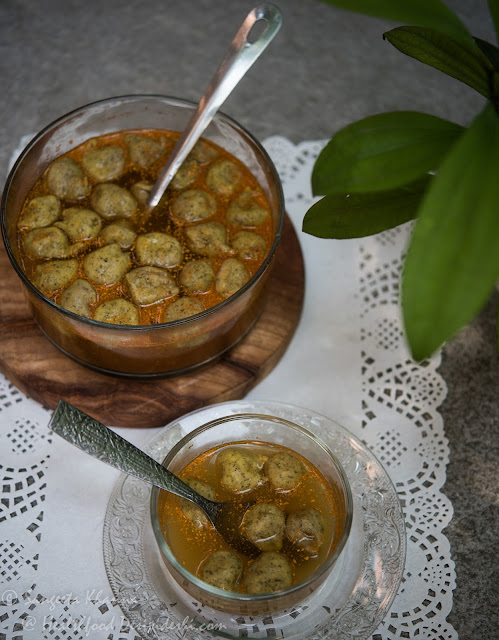
How to make kanji vada | fool proof kanji vada recipe


Kanji vada is a lentil dumpling soaked in fermented kanji. Ah and kanji is something you must know if you haven't come across yet. It is the most delicious probiotic drink generally made with black carrots during winters but can be made with summer carrots or even beetroots.

kanji vada recipe

For kanji vada the kanji was made even without carrots in older days and the kanji used to be pale but it packed extra punch because it had the kala namak and the hing in it, making it an absolutely lip curling drink and eat. In fact a few chaat walas used to make kanji wada on special request. The kanji vada was always kept in a ceramic barni because clear glass utensils were not so common in older days.

Kanji vada is typically a Marwari tradition and since Banaras was initially populated by Marwaris and Gujratis we have had a flourishing tradition of papad, badiyan, achar and kanji vada apart from many more Marwari treats. I have had kanji vada in a Marwari friend's home and Arvind's mother used to make it too but I have heard more stories about how much kanji vada was loved and that it was part of the elaborate wedding rituals in punjabi khatri homes.

Kanji vada or plain kanji was made during Holi too.

I wonder how such simple foods made such fond memories for so many people. A few ingredients were used in so many different ways that food was never boring, every season brought new flavours even though the recipes were basic.

There were a few fermented foods that were considered good for health and were intertwined with either religious or wedding rituals or festivals and that is how some of the recipes have survived. Kanji vada was always considered good for digestion and all the heavy eating during wedding was taken care of by this, at least that was what people said. Few people knew it was probiotic food too.

Similar belief was bestowed upon kanji vada during Holi festivities.

kanji vada recipe

ingredients 
(serves 8-10, takes 3-4 days to prepare)

for kanji 
2 tbsp mustard powder
1 tbsp red chilli powder
2 tsp rock salt (adjust later)
1/2 tsp kala namak (black salt)
pinch of hing (asafoetida)
3 liters filtered water

for the vadas
250 gm urad dal (soaked) I used urad dal with skin
oil for deep frying (mustard oil preferably)

procedure 

Mix all the ingredients for the kanji and keep it in a glass jar or ceramic barni, covered. This fermenting pot will be kept in a warm place so it starts getting sour after 2 days. Keep in sun if it is winter time.

The day it starts getting sour, prepare for the vada. Soak the dal overnight, drain the soaking water and make a smooth paste, adding a little salt and water if needed. A mixie grinder works best for this but you can use any gadget to make urad dal paste that looks fluffy and smooth.

Heat the oil and deep fry small fritters scooping the urad paste with a spoon and dropping it in hot oil. Fry till the vadas are cooked and dunk them straight into the souring (fermenting) kanji. Leave the kanji vadas for one more day so it gets nice and sour and soaks up liquid too. It keeps well for a couple of days at room temperature.

Serve as required, chilled or at room temperature but remember to adjust seasoning before serving.

The black carrot kanji or beetroot kanji also works great for soaking vadas.

kanji vada recipe

It makes a nice aperitif served before meals but can also be served as a snack.

Make some kanji vada now and see how you like it. I have seen people taking second and third helping but for some people it can be an acquired taste.

Fermented foods don't always make great first impressions but will stay with forever if you make friends with them. Kanji vada is one of those fermented foods to be friends with. Try that.