Showing posts with label pickles. Show all posts

Thursday, December 1, 2016

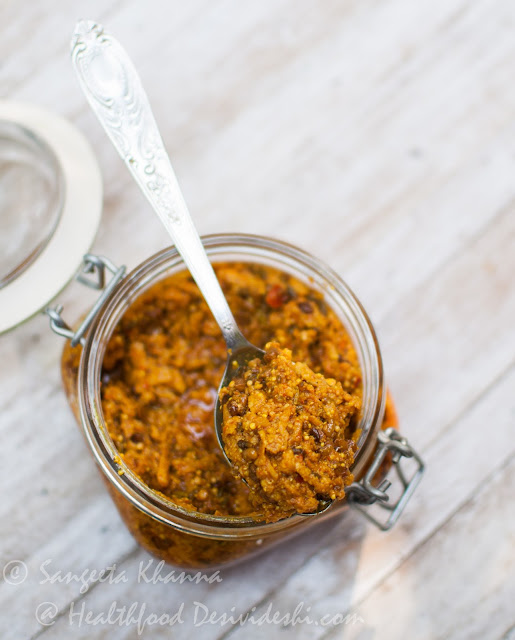
recipe of kachri ka achar | traditions of foraging and preserving the best of season


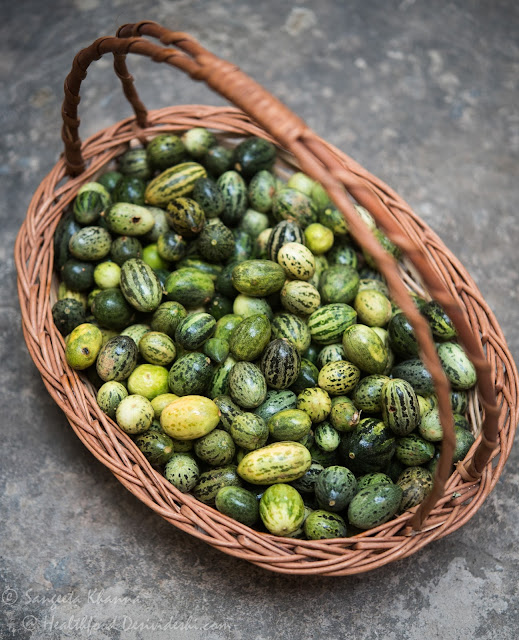
Kachri is a small cucumber that grows wild by the fields in the end of summer season. Some smaller kachris keep growing till early winter and that is how I found them when I went to Tijara farm couple of weeks ago. I love kachri ki chutney made with dhaniya patta and garlic etc and another kachri ki chutney with sesame seeds and keep making it frequently.

kachri

I had heard about the kachri ka achar from my house help and the farm workers at Tijara so I gave it a try this season. I was not very hopeful because I always preferred the chutney more.

But as soon as the pickle got 3 day old and I tasted it I had to change my opinion. This was the most unusual pickle I had ever tasted. The slightly tart and very mild bitter flavour of kachri responded really well to the north Indian pickling process, though I had tweaked the pickling spices to suit the kachri.

Note that kachri grows at ground level and sometimes it get buried after rain or slush caused by irrigation water. Some of the kachri may be covered with a thin layer of dirt so soak it in water and rinse well before chopping it. 

ingredients 

first mix 
400 gm kachri cleaned and quartered lengthwise 
45 gm salt or 1 tbsp and a little more
1.5 tbsp turmeric powder
1.5 tbsp red chili powder
2 tbsp mustard powder

second mix 
200 ml mustard oil
1/2 tsp asafoetida powder
2 tsp nigella (kalonji) seeds
1 tsp Bishop's or ajwain seeds 
2 tsp coarse fennel powder

recipe of kachri ka achar

 procedure

Toss the first mix together in a glass bowl and mix well. Keep it in sun for a day or two till it dehydrates a little.

Heat mustard oil to do the second mix once the first mix start looking a little dry and tip in the spices together. Take the pan off heat immediately and pour into the first mix. Stir and mix well.

Fill in sterilized jars.

recipe of kachri ka achar

The pickle gets ready to eat in 2 days though it can be eaten at any point during the mixing process. After 2-3 days the kachri becomes soft and the taste is very unique and pleasant.

Since I made this pickle for the first time I will wait to see how it behaves and how well it preserves. Now after about 2 weeks the pickle has not changed at all so I conclude that the texture will remain the same for a long time.

I will definitely update here about the shelf life as and when I see changes in the pickle jar I kept for myself. The other jar was sent to Tijara as a gratitude gesture.

Some of the kachri I brought is being dehydrated. Since winter sun is not enough for sun drying I am keeping it in refrigerator for cold drying that may take some time.

Kachri is a nutritious wild food and should be used frequently in everyday food. If the pickle doesn't suit your taste you can always depend on the chutney. Some people say the taste of millet rotis gets enhanced when eaten with kachri chutney and white butter. I have tried that combination and can vouch for that.

Let the kachri ka achar be for bajre ki khichdi or any khichdi we make during winters. 


Monday, August 15, 2016

chane wala aam ka achar | raw mangoes pickled with whole chickepeas


Kachhe aam ka achar or raw mango pickle is a necessity in Indian homes.

If the stock of aam ka achar has finished, people start feeling seriously deprived.

Last month when I was talking to my sister about her fetish for aam ka achar, she was the one who would even steal pickles and eat it like a candy while reading a book or playing, we were reminded of how the chane wala aam ka achar (raw mango pickle with chickpeas) used to get over sooner.

chane wala aam ka achar

Chane wala aam ka achar was a favourite of all of us and the pickle jar was never out of sight on the dining table. Everyone wanted to keep this chane wala achar closer to themselves so second and third helpings can be taken quickly without anyone else noticing it. How we used to blame each other about who finished the achar.

Those days of chatorapan.

My mother used to make this chane wala achar with both black gram (kale chane) and the garbanzo beans (kabuli chane) but her method was a little different. She used to soak the chickpeas in the water left after marinating the raw mango pieces in salt and turmeric. So the quantity of the chickpeas was always limited. That explains the scarcity of the chane wala achar.

Since my recipe of aam ka achar uses up all the liquids oozed out during marination time, I had to device new ways to add chana to the achar. 

Recipe and procedure of chane wala aam ka achar

During the making of the aam ka achar, the day I mix the the pickling spices (check the recipe and steps), I soak some chickpeas in advance.

The soaked chickpeas are mixed with salt and turmeric powder again and kept overnight. For each 100 gm soaked chickpeas I use 15 gm salt and 5 gm turmeric powder.

Then the overnight marinated chickpeas are added to equal amount of freshly mixed aam ka achar.

aam ka achar

Note the amount of mixed aam ka achar left in the pan here. The chickpeas were added to that.

The chane wala aam ka achar gets ready to eat in a couple days and stays good for at least 6 months. I haven't seen this pickle lasting more than this, if the present batch lasts the whole year I will update this post.

Some people make this achar with grated mangoes too, Anjana's recipe can be referred if you want that type. I sometimes chop the raw pickling mangoes in smaller bits but never have made it with grated mangoes. 

The chane can even be added to sooran ka achar as well and I remember my grandmother used to like that one more.

chane wala aam ka achar

The pickle can be served just as any other Indian pickle and the chickpeas taste really good while retaining their texture.

Do let me know if you try making this chane wala aam ka achar. 


Tuesday, August 2, 2016

mirchi ka kutta | मिर्ची का कुट्टा | pounded green chilli relish


Mirchi ka kutta is not a recipe I grew up eating but I had tasted it once in a while cooked by a friend's mother. Back then I was not so enamored by chilies, anything made with just chillies had to be in small servings and it was used just like a spot of heat on the platter. The kind of relish that was put to use only when the food was bland otherwise.

mirchi ka kutta | मिर्ची का कुट्टा | pounded green chilli relish

And then I tasted this mirchi ka kutta that blew my mind away. I loved that it was made from the less hot Rajasthani chillies and that it had loads of methi (fenugreek) seeds. I know the picture that comes to mind is a bitter and hot relish but this mirchi ka kutta is far from that.

As I mentioned in the last post about Kiradu temple complex, the sattvic meal we enjoyed there had this mirchi ka kutta as a side dish and I loved it so much that I took 3 helpings and the last time I asked for a bigger serving so I can enjoy it without worrying for refills. It was really that good.

I called Chef Megh Singh Rathore immediately and asked for the recipe. He rattled a simple recipe and I memorized while polishing the last bits of mirchi ka kutta with soft pooris.

Apart from loads of methi, this mirchi ka kutta has some sounf (fennel seeds) and some rai (small mustard seeds), some crushed garlic and a little lashing of hing (asafoetida). All this is balanced off with a sprinkling of amchoor powder.

mirchi ka kutta | मिर्ची का कुट्टा | pounded green chilli relish

The only similar recipe that I am reminded from my home is a mirch ki kalonji that my grandmother used to make in bulk and refrigerate for the whole week. One mirch ki kalonji used to land up on everyone's plate at meal time. I need to recreate that too very soon. Let it be mirchi ka kutta till then.

ingredients for mirchi ka kutta (मिर्ची का कुट्टा )
(makes enough to fill a 350 ml jar)

15 large Rajasthani chillies or any large green chillies that are not too hot
4 smaller hot green chillies 
6-8 fat cloves of garlic peeled
2 tbsp methi (fenugreek) seeds
1 tsp sounf (fennel) seeds
1 tsp rai (small mustard seeds)
a generous pinch of hing (asafoetida)
2 tbsp mustard oil
2 tsp amchoor powder
1 tsp salt or to taste 
1/2 cup water

procedure

Pound the garlic and chillies separately. It helps if you chop the chillies before pounding them in a mortar and pestle. Be careful of any seeds that may decide to fly and land in your eyes while pounding.

mirchi ka kutta | मिर्ची का कुट्टा | pounded green chilli relish

Heat the oil and tip in the hing first. Let it sizzle and then add the methi seeds followed by sounf and rai. Add the garlic when the seeds start getting aromatic. Mix and cook for a couple of seconds.

Add the chillies, salt and mix well. Cook for a minute and add the water. Cook covered on low for 10 minutes. Add the amchoor powder and cook again for a couple of minutes, adding a little more water if required.

The mirchi ka kutta will be moist enough so that the methi seeds swell up after soaking the juices.

Empty the contents into a clean jar or container and refrigerate immediately. It keeps well for a week easily.

mirchi ka kutta | मिर्ची का कुट्टा | pounded green chilli relish

This mirchi ka kutta goes really well with poori and paratha but I love it with khichdi and dal chawal meals too. You can serve it with practically everything, all kind of Indian meals.

It is an interesting amalgamation of flavours ranging from bitterness from methi, aromatic sweetness from fennel, sharp punch of garlic and the flavourful heat of green chillies, everything wrapped up by the tartness of amchoor powder. All strong flavours meld so well you crave for more.


Thursday, July 14, 2016

sooran ka achar or zamikand ka achar | pickled elephant yam


I keep saying we are not a pickle consuming family but we do appreciate a good pickle once in a  while. And sometimes when someone mentions a pickle that was made back home with much ostentation, I feel like making that pickle just for my memory's sake.

This sooran ka achar was one of those pickles that I made after my brother was remembering this pickle made my our grandmother.

sooran ka achar

We used to take second and third helping of this pickle whenever it was placed on the table. I remember this was one of the pickle that was used to show off the varieties of pickle that my parents used to hoard. And we were lucky to have a grandmother who used to find great pleasure in seeing such pageantry around the food she made.

Making sooran ka achar is not difficult once you get the vegetable grated and ready. A food processor or a handy house help and you can easily breeze through making this Elephant yam pickle. Peeling the muddy skin and grating this hard tuber is the most difficult thing, but once it is done you just have to toss it like a salad.

Salad? Do we have salads in India? Check this article I wrote for my column in Indian Express.

Coming back to this sooran ka achar, it is actually a balanced mix of the yam, ginger, garlic, chillies and of course the pickling spices. It looks more like a chutney and tastes somewhere between an Indian tart chutney and a pickle resplendent with pickling spices. Ginger plays a very good role in this pickle.

elephant yam

ingredients 

300 gm peeled, rinsed and grated sooran
200 gm cleaned and grated fresh ginger root
100 gm garlic peeled and minced (or chopped roughly if you like the bite)
50-60 gm dry red chilly powder (coarse preferably)
150 gm salt
100 gm pickling spice mix
50 gm turmeric powder Or 100 gm fresh turmeric root grated
200 ml pure cold pressed mustard oil (a little more to top up)
1/4 tsp hing (asafoetida)
100 ml vinegar of your choice (I use home made jamun or apple cider vinegar)

procedure 

Take care to clean the chopping board and grating equipment thoroughly. Grate and chop the ingredients as required and mix with salt and turmeric. Keep aside for an hour or so. No need to sun dry anything.

Heat the mustard oil, add the hing powder and wait till it froths. Add the remaining spices at once and take the pan off the stove. Add this infused oil along with the spices in the sooran mix and give it a good stir.

Add the vinegar, mix well and immediately fill into a sterilized jar, press it down to remove air gaps. Pour some additional mustard oil if the pickle looks too dry, the top layer should be submerged in a thin layer of oil.

sooran ka achar

This pickle will be ready to eat in 2-3 days and keeps well for a whole year. The taste keeps getting a little more tart as this pickle ages.

This sooran ka achar is great as a condiment for Indian meals but do try it as a spread for sandwiches sometimes and see how it replaces your regular mustard.

Sooran is also known as Zamikand, Oal or Ole in other parts of India but this pickle is probably a recipe belonging to eastern UP and Bihar. I haven't come across this sooran ka achar in any other regions till now.


Tuesday, June 14, 2016

methiya athanu or keri methi nu athanu | the Gujrati fenugreek and raw mango pickle


methi (fenugreek) seeds

I love methi (fenugreek) in almost every form and have grown many varieties of methi in my garden. While the methi greens make delicious methi parathas and alu methi ki subzi apart from many more winter favourites, it is the methi seeds that come to rescue in summers.

The methi ki launji is a very popular UP (Marwadi to be precise) dish that is served like a relish. I was really glad to have discovered a methi and raw mango pickle a few years ago when a client of mine asked me one day if she can eat methi nu athanu while on her diet regime. When I asked about it she told me details and promised me to share the recipe, thankfully she used to write a food blog too back then.

Of course she was allowed to eat this pickle and even I found myself hooked to this unusual pickle very soon. I have been meaning to share the recipe of Mehtiya athanu since then but I make very small batches of pickle and this one gets over really fast somehow.

keri methi nu athanu pickle

You would know how it gets over so fast when you make this methi seeds and raw mango pickle too. I have been eating it even with idlis and plain rotis and dal chawal, practically everything I mean.

Methi keri nu athanu is actually a genius recipe from Gujrat that neutralizes the bitterness of methi seeds with the tartness of raw mangoes and the methi seeds swell up with the juices exuded by the mangoes, beautifully complementing each other.

This recipe is adapted from a client of mine as I mentioned. You can see the original recipe here.

ingredients 

200 gm firm raw mangoes
200 gm methi (fenugreek) seeds
5-10 gm (1-2 tsp) red chilli powder according to taste
25 -30 gm salt (scant 2 tbsp)
5 gm or 1 heaped tsp turmeric powder
a generous pinch of hing (asafoetida)
3/4 cup mustard oil and a little more if required

procedure 

Grind the methi seeds coarsely.

Chop the green mangoes in small bits with skin, discarding the stone.

Mix the coarse methi powder with chilli, turmeric and salt. 

Heat the mustard oil with hing and pour it over the spice mix. Let it cool.

Mix the chopped raw mangoes with the oil and spice mix, stir to mix and bottle. The pickle is ready after 2 days and it keeps well for the whole year.

Just take care to keep it lightly covered with a layer of mustard oil, pouring a little more over the top if required.

keri methi nu athanu pickle

Do let me know whenever you make this methi keri nu athanu. I suggest you make just with 2 raw mangoes just like I did and start enjoying it asap. Making a larger batch can take time so make sure the quick small batch keeps you company.


Saturday, March 12, 2016

drumstick flowers in a delicious pickle | sehjan ke phool ka achar


Drumstick flowers

The Drumstick tree in our garden has started flowering and we will see thin tender drumsticks protruding from the bunches in a couple of weeks. But early last month when it was still a bit cold the drumstick flowers were just budding. I plucked some and made a drumstick flower cheela for breakfast, planning to pluck more and cook a few new recipes this season.

A coincidence later that day, when I was out to buy some vegetables at the neighborhood subziwala I saw a silver haired lady asking the cost of ek pao swanjne ke phool (a quarter kilo drumstick flowers), pointing to a small basket and there I saw a heap of light pink hued buds of drumstick flowers.

Drumstick flowers

These were the flowers of another variety of drumstick and the lady's question gave me ideas. I immediately asked her what was she planning to make and told her that she can get as much flowers as she wants from my tree. Some chitchat ensued and we exchanged recipes, she told me she makes pickle with it too and that perked up my ears.

The subziwala was not happy as so much drumstick flowers were being cooked in so many recipes and none was being bought from his shop. I ended up buying some drumstick flowers to please him.

This drumstick flower pickle was made the very next day after some planning, I thought of adding a few more elements to keep some texture in the pickle.

drumstick flowers and lotus stem pickle or sehjan ke phool ka achar

 The resulting pickle was really good. I gifted to a friend and she also loved it. Now to the recipe.

ingredients
(fills up a 500 ml glass jar)

200 gm drumstick flowers *cleaned* and rinsed under running water
200 gm lotus stem thinly sliced (I used thin tender ones, you can chop in smaller bits if the lotus stem is thick and fleshy)
one large bulb of garlic peeled and halved lengthwise
6-8 large chilly peppers (less hot variety) sliced in bite size pieces
1/3 cup mustard oil
3 tbsp apple cider vinegar
2 tbsp turmeric powder
3 tbsp yellow mustard powder
1 tbsp fenugreek powder
1 tsp nigella seeds crushed lightly
1 tsp ajwain (bishop's seeds) seeds crushed lightly
1-2 tbsp red coarse chilly powder (to taste)
3 tbsp salt

*cleaning the drumstick flowers may be tricky if it is not too fresh. Soak it in water for 20 minutes and then rinse under running water to make sure all dirt and impurities are washed away.

drumstick flowers and lotus stem pickle or sehjan ke phool ka achar

procedure

Boil water in a deep pan, about one liter with 1 tsp salt to blanch the lotus stem and flowers both.

Dip the sliced lotus stem in boiling water for a couple of minutes and strain. Keeping the lotus stem in a steel colander while dipping it in the boiling water helps.

After removing the lotus stem from the boiling water, dip the drumstick flowers too for just a couple of seconds and take them out or pour everything over the colander that has the blanched lotus stem slices. Let all the water drain, for about 10 minutes. No need to make the vegetables dry.

drumstick flowers and lotus stem pickle or sehjan ke phool ka achar

Mix everything together in a large bowl.

drumstick flowers and lotus stem pickle or sehjan ke phool ka achar

 And transfer in a sterilized glass jar.

drumstick flowers and lotus stem pickle or sehjan ke phool ka achar

The pickle will be ready to eat in the next 24 hours or so. Top up with some more mustard oil if the pickle ingredients don't settle down and a thin layer of oil floats on top.

drumstick flowers and lotus stem pickle or sehjan ke phool ka achar

This lotus stem and drumstick flowers pickles lasts for at least six months. The tartness increases a bit after some time as the pickle keeps 'pickling' more.

I am loving this pickle though I keep saying I don't like pickles much. Sometimes with plain dal chawal meals and sometimes with a paratha, this new pickle has already become a favourite.

This pickle can also be made using sun dried flowers of drumstick. I am planning to pickle some drumstick leaves too along with the flowers next time. Will add those pictures when I do that.


Wednesday, October 7, 2015

singhade ka achar | pickled water chestnuts in Indian spices


singhade ka achar

Singhade ka achar (pickled water chestnuts) is one of those seasonal pickles that very few people make. In fact pickling was mostly associated with aam ka achar, bhari mirch ka achar or nimbu ka achar more and these pickles were a must have in any Indian kitchen (read north Indian kitchen). But few families (read chatori families) kept pickling seasonal vegetables on the sly and serving such seasonal pickles as a fresh condiment to bring variety and taste to the everyday meals.

All of those gobi matar ka achar, gobhi, shalgam, gajar ka achar, sem ka achar and even alu ka achar made with new potatoes come into this category of seasonal pickles. Many of these pickles are called pani ka achar as no oil is used in making these or very little oil just to bring the spices to life. It will be useful to mention that pani ka achar is more of a mustard based pickle that gets fermented a little in a day or two and tastes very good, apart from being a good probiotic supplement. I will share a few recipe of pani ka achar, this mooli ka achar comes into that category.

This singhade ka achar has the pickling spices used for aam ka achar, the most common and popular pickling spice mix in north India. I made sooran ka achar recently with the same spices and it has been the must have condiment on the table right now. You can pickle any vegetable and even some fruits using these spices, the treatment of the vegetable will differ according to the water content they have.

Indian pickling spices

And singhadas have loads of water in them. The tough skin contains the nut (kernel) inside which is in fact a very soft and watery nut. They start coming to markets in early winter, the season lasts about 6-7 weeks. The water chestnut kernel gets harder and more starchy by November, the hard kernel is preferred more for boiled water chestnuts and curries.

Some people like this achar made with softer (tender) water chestnuts while some like it with the hard ones. I prefer the soft singhada for achar.

water chestnuts

Singhade ka achar is a fresh pickle that is meant to be consumed in maximum 2 weeks. It can be preserved for longer duration but the fresh taste will be lost after a month or so and the specialty of this pickle will be lost.

Each water chestnut is peeled in a specific way so as to keep the soft parts of the skin on and to remove the hard horns, also to remove the tip from both ends to allow the pickling spices to seep in.

The picture below would give you an idea about how to peel the water chestnuts to make the achar.

singhade ka achar recipe

ingredients 
(to fill up a 500 ml jar)

500 gm water chestnuts (singhada)
15-20 gm salt (keep it lesser if you want to eat more singhade ka achar for every meal)
2 tsp turmeric powder
2 tbsp yellow mustard powder
1 tbsp whole fennel seeds (sounf)
2 tsp fenugreek seeds (methi)
1 tsp omum (ajwain)
1 tsp nigela (mangrail or kalonji or kalo jeere)
pinch of good quality asafoetida (hing)
2 tsp red chilli powder or to taste
2 tbsp mustard oil

procedure 

Rinse and clean the water chestnuts nicely. Drain. No need to sun dry.

Peel the water chestnuts, they look like this after partial peeling. Alternately, you can just remove the thorns and cut the water chestnuts in 2 halves lengthwise.

singhade ka achar recipe

Boil enough water in a deep pan to submerge all the water chestnuts. Add a little salt (1 tsp per liter) and tip in the water chestnuts in boiling water at once. Wait for 2 minutes and drain the hot water, retain the water chestnuts in a colander.

Add the salt and turmeric powder to the water chestnuts and toss to mix. Now add the mustard powder too, toss and keep aside. Start preparing for the other spices.

Heat mustard oil in a pan, add the asafoetida, fenugreek seeds and nigela seeds one by one, waiting a few seconds before one spices starts sizzling. Then add the fennel and omum (ajwain) together and remove the pan from stove.

Mix well, add the red chilli powder and pour the spice mix over the water chestnuts seeped into salt, turmeric and mustard powder. Mix well to coat them all and fill in a sterile glass jar. The pickle will be ready to eat in 2-3 hours.

Refrigerate after about 4 hours. This pickle keeps well refrigerated for 2-3 weeks. At room temperature it lasts for a couple of days, adding more salt and mustard oil can make it stable at room temperature.

singhade ka achar recipe

The water chestnuts release a lot of water by the next day, shake well before serving. You can add boiled and cooled baby potatoes to this pickle to make a nice variation after 3-4 days when there is enough watery liquid in it to soak up the potatoes.

The kernel of the water chestnuts remain whitish but take up the flavours of the spices very well.

singhade ka achar recipe

You would love singhade ka achar I am sure and will keep making it once you get the taste. It is as easy as making a subzi and can be served as a side dish during singhada season. Tastes great with parathas and daal chawal, tahiris and khichdi etc.

There a loads of singhada recipes on this blog. Check out the singhade ke atte ki roti if you haven't seen already. Singhade ke atte ki roti is a fasting bead recipe you might like to try this Navratri.


Thursday, June 12, 2014

Gooler, the country fig: a medicinal fruit that can be cooked in many ways | gooler ka chokha and other recipes


My article about Gooler, the country fig or the Indian fig was published in Down to Earth magazine. I am posting the detailed version of the article, the magazine article was a downsized version of all the research I did with gooler and it's properties.


I remember my grandmother telling us bedtime stories and taking us to unknown lands of fantasy. Her stories involved birds, jungle animals, trees and their conversations and we grew up considering these ‘characters’ as our companions. One of the stories that stuck in my mind was when she told about Gooler ke phool  ( Fig flowers) in a story, that these flowers are seen by rare lucky people and whoever is able to see Gooler ke phool finds a treasure or a lost kingdom. This story stayed with me in my childhood and I often enquired the wild fig trees around to find a flower. No wonder I could never be lucky, I came to know later when I studied inflorescences in my biology class much later. The small figs we saw on the trees were actually inflorescences (cluster of flowers) and this special type of closed inflorescence is called as Syconium. There are more reasons why I associate Gooler with my grandmother, she relished Gooler as food and introduced us with the ways it can be eaten.

In the last few years we have seen the fresh plump ripe figs appearing in the upmarket stores, the fruit being sold at a premium price as it is deemed exotic. These fresh figs are the Ficus carica species, this fleshy variety of figs is either imported or grown as exotic fruit only in a few places in India, one variety grown around Maharashtra is called 'Poona figs' (ref. Handbook of Indian Agriculture). This fruit variety is highly perishable and hence most of the produce is dehydrated to form discs that can be re hydrated and used as required. Many of us have been relishing these figs in the dehydrated form called sookhe anjeer, those flattened and dried sweet discs filled with crunchy seeds and chewy dry flesh. Many 'sugar free' desserts including the kulfi and ice creams use sookhe anjeer.

Most of us have forgotten the smaller, more common variety of figs that grows wild all over India and is seen on roadsides or along old buildings. This one is called cluster fig or country fig, Ficus racemosa is the small Indian fig that is equally nourishing as the fruit fig. Goolar is the more common name it is known as in north India. The fruits are loved by Macaques, Squirrels and most birds, particularly Barbets, Tree pies and Parakeets and that is how the seeds get dispersed and this fig variety propagates easily.  

The last time I had the fortune of tasting Goolar ki subzi was a couple of years ago when I was visiting Banaras. The spicy meaty Goolar ki subzi has been a family favourite and my mother had cooked that for us. We miss Goolar here in Delhi though we see it growing around our colony. Goolar is a great shade tree, home to my favourite birds but the fruits were never accessible somehow, this time I asked the gardener to bring me some and he obliged. I cooked chokha and kababs first and then pickled a few for the first time. The pickle is doubly nourishing as it gets some probiotic flora along with the naturally occurring prebiotic fiber.


Considered as cooling, blood purifying, anti inflammatory and healing by Ayurveda practitioners, the raw fruits are valued as a tasty and healthy vegetable. The fruits contain tannins and the soluble and insoluble fiber found in the fruit is prebiotic in nature. That is the reason the raw fruit used as a vegetable was considered extremely good for stomach ailments. I remember my grandmother who lived a healthy and active 105 years, always brought some goolar whenever she had upset stomach. She would make goolar ka chokha mostly but she loved the spicy meaty curry made using goolar as well. People of her generation knew what to eat day to day ailments.

The goolar ka chokha is considered cooling during summer months, a raita mixed with buttermilk is cooling too and highly recommended for stomach upset caused due to amebeosis.

Interestingly, goolar was never cultivated as vegetable or fruit but the abundant bunches of fruits were foraged during harsh summers and beginning of monsoons when the green vegetables would become scarce in the olden days. Ripe fruits used to be plucked by children as they are quite attractive and aromatic, some children would eat the fruits but the taste is not as good, so most of the ripe fruit would get wasted. 

Raw fruits are actually an inverted flower filled with stigma and stamens and hundreds of insects that pollinate this closed inflorescence called Syconium. These insects would complete their life cycle till the fruit is ripe and would escape leaving the ripe fruit empty. This is a great example of symbiosis between a fruit and insect.

To cook the raw goolar, one has to cut them in quarters, clean the interiors of all the fibrous floral parts and the insects and the fleshy envelope of the fruit will be parboiled and then either curried or mashed to make bharta or chokha.


Many vegetable vendors would collect the goolar from nearby jungles and sell them to earn some profit, there was always a demand for goolar as folks knew it is good for health. Even dehydrated raw goolarwould be stored, its powder was used with sugar candy to cure E. coli infection. 

The fresh milky discharge (latex) from the leaves is considered healing for epidermal wounds when applied 3-4 times a day, it helps many kinds of infections of the skin (source). The enzyme ficin present in the fig latex is responsible for its anthelmintic activity and can be given with great benefit in worm infestations especially ascaris and tricharus types (source). Apart from the usage in traditional medicine, scientific studies indicate F. racemosa to posses various biological effects such as hepatoprotective, chemopreventive, antidiabetic, anti inflammatory, antipyretic, antitussive and antidiuretic (source).


Gooler ka chokha recipe 
ingredients 
1.     cleaned, quartered and seed removed goolar 1.5 cup
2.     finely diced onion 1/4 cup
3.     minced garlic 1 tsp
4.     minced green chilly 1/2 tsp or to taste
5.     salt to taste
6.     mustard oil 1 tsp
Procedure
1.     Boil the chopped cleaned goolar in sufficient water till soft. Strain and reserve the gooler.
2.     Mash with a fork or blend in blender and mix the other ingredients after blending.
3.     Serve with khichdi, daal rice meals or as a side dish for any Indian meals.


Gooler ka Kabab recipe 
ingredients 
1.     cleaned, chopped and seed removed gooler 1 cup
2.     roasted chickpeas flour or sattu 2 tbsp
3.     minced ginger, garlic and green chillies 1 tsp each
4.     garam masala 1 tsp
5.     chopped coriander and mint greens 1/2 cup
6.     salt to taste 
7.     ghee to shallow fry
procedure
1.     Boil the cleaned gooler in sufficient water till soft, drain and cool. 
2.     Mash with other ingredients except ghee to make a dough like mixture.
3.     Shape lime sized balls and flatten them between the palm. Arrange to be shallow fried in batches.
4.     Shallow fry using ghee or any oil of choice. Serve hot with green chutney or tamarind chutney.


Gooler pickle recipe
ingredients
1.     cleaned and chopped gooler 1 cup
2.     white vinegar (preferably with mother) 1/2 cup
3.     salt 1 tbsp
4.     chopped green chillies 1/4 cup
5.     crushed mustard seeds 2 tsp

To make the pickle, boil the cleaned gooler till soft, drain the water and let the gooler cool down. Then mix everything together and store in a sterile glass jar. The pickle is ready to eat in 3-4 hours and keeps well for a month or so.


Friday, August 23, 2013

hari mirch ka sarson wala achar | green chilly pickled with mustard ...


 Green chilly pickled with mustard seeds or hari mirch ka sarson wala achar is an easy recipe that needs just a couple of days to get pickled. Mustard is a traditional pickling agent in north India and we use it many ways and making the hot chilies milder is one of the benefits of pickling with mustard. It helps ferment the pickling chilies first, makes them a little sour after a few days and then the sourness just kills the heat of chilies after about a month or so. Some people like it a month old when all the heat of chilies is gone and the pickle has gone completely sour. I generally add the soured green chilly pickle to some salad dressing or blend it in some dip or hot green chutney.

If you are pickling green chilies this way, make smaller amounts so it is over in about 2-3 weeks, or wait till the required sourness is achieved and refrigerate the pickle after this point, if something is left till then.

Mild jalapeno peppers are used for this pickle, but you can go ahead and use the hot jalapeno as well. Depends upon how hot you like your pickled chilies.


ingredients..

8-10 mild jalapenos
1/2 cup yellow mustard powder
1 tbsp mustard oil
2 tbsp table salt

procedure...

Wash and pat dry the chilies. Make a slit lengthwise and keep aside.

Powder the mustard and mix in the salt and mustard oil.


Mix the mustard powder and oil well to make a crumbly mixture.


Stuff lightly into the slit green chilies and bottle them. The chilies release their juice within 2-3 days and you would see a watery liquid in the bottom. Shake the jar once in a while so the pickling is evenly done.  The pickle is ready after 2-3 days of pickling but keeps maturing for 2-3 weeks before getting too sour.


Serve this pickle with any Indian meal as a condiment or chop it and add to the salad you toss that requires a hot mustard dressing. You would see how versatile it is.


 Some more chilies anyone?


Sunday, March 17, 2013

laal mirch ka bharva achaar | pickled stuffed red chilies : UP special...


stuffed red chilli pickle

 Laal mirch ka bharva achar or just call it bhari laal mirch. Almost everyone knows it what it is when you say bhari laal mirch in Banaras or any part of UP. Many pickle brands and small time pickle makers run a thriving business thanks to Bharva laal mirch. I have seen people getting this pickle packed in large quantities to be taken to different parts of the world. Such is the power of those familiar taste that you had sometime in your childhood.

I have known a few people who would consume one large bharva laal mirch everyday. It is almost like ajinomoto in some people's lives. Addictive taste maker that it is.

Although I am not among those people who would crave badly for this pickle, sometimes my mom used to send it to me and even that would get distributed to friends who liked it. But I had some wonderful lovely memories of making of this pickle at my parent's place. It was always prepared by my grandmother and she would call me to sit by her and sometimes help her stuffing these red chilies. I used to wear surgical gloves while stuffing these and used to wonder how my daadi's hands never burned by the chilly heat. And now after so many years my hands have seen many moons, many chores and they burn no more. Of course I take care not to touch the innards of any chilies. If I touch my face or eyes it is a different story altogether.

Daadi would make stuffing equipment by cutting Neem ka datun (Neem sticks used as a toothbrush) neatly and would use it as a pressing instrument to push all the spice mix inside the hollow of red chilies. We shared many stories stuffing those laal mirch. I know about my grandfather only due to such chit chat with my daadi. Her hands would do the work deftly while she would keep on talking about the British raj and how the Angrez (Englishmen) ruled and destroyed. Both my grandparents were freedom fighters, grandfather couldn't see a free India in his lifetime. But that is another story.

stuffed red chilli pickle

This laal mirch ka achar was a long due recipe to be posted here and I had bought these chilies a few times this season, but making Orange chilly marmalade came into picture and then I made another jam with Tamarind and this chilly. Both these were made repeatedly this season to gift them away as well. Lastly, when I suspected these chilies will be off from the markets this season, I decided to call my mom to ask for the spice ratio to confirm what was on my mind. Made the pickle in the next hour and called her in the evening to tell her how lovely it is smelling, just like daadi used to make it.

fresh red peppers for pickle

I pickled only 5 large red chilies as we don't eat pickles much and I did not have much time to stuff many chilies. It took me only 30 minutes including clicking the pictures. 

Multiply the recipe if using more chilies but the amount of the masala used depends on how large and fat the chilies are. So go by your 'eyeballing the ingredients' experience and use the extra spice mix for a mixed up pickle like I have told in the end.

ingredients...


fresh red peppers and spices for pickle


5 large and light weight red chilies

2 tbsp amchoor powder
1 tbsp red chilly powder
3 tbsp black mustard seeds
1 tbsp fennel seeds (motti saunf)
1 tbsp fenugreek seeds
1 tbsp ajwain seeds (bishop's weed)
2 tsp kalonji seeds (nigella seeds)
2.5 tbsp salt or to taste


1/4 cup mustard oil (use the best quality available)

A clean sterilized glass jar that can hold the chilies arranged vertically.

A note on choosing the right chilies for this pickle :

 Get the lightweight for it's size chilies as those will have lesser seeds and the seeds would come out easily. It the chilies are tightly packed with seeds it will be tough to remove the seeds and the chilies may get damaged during hollowing them. But if you don't get such hollow chilies, you can always make the mixed up chilly pickle suggested in the end of this post.

Procedure...

First wash the chilies well and let them get dry. I kept them in sun for about 15 minutes, lining the basket with tissue paper.

preparing fresh red peppers for pickle

Cut off the crown of the chilly, discarding the green stalk and some of the red part to make a smooth round opening at the top.

Using a sharp pointed knife hollow out the innards of the chilies, including all the seeds.

Wear surgical gloves or kitchen gloves if your skin is sensitive to chilies.


preparing fresh red peppers for pickle

Now make a coarse powder of all the other ingredients except the oil. Chop off the bits of red chilly clinging to the green stalks and add to the grinding mixture. It makes the mixture moist and keeps it glued together. Add a tbsp of mustard oil when everything has been coarsely powdered and run the mixie or food processor once again for a couple of seconds.

See how the ground mix looks like. Now stuff each chilly with the spice mix. I used a small spoon meant for weaning babies. The ones that come with baby feeders.

Basically anything that can be used to press the spice mixture down into the chilies.

preparing spices and stuffing the red peppers for bharva mirch ka achar

Drizzle mustard oil with the help of a spoon into each of the stuffed chilies. About a tsp of mustard oil goes into each one of them.

Now is the time to arrange all of the chilies into the glass jar. Drizzle more mustard oil into each chilly if it can still hold some. Keep the jar in sun with lid on.

You can drizzle some more oil into each chilly everyday, taking care not to spill any oil outside as that oil wouldn't help the pickle in any way.

Some people like to fill the jar with mustard oil to drown all the stuffed chilies, I find it a wasting activity as this oil wont be used for anything if you don't make Litti chokha frequently. This pickle is used in the masala of Litti chokha and some people like this oil too into the spice mix made for Litti chokha.

Here is a picture of my mom's red chilly pickle of the last year, that has turned a deep shade of red, the top one in the picture.

The freshly made pickle is bright red. Smelling awesome and reminding me of my daadi, left side one.

laal mirch ka bharva achar

In the small jar on the bottom right, you can see the mixed chilly pickle. Mixed as in all the spices and chopped red chilly is mixed and put up into the jar.

See how it is done. All mixed up and drizzled with mustard oil and then filled into a small jar. You can always chop and add some green chilly to the same spice mix if you wish.

laal mirch ka bharva achar

Pictures tell the whole story. We tasted this mixed one today and loved it. This mixed pickle is ready within 3 days while the stuffed one would take some time when it can be broken easily and enjoyed the way it was done back home many years ago. The skin of the chilly becomes softer so you can break off a half inch piece from top of the chilly and have with a meal. That's how it is normally served. One whole stuffed chilly pickle is broken into half inch or bigger pieces and served individually.

That's why it is sensible to make a little of this mixed chilly pickle as well so you can taste it after 2-3 days.

Best with daal chawal meals. Some people use it to mix in alu paratha stuffing, Sattu paratha stuffing or even with matthhis. I have seen some people having it with Thekua in Bihar. Ah yes, this pickle is as common in Bihar as it is in UP. A shared inheritance.

I felt so good making this pickle that eating it with my meals will be special now. I know my daadi will visit me from heavens whenever I'll have it.

The pickle has a shelf life of a couple of years.

Please do let me know if you make this pickle. It is special.