Saturday, November 20, 2010

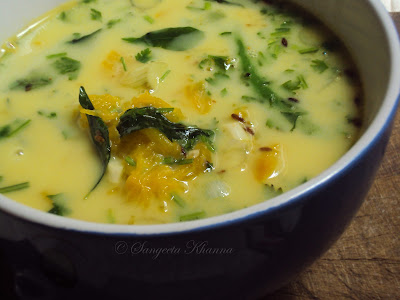
Olan made with pumpkin | the Kerala Olan suited to our taste | pumpkin curry with coconut milk


I was never sure if I would like Olan made with pumpkin but since I love all the curries and stews made with coconut milk, I knew it was close to my comfort zone. I was still apprehensive whether others in the family will appreciate the taste.

I love yellow-orange fleshed ripe pumpkin, so whenever I used to see those olan recipes on some blogs, it was like a visual treat always. This recipe by Gauri looked really light and flavourful and I decided to cook Olan with a firm ripe orange flesh pumpkin.

Pumpkin olan recipe

I used coconut milk from a tetra pack and I am sure freshly squeezed coconut milk can make a lot of difference to the dish. But I think as the recipe is so easy to put together, any beginner in the kitchen would feel elated to concoct a beautiful looking curry with ease, especially if canned coconut milk is used.

Fresh coconut milk should not become an issue with this recipe at least. So go ahead and make it with canned coconut milk.

Pumpkin olan recipe

ingredients...
(2 servings)
coconut milk 1/2 cup
pumpkin cubed 2 cups
water 4 cups
spring onions 2-3 nos.( only the lower halves )
curry patta 3-4 springs ( i refrained myself from using a lot of these and saved the olan )
green chillies slit length wise 2-3 nos.
green coriander leaves with stems , chopped finely 2 tbsp
cumin seeds 1 tsp
coconut oil or vegetable oil 1 tsp
salt to taste

procedure...

Boil the pumpkin with water and salt to taste till the pumpkin is mushy.

Heat oil in a pan and throw in the cumin seeds, wait till they splutter and add the green chillies and curry patta. Stir for a while as the green chillies and curry patta start twisting and getting aromatic.

Add the roughly chopped spring onions and coriander leaves. Both these ingredients are my own addition to this curry and I found them really good in the curry. You may wish to exclude them and the curry will be great that way too. The spring onions have to be cooked just till they get shiny and soft, not pink or brown.

Pour this mixture of stir fried ingredients to the boiling pumpkin and stir to mix.

Add the coconut milk and allow another boil before turning the heat off.

Such a simple curry for a side dish. I am getting new ideas with these flavors and you will see me coming up with some more on this. We had the olan with our regular dal roti meal. Here you see a maah chhole palak daal (urad chana daal cooked with spinach), muli ka saag and the olan with chapatis.

Pumpkin olan recipe

I was apprehensive if my mom would like it as she does not like any watery curries. She is always suspicious of my curries tasting 'healthy', that kind of mother :-)

But she just loved it when I served the leftover olan with a matar paneer, raita and bhujia kind of lunch.

One very impressive aspect of this recipe is that the pumpkin is cooked in water first, just like making a soup and then a tempering is thrown in to make it very flavorful.

As healthy as it can be, this technique is not followed in any of the curries in the North, as much as I know. Not for vegetables at least, lentils are always boiled first and then the masala tempering is added and cooked again.

Pumpkin olan recipe

I have never tasted an authentic olan so the recipe may result in a different flavor than the southern homes but I loved the curry with these flavors to start with and may be in future when I come across a purist recipe I might give that a try.

Do you have a link of a purists olan ?? I will be more than happy to get a few links of yummy olan made with just the pumpkin. Come on share it with me here.

Thursday, November 11, 2010

how to make parwal ki mithai | khoya stuffed candied parvals


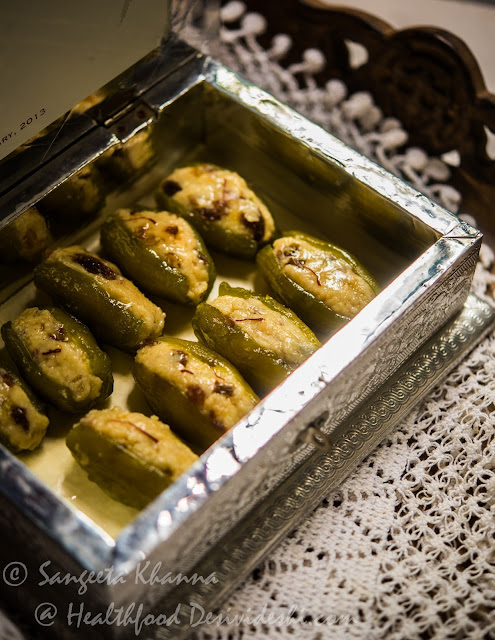
parval ki mithai

Parval ki mithai is definitely a genius work of someone who had this idea to turn a vegetable into a delectable mithai.

Parval (pointed gourd) grows really well in the Indo-Gangetic plains and there are a few cultivars of this vegetable that taste really good when cooked to make alu parval ki bhujia or even parval ka chokha. Stuffed parval ki kalonji is something every family cooks at least once a fortnight in eastern UP.

parval

When the same parval is stuffed with mithai material it transforms into something else literally. I remember how I used to be a reluctant mithai eater always but would look for a parval ki mithai in the assorted sweets dabba whenever someone brought a mithai gift. There is a tradition in UP to carry a dabba of mithai to your host whenever you visit.

parval ki mithai

Later when I started making a few mithais at home, the rasgulla and parval ki mithai were the most frequent. The reason why I make mithais and other desserts at home is that I am a little paranoid about the synthetic colours, silver foil and too much sugar used in the commercial mithais. Although most Indian mithais are relatively safe to eat but one must watch out for synthetic colours used.

They use green colour to make the parval look bright green in the mithai shops. The stuffing has now deteriorated too with spurious khoya and some leftover mithai material being stuffed after dehydrating everything. A few such experiences in the past have actually made me positively allergic to mithai shops.

I started making this parval ki mithai a few years back when a tribal subziwala (a vegetable vendor) used to knock my door whenever he could not sell his tokra full of vegetables. Parvals, lauki and green papaya was always there in his basket and as I could never refuse him, I always ended up buying 2-3 kilos of each of these vegetables. And then he used to get treated with this mithai too. My friends in Dhanbad tell me that he still remembers me. Not for this mithai but for buying all his stuff.

Oi khanna boudi onek shobji kinten he says (that khanna lady used to buy a lot of vegetables)  ...

Normally a whole parval is slit from one side, innards emptied, cooked in syrup and a khoya filling is stuffed inside. In the mithai shop version the filling is not visible mostly and the parval looks just green on the outside, the slit covered with a silver foil.

I never use silver foil in my cooking for obvious reasons and I find making boat shaped mithai with the fillings visible as a topping more attractive and practical.

ingredients....

parval 500 gm (choose equal sized ones, I used 9 parvals to make 9 mithais )
sugar for syrup 1 cup ( if making it my way )

for filling ...
homemade khoya 1 cup (about 250 gm )
finely chopped cashew nuts 3-4 tbsp
finely chopped almonds 3-4 tbsp
chopped raisins 2-3 tbsp
green cardamom powder 1/4 tsp
saffron threads a generous pinch

procedure...

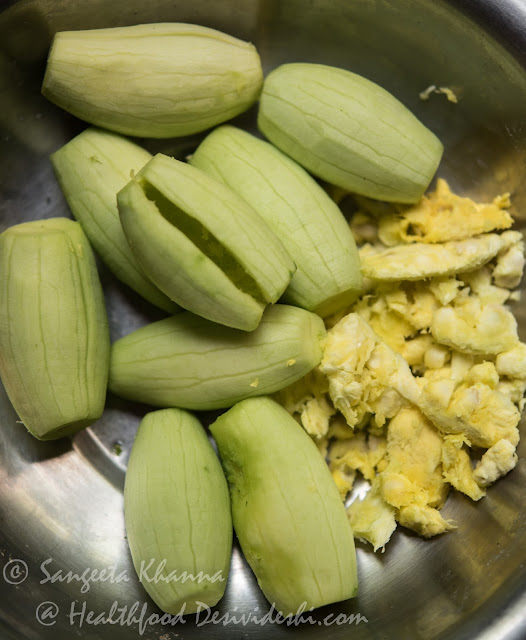
Peel the parvals using a potato peeler.

Make a slit and remove the innards using a melon ball scoop or just using a paring knife. 

prepared parval for making parval ki mithai

Boil enough water (to submerge all the parvals) in a wide pan with the sugar. Dunk the peeled and emptied parvals in simmering sugar syrup and cook till done. Keep stirring in between and turning the parvals so they cook evenly.

The syrup starts frothing when the parvals are nicely candied and yet wet and sticky. The syrup should not dry up but remain a honey like consistency. There will be very little syrup remaining in the end.

Now fish out the parvals and drain them into a colander propped over the same pan so the sugar syrup drains back into the pan. The syrup can be used to make something else as it will not be used in this recipe any more.

Make khoya using this method of home made khoya in microwave. You can cook the milk powder mixture into a pan on low heat to make a nice granular khoya. Use ready made khoya if you get good quality.

Add the chopped nuts and raisins, saffron and mix well. No need to add sugar to this stuffing.

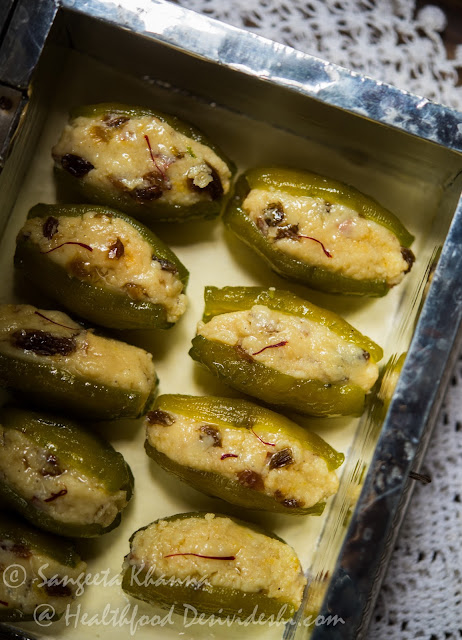
Now make lime sized balls of the khoya stuffing. Elongate the ball of stuffing by pressing into your fist or rolling between the palms, prop open the candied parvals and stuff the khoya mix into it.

You would actually need to wrap the candied parval around your stuffing if you want more stuffing into each parval ki mithai. Pinch the ends to make them look pointed as the raw parval looks. Repeat with each candied parval and make more parval ki mithai.

parval ki mithai

The process doesn't take more than 40 minutes for 9-10 pieces of parval so I would say it is fairly easy to make from scratch. There will be some khoya mix left after making this quantity if the parvals are small or you could not fill so much.

Make stuffed paratha with the khoya mix, that khoye ka paratha is also a Banaras special that many people crave for.

parval ki mithai

The end product of this exercise is sensational. Especially if you love this mithai. A forgotten gem amongst the Indian mithais. 

Earlier I used to make open faced parval ki mithai too. Here is a picture to show how I used to halve the parvals and make 2 mithais out of one parval.

parval ki mithai

Make the way you like it and let me know if you try this recipe.

Many other summer gourds are made into mithais and I intend to share the recipes some day. So much to do so little time.


Tuesday, November 2, 2010

lemon pound cake served with a quick butterscotch sauce...


I baked a lemon cake for Arvind's birthday after spotting a few plump lemons in my garden . The lemon tree is laden with green lemons but they are not yet ready to be juiced or zested . I spotted a few of them just fragrant enough for a nice lemon cake .


But the flavors were not a bit close to the lemon cake i used to bake some years ago when i had a gondhoraj lebu ( a variety of large lemons with a think and very fragrant rind ) tree in my garden . That gondhoraj lebu was so good for making cakes and lemon tarts , i am looking for a seedling of that variety just for the lemon cakes and tarts we so used to enjoy.


Baking a lemon cake is anyways a great thing as the home is filled with a nice lemony fresh aroma and anybody entering the house is tempted to snoop into the kitchen . Lemon pound cake has been a long time favorite with both of us and whoever has been visiting when the cake was baked.

And the quick butterscotch sauce is as aromatic while being cooked , it sizzles on the flame and makes me drool with a chocolaty caramel aroma .........so well complemented with lemon cake . I made the butterscotch sauce thin so that the cake is soaked well , thick butterscotch sauce is suited for ice creams and trifles .


The cake is a normal pound cake where the cup measurements are so convenient even a child can whisk and bake them..

ingredients for the cake ...
maida ( APF ) 2 cups
butter 1 cup
sugar 3/4 cup ( 1 cup can be used when the cake is not topped with butterscotch sauce )
eggs 4 nos
lemon juice 1 tbsp
lemon zest 1 tsp
salt a pinch
soda bicarb 1/2 tsp
baking powder 1.5 tsp

procedure....

Sift the maida , soda bi carb and baking powder together to mix them well and keep aside.

Whisk the eggs in a small bowl . Whisk the butter and sugar in another larger bowl till light and creamy . Add the whisked eggs slowly and keep whisking till a creamy frothy consistency is achieved . Add the lemon juice and lemon zest and whisk to mix .

Add the flour and fold the batter to make a homogeneous batter. Pour in a greased tin and bake for about 25 minutes at 200 degree C . Insert a skewer to check if the cake is cooked .


It is a lightly sweetened cake and great with a cup of tea any time of the day...


As a dessert it is complemented very well with this runny butterscotch sauce ...

ingredients for the butterscotch sauce...
sugar 1 cup
salt 1/2 tsp ( or 1/4 tsp if you don't like the hint of salt )
heavy cream 1 cup
milk 1/2 cup or more if you want it more runny
cocoa powder 3 tbsp
vanilla essence 1 tsp ( i used butterscotch essence which my sister had gifted me )

Pour sugar in a pan and heat to caramelize , as soon as it starts melting and getting golden colored add the cream and let the mixture boil . Mix cocoa powder with the milk and pour into the boiling mixture . Let it boil vigorously once again . Add  salt and take off heat. Use hot or cold as required.


A runny sauce is very well soaked into the cake and it was great this way . For ice cream topping it is better to keep the sauce thick so do not add any milk in that case.


You may like a thicker butterscotch sauce sandwiched between the slices of cake .... chocolate and lemon are the hottest of flavors and eat the way you like it.....